• Welcome to Overclockers Forums! Join us to reply in threads, receive reduced ads, and to customize your site experience!

DIY Low Cost Benching Station

Overclockers is supported by our readers. When you click a link to make a purchase, we may earn a commission. Learn More.
Station#28--the SR-2 project


And here is another new version. Somebody wanted a station to accommodate an SR-2 motherboard.


The SR-2 is a giant unique "HTPX" motherboard for dual 1366 sockets:

Official EVGA SR-2 motherboard link.


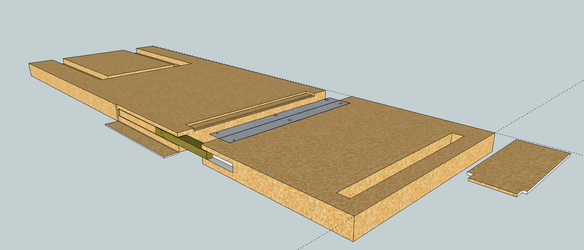
I first started with a general size layout sketch:


SR-2projecttoplayout.jpg


Then I cut my plates:

Station28upperplatelayout.jpg


The purple represents a standard ATX motherboard, the red the SR-2.


Next I milled out the cable passthrus:

Station28passthrus.jpg


Note, that this station will accommodate a standard motherboard or an SR-2.


Paint:


Station28paint.jpg


Parts:

Station28posts.jpg


.
 
I picked a motherboard tray from MountainMods to locate my SR-2 specific standoff holes.

Red is standard ATX.

Green are SR-2 specific:

SR-2mobotraylabeled.jpg


The purchaser wanted a removable toold-free 3 drive caddy, so he could shutter drives from one station to another.

I started with a Lian Li cage (unfortunately no longer available) mounted to a block with a fan mount:


Station28harddriveunit1.jpg ]


Next I put together a fitted bracket. The bracket is upside-down to show how the mount on the drive caddy will slide into the bracket.


Station28drivebracket.jpg


And here is a video of the tool free action:


th_Station28drivecaddydemo.jpg
 
And here was the completed station:


Station28final7.jpg

Mods seen here:

Front USB/firewire/audio panel.


Station28final2.jpg

One drive caddy is hard mounted, one is tool-free removable.


Station28final3.jpg

Dual power supplies, and dual radiator mounts.


Station28final4.jpg


SR-2 ready!


.
 
VLC 10


This is my most ambitious and different station yet. I designed my stations to be simple, which this station is not, but I guess you could say my simple station design is the backbone for a more complicated system.


In any case, tRidiot requested a Folding Station, and not as in F@H, but a station that physically folds into a more compact and flat configuration. I had actually thought about this prior to this request, altho along a different line. Due to the general economy, shipping prices by UPS or Fedex have skyrocketed. So I’ve looked at ways to reduce shipping size, yet retain quick setup, such as making the PCI rack removable or foldable.


First we started sending sketches back and forth about design possibilities. MSpainting pics from previous stations, we settled on this possibility:


VLC10planfold.jpg


I’d install piano hinges along the red lines so that the station flat panels could fold in the direction of the blue arrows. I would have to devise some method for folding the legs.


But this design would take a station that is 16 inches in height down to 6!


Also, the offset hinges allow for an intriguing possibilty:

Allowing the powersupply to remain mounted even in the flattened configuration:


VLC10plan3.jpg
 
There were also some other modifications desired:

1) Paint--going for glossy black with aluminum trim. Lots of work but no problem.

2) Navig DIY 5 hard drive rack.

3) Big under cpu hole

4) Removable caster wheels

5) Brollocks fan bracket


Getting back to the big picture, I first identified several serious design obstacles I needed to overcome.

1) With all these hinged panels, how would I lock the station rigid when in benching mode?

2) When the station is folded flat, how would I lock the station in this configuration?

3) If you mentally fold the picture above, you will quickly realized the 2 front legs must somehow detach from one of the flat panels and fold out of the way.


So I began a series of experiments to see how I could solve these issues.


1) How to lock the station rigid when in benching mod?


I took some aluminum U channel, cut a short length, then milled out ¼” slot using my router table:


VLC10hingelocks1.jpg


Then I made a little test piece with 2 pieces of MDF and little segment of piano hinge.

By using a screw with a ¼” diameter spacer I could make the U channel slide along the edge:


VLC10hingelocks2.jpg


By sliding it past the joint, it locks the 2 panels flat to each other:


VLC10hingelocks3.jpg
 
Navig,

May I suggest. Instead of the sliding piece of metal. Use an edge dado and have an inserted piece of hardwood, or scrap instead for the slide. It's the same principle as you already are using. But more internal and elegant.. I would suggest. 3 times as wide as the height. Assuming you are using 5/8" material..You edge dado out 1/4'" make it 3/4" deep. Which would be the size of the slide. You could even integrate a finger pull while cutting the material. A simple J, on one side, should do the trick.

As a long time woodworker. Don't forget dado and rabbit/finger joints are your best buds. They make take a little more time, but save cost in hardware. Plus keep it simple and nifty looking.

For example: You could dado out enough material on each surface of the flats. To allow the legs to fold to the inside of the bases and it all remains remains one flush unit. With the added benefit of slightly lightening the overall weight.
If you are using 5/8 board. It makes it pretty easy. Since if you dado out 1/4" on each surface. You can use milled and rounded over 1/2" x 1 1/2" scrap. You could probably use 1/2" x 1", depending on what material you use.. Instead of the expensive dowel. Rabbet or finger joint the top of the folding support leg, (so it locks in.) Then dowel pin or hinge the bottom. Or use dado and finger joints exclusively.
When folding away, put the support leg(s) in the dado slots when not in use.

Finger joints due to being square and easy to make. Allow you to lock pieces together, in more than one way. Rabbet joints are super strong. So less mechanical fasteners are needed, and of course less hardware cost.

You could use your router/router table or the table saw for the dado and joint cuts really easy.

Hope I am not being overbearing and give you some ideas. :D
 
Last edited:
This station is already currently in the paint stages...so the design for this one has already been finalized.

I'm still not entirely following you--might need a diagram. But I am always open for suggestions. I've had zero woodworking instruction. I am using 1/2" MDF, tho, which ain't the sturdiest.


2) How to do the front leg supports.


I took some scraps and did some little test pieces, and this was what I came up with:


VLC10frontpostsprototype3.jpg


The legs, represented by the flat board mounted with a friction hinge, have a piece of angle aluminum mounted to its top.

When folded up, this will lock into a receiving piece of aluminum trim, locking the 2 together, pretty stable without even any fasteners:


VLC10frontpostsprototype2.jpg


3) The second issue I mentioned in the previous post:

When the station is folded flat, how would I lock the station in this configuration?


I figured I would have to figure this one out later, using whatever available space would be there in the folded flat configuration (in other words, I wuldn’t smart enuff to picture clearances in my head, so hope for teh best...).


So, enough with the tinkering with scraps....
 
I'm still not entirely following you--might need a diagram. But I am always open for suggestions. I've had zero woodworking instruction. I am using 1/2" MDF, tho, which ain't the sturdiest.
Firstly, Congrats on Blue. Well deserved!!

Let me grab a copy of google sketch and do a few things. First I have to learn how to use and manipulate it. Then I can sketch up some concepts for you.

It shouldn't take to long for me to come up with something.

Edit:

I got some of the concepts I was giving. If you need me to expand on them. I would happy to share more.

On the back side of the model. You can see the dado. Since I really do not know how you anticipate going there. I left that really basic in concept. Yer a smart feller, so it should light that bulb I assume. If not, I can expand further.

The lock system. Is very basic. A sliding piece of wood. Use a cover to keep it in place. You inset one side that has the cover. To accommodate it. The other side is left to remain flush. it allows for the finger pull also, leaving it without a cover. Just make sure. that the slide can fully retract. Allowing the piece to fold as you would like. So accommodate the dimensions on that. For added locking strength. You could do both sides with the simple lock system..

I would like to mention. Piano hinges are much nicer than standard long hinges. Since if you install them inset. They pretty much go flush and get really nice looking, plus they are stronger with less weight.. Much more elegant IMO. (Keep in mind. There is two rabbet depths. One for the screw plating, one for the hinge itself.)
I included the installed concept of one in the sketch. You can easily go all the way across with one. Though it may interfere with the locking system.

As for your shelving/risers/supports/or angled butting.. I also included a tried and true method for a strong attachment. It would reduce the need for brackets. Plus make it look nicer. Just make sure the material passes all the way through. For a nice snug, pretty butting.
The one piece is not to scale. I made it much smaller in scale, so the image was not huge in size. matter of fact. The whole thing is not to scale.
:)
 

Attachments

  • Capture.PNG
    Capture.PNG
    215.7 KB · Views: 420
Last edited:
I get it, and looks like a solid design. I'm not a 100% certain that 1/2" or even 5/8" thick MDF is sturdy enough to accomodate a dado groove with a shuttle sliding inside of it. Might try some future investigations, altho I'm thinking this station is probably going to be a one-off.


First, I cut my back panel which is really the backbone of my VLC stations:


VLC10backpanel.jpg


Then I cut the top and bottom flat panels, and started with some piano hinge on the top panel:


VLC10toppanelhinged.jpg


Then I tested the piano hinge and side locking brackets:


Locked:


VLC10toppanelhinged2.jpg


Unlocked and folded:


VLC10toppanelhinged3.jpg


Next I made my front "legs". Which honestly aren't actually legs but a single solid piece cut from 3/4" MDF.


VLC10frontposts2.jpg


Also added the hinges and the locking system for the legs.


And here's a video of the system in action:


th_MVI_5231.jpg
 
And so i've finally started on my project Navig, as I talked to you in PM.... I've found metal to be too expensive and a PITA, so i've done a similar wood setup, except all my 4 legs are the same size.... I figure if needed, i'd expand onto another shelf as this desktop setup is meant to mount on the wall next to my HDTV. I'm currently using a 32in TV right now but i'm waiting to see whether i'm going 42in-50in in the future as I'm shopping for a TV right now lol (bigger sides accomodate for different mounting locations). If it's okay, i'll post a finalized picture here :)

P.S. I've already made 3-4 mistakes along the way of building the shelf LOL..... i just didn't have the tools or help (like table saw or anyone to hold the boards together for me to start the process. Here are MY pictures (i've included it in my own thread too). I've also included pics of my old setup (in a cheap computer case, for comparison).

http://img708.imageshack.us/i/20120502002705.jpg/
http://img844.imageshack.us/i/20120502002714.jpg/
http://img441.imageshack.us/i/20120502002731.jpg/
http://img84.imageshack.us/i/20120502002741.jpg/
http://img841.imageshack.us/i/20120502002751.jpg/
http://img18.imageshack.us/i/20120502002757.jpg/
http://img40.imageshack.us/i/20120502002804.jpg/]
http://img189.imageshack.us/i/20120503124553.jpg/
http://img835.imageshack.us/i/20120503140041.jpg/
http://img502.imageshack.us/i/20120503140116.jpg/
http://img406.imageshack.us/i/20120503140126.jpg/
http://img43.imageshack.us/i/20120503140330.jpg/
http://img855.imageshack.us/i/20120503140334.jpg/
 
Last edited:
Good job--I'll follow your thread.


Next I added the piano hinge to the bottom panel:


VLC10upclosemechanism.jpg


And a latch to keep it locked in the up position.


VLC10uplocked.jpg


Video (click):


th_Uplockingmechanism.jpg


And there you have it--Station that was something like 14 inches in height can flatten out to 6 inches.
 
On to some details:


tridiot wanted some removable caster wheels.


I embeded some T nuts into the feet:


VLC10wheelmounts.jpg


Caster wheels can screw on:


VLC10wheels.jpg


VLC10wheelsupright.jpg


Ready to roll.


Constructed the switch panel:


VLC10switchpanel.jpg


It will be mounted here, to accommodate for the folding mechanism:


VLC10Swtichpanelinstalled.jpg


Dome power-on switch, flat reset switch, LEDs for power-on and HDD activity, and a CMOS reset.


Added the power supply bracket and aluminum trim.


VLC10prepaint4.jpg


And here were my final pictures pre-paint:


VLC10prepaint2.jpg


VLC10prepaint6.jpg


VLC10prepaint7.jpg
 
First rule of paint: Test your paint.

My plan was: 3-4 coats ebony stain (6 hours dry between). 3-4 coats of glossy clear oil based polyurethane with 220 grit sanding in between. All applied with foam brushes.

My test sample--black n glossy:


VLC10painttest.jpg


Parts were painted on a rack:


VLC10paint2.jpg


The large flat panels lagged behind as I had to do one side at a time:

VLC10paint1.jpg


I’ve found that for large panels, it is a little difficult to hang them vertically and paint them with a brush. The paint tends to develop runs, especially at contours. Unless you use spray, but I haven’t that equipment.

So I paint one side, then let it fully dry. Then I mask tape over-drip areas, and paint the other side.


VLC10paint3.jpg


And pictures of the mechanisms:


From a full opened station, the first step is to release the hinge lock slides:


VLC10finishedslidelocks2.jpg


Next, you undo the locking thumbscrew:


VLC10finishedfoldingscrew2.jpg


Then disengage the front legs from their bracket, folding them down:


VLC10disengagefrontfeet.jpg


And hinge up the top panel:


VLC10finishedfoldup.jpg


And hinge up the bottom panel, locking the panels up with the latch:


VLC10finishedfoldup2.jpg


The folded station can stand up:


VLC10finishedfoldup3.jpg


Or flat:


VLC10finishedfoldup4.jpg


This flattened station takes an open station from a height of about 16 inches down to 6 inches. Plus you can leave your power supply onboard, and one 5.25 bay device.


And some videos of the action:


th_VLC10Foldingaction.jpg

(Click to Play)

Fold’er up, fold’er down.


And if you’re in a hurry and not worrying about moving the station much, you can skip all the locking mechanisms as the station is pretty sturdy without any positive locks. See how quick it would be to go from packed in the trunk of your car to benching:


th_VLC10Hurrytobench.jpg


And that’s it--hope tRidiot likes it. It’s definitely one of the most unique benching stations out there.


.
 
Back