• Welcome to Overclockers Forums! Join us to reply in threads, receive reduced ads, and to customize your site experience!

Having 1 fan on the heatsink is good, what about 2?

Overclockers is supported by our readers. When you click a link to make a purchase, we may earn a commission. Learn More.

@md0Cer

Senior Member
Joined
Nov 6, 2003
Location
Denver, CO
The other day I was dreaming about owning a Porsche 911 Turbo with the XD50 power package. That thing is amazing, it gets 450 HP and a similar amount of torque out of a 3.6liter motor.

Then it hit me! Twin turbo's. Well, metaphorically speaking, if this was in car terms, you guys with your Thermalright SP-97's would be like a big block v8, and my volcano9 like a 3.6 liter flat 6. Why not make mine a a twin turbo?

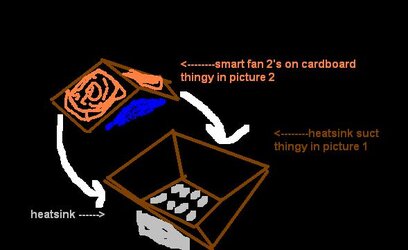
Ok....here is the thing....I decided to try and lower my temperatures by ramming more air through my heat sink. A Thermal Take Smart Fan2 on full blast was not enough, so why not put 2 on?

Here is how I did it.
*WARNING this material is rated "restricted" or "R" for those who hate ghetto looking projects or lowering their temps for free*

MATERIALS NEEDED
  • Masking tape. ALLOT of it
  • Cardboard, box, approximately 1-2 square feet needed
  • box cutter
  • 2 fans that you plan to use
  • Elmer's school glue
  • hair dryer (optional, it just helps you dry the glue faster)
  • patience

STAGE 1


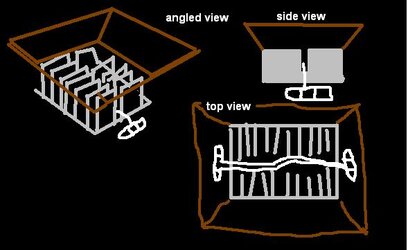
In this first picture you will see this shroud thing I built out of cardboard. I just cut out pieces of cardboard, not entirely square as you can see. I taped these 4 pieces together and probably made an opening of a good 100-150mm above my heat sink. I kind of made a fan adapter, but this is only stage one. At this point, I did not have it on the heat sink. This does not have to be perfect, the pieces I cut out were less than symmetrical :p . The gaps can just be fixed with tape. I just used standard masking tape.
 

Attachments

  • heatsinkmod1.jpg
    heatsinkmod1.jpg
    27.6 KB · Views: 1,659
STAGE 2

Here in this second picture, you see a rectangular piece of cardboard with both of my Smart Fan 2's on it. When cutting this, make sure you have approximately 1/3 of an inch from the fans to the edges and about 2/3 of an inch between the fans. You need the space on the edges so the glue has more room and you can put some around the outside of the fan, and it will be useful when taping the whole thing together. The space in between the fans is where you will fold the piece of cardboard, so it does not break the glue, I suggest you fold it before gluing it, it does not have to stay folded while gluing, or while the glue is drying, but that initial fold puts the crease in the cardboard.

OK, just put your fans on it now, and take a pencil or pen, and trace around the inside so you can cut the hole out. Now dab a bunch of glue on the corners of where the fan goes and place the fan down. Now glue around the edges.

This is where the hair dryer comes in handy. Blow the hair dryer on the glue every now and then for accelerated drying. If your hair dryer has a cool shot button that turns the heat off, click that every now and then. It is not good to melt the wires on your fan or maybe even the fan itself :eek: . When that happens, Smart Fan 2's become more like Smart Fan .03's or maybe Not So Smart Case Fan 2. Or Vantec Tornado's might become Vantec Calm Spring Day's. :D I would let it dry a good 3-5 hours before working on it, hair drying for 5 minutes every now and then, or however long you can stand there.
 

Attachments

  • hintsinkmod2.jpg
    hintsinkmod2.jpg
    22.4 KB · Views: 1,646
Last edited:
STAGE 3

Here is where you introduce stage 1 to stage 3 and the couple take each other's hand in marriage, unless you have crappy tape and/or crappy taping skills, then stage 1 divorces stage 3 and your CPU burns in hell for eternity, or until it melts your computer to the point where it shuts itself off.

What you want to do here is take your now dried stage 2, fold it again so it looks like an upside down V, kinda like this:

Code:
      /\
     /  \
    /    \

Only the angle should be much wider because if it is as narrow as that, your fans will cancel each other out.

So, what you want now is to take stage 1, and tape it to your heatsink, try to not block airflow exits. Tape it to the side where it is the fin and air does not come out. Remember, use plenty of tape.

Now, take stage 2 and tape the ends of it to the ends of stage one. It should look something like this from a side view:

Code:
      /  \         <--  Stage 2
     \  /          <--  Stage 1, the adapter thingy on the heatsink
      |_|         <--  The heatsink itself

As seen in the blue in the picture below, here are open sides, just take some tape and tape those off. You will probably find yourself using allot of tape.

Once that is done you should be done!

I was not though! I did not measure too great in the beginning and one side of this contacted my case and half the heatsink could not even touch the core. So I untaped stage 1 from the heatsink and tilted the whole thing away from the case edge and re-taped. Then, whoops! how am I supposed to fit the PSU back in with this thing! Well, I had to kinda bend one of the sides in with the tape a bit, but tape is flexible :)

Now, the last one and a half hours was attaching the heatsink. I realized I could not do this without the PSU, because I would not be able to get the PSU back in the case. So I had to attach this heatsink with the thing on top with the PSU in the case. It was very difficult. I was afraid I might crush the core of the CPU, and it overall was VERY hard. But since I was so freaked out, I never thought that I could take the cdrom drive out and put the PSU in its place, and it was in the case and completely out of the way. I got the heatsink attached in a matter of seconds, then put the PSU in its place and put the CD drive back in.

Remember to plug the power for the CD drive or any drive back in because when I started the computer, it detected the drive, but the drive had not power and the system locked up on POST.

My CPU diode's load temperature before this project was 72-78°C, now it is in the low 50's :cool: Good Luck!
 

Attachments

  • hintsinkmod3.jpg
    hintsinkmod3.jpg
    24.1 KB · Views: 1,643
Last edited:
hey, neat idea, i don't see anything that would go wrong with this.. but i don't know how the fans will deal with the extra backpressure, but it turned out pretty good for you.

i had a dream the other day about my car, heh.
As much as i want to get turbo for my 2liter jetta, i can't afford it, so i was thinking about how many tornado fans i could add to make it sound like i have turbo...

edit: btw, u got pics?? :D
 
Korndog said:
hey, neat idea, i don't see anything that would go wrong with this.. but i don't know how the fans will deal with the extra backpressure, but it turned out pretty good for you.

i had a dream the other day about my car, heh.
As much as i want to get turbo for my 2liter jetta, i can't afford it, so i was thinking about how many tornado fans i could add to make it sound like i have turbo...

edit: btw, u got pics?? :D

You are right, there is some backpressure, and my fans are spinning abou 100-200 RPM slower, but ALOT more air is going through than it used to. Only downside is that I cannot give specific instructions on how to build this becuase in every situation it is different and people will encounter problems and have to add their own unique touch. Like me having to tilt it to get it to fit for example.

As for your Jetta, keep in mind an engine at full throttle probably sucks in more than 800 CFM. And if you got 10 tornados blowing 800 CFM, that would not do any good, you would probably need like 2000 CFM worth of tornado's to build up enough pressure to do some good. I think you would just be better off with getting some PVC pipe and making your own custom intake. Have it go down lower in the back of the engine compartment to take in cooler air. That should help too. Dont go so low that it will scrape the ground or get wet when driving through water though! Also the engine management chip might need tweaking becuase it is tweaked specifically for the air resistance of your car the way it is.


As for pics in this thread, sorry, I have no cam. If I get one I will try though!
 
The thing i'm wondering is how all that air can escape fast enough throught the HSF fins. I guess the answer doesn't matter too much since your mod obviously worked for you. Nice work btw

I've always toyed with air funneling ideas but have yet to try any of it out. One idea is to run a dryer duct from a rear air intake through a basement floor to the cool air downstairs. And maybe adding a few repeater fans to make sure air flows through it quickly enough. The same idea can be applied to an air conditioning vent, or just funnel in cool air from outside in the wintertime....
 
As for duct tape, duct tape works great too, although I had none of it and with the amount of taping you are doing, it can be troublesome cutting the ductape, having it fold over on itself, etc. For some of the minor stuff, I recomend masking tape becuase it is easier to deal with, but if I had duct tape, I would have used it on some of the more crucial parts, like taping this whole thing onto the heatsink, I probably would have used duct tape there.

sJetski, you do have a very interesting point, and you are correct, it is hard for that air to escape. One of the flaws with the Volcano 9 is that it does not alot much air to escape at all. I was thinking about dremeling slits in the base to let more air flow through, but the base is too thick. With one fan, from just reaching in and feeling the air coming out of both sides of the sink, my esitmate would be about 30 of the 75 available CFM actually moved through, now, maybe 60-80 of the 150 available CFM are able to move through would be my best quess. The air conditioning vent and window is a good idea. Unfortunatly it is a long way until winter time, and I am no where near an air conditioning vent. I dont run the a/c very often either. The blower in this house is week, so the a/c and heat are not very effective and it takes alot of energy. This is an older a/c system too, so that takes alot of energy as well. It is quite ineficient. But that is a great idea.

I would like to thank everyone for putting valuable feedback into this thread :thup: :) , I hate it when people aimlessly spam. :p (well.....I used to do that so I guess I can put up with it lol)
 
well what i wonder is if that worked for your little flat 6 would it work just as well for my big block (sp-94)
maybe the one fan on top and a 80mm blowing in the side through the fins.
sounds like it could work.
if anyone has done this please post or pm me with your results
sry OCer didnt mean to steal your sunshine :)

Thnx, ~Magick_Man~
 
I saw a thread the other day where something similar to this had been done on an SP-94, except that in that setup, the fans were side by side and flat, overlapping the sides of the sink. The two fans were in a frame-like piece that appeared to have been made from something like sheet metal/roof flashing. It looked pretty good also. It sat "cross ways" and was attached to the heatsink with the standard wire clips. I just can't recall where I saw it.

Darn it, now I'm going to have to spend the next hour looking of it.
 
I'm not sure how your Heatsink is shaped, but I'll tell you this,

My friend bought a new system, barton 2500 MSI board, etc...

when we set it up it idled at 52 degrees, the case was crap and it came with no fans,

so I thought, instead of spending another $50 on a HSF, lets toss another fan on the stock HS, both fans are OEM amd 60mm sleek fans, I mounted them along the edge of the cutout for the retention plate, it eliminated the deadzone, and also dropped his tems to 33 degrees at idle,

what I'm saying is, try something simple before wasting time on something elaborate.

hope this helps.

Komitet.
 
magick_man said:
well what i wonder is if that worked for your little flat 6 would it work just as well for my big block (sp-94)
maybe the one fan on top and a 80mm blowing in the side through the fins.
sounds like it could work.
if anyone has done this please post or pm me with your results
sry OCer didnt mean to steal your sunshine :)

Thnx, ~Magick_Man~

A twin turbocharged big-block will do great :D

I cant wait to see your results if you try it ;)
 
Im thinking of doing a similar thing to you with my SP-97 shortly when i get my hands on some
better tape and order another Ttake smart fan II So i'll try and let you know how it goes, :D .

Until then have you got any pic's ;) ? ...

Oops, Never mind i didnt read the thread properly, Just noticed the no cam bit, :D ...
 
yeah now i only have to find another fan to put on it,
i think i will slap it onto the side so all the air goes out one direction and stuff.
wait i think i have one in my closet.
i'll try to find it and put it on there to see what i get

~Magick_Man~

*EDIT* upon looking at my board i remembered that i dont have room on either side of my hs to mount the fan mosfets on top and nb on bottom :(
oh well
 
Last edited:
Ok guys......use duct tape....it fell off. Tape it to the heatsink very well but do not block airflow out of the heatsink, tape the whole thing with duct tape, and duct tape it to your PSU too.


magick_man, I dont see how your mosfets could get in the way. I will make another paint pic to make this look a little less confusing for everyone. I apologize ofr not having a cam. :(
 
@md0Cer said:
Ok guys......use duct tape....it fell off. Tape it to the heatsink very well but do not block airflow out of the heatsink, tape the whole thing with duct tape, and duct tape it to your PSU too.


magick_man, I dont see how your mosfets could get in the way. I will make another paint pic to make this look a little less confusing for everyone. I apologize ofr not having a cam. :(

Here is attachment 1.
 

Attachments

  • untitled1.JPG
    untitled1.JPG
    11.1 KB · Views: 1,272
What about just stacking them on top of each other? I've thought about trying that but don't have any short mounting screws to experiment. The air would all be focused in one direction that way, but I wonder if the bottom fan would be going 9000rpm...lol
 
braze said:
What about just stacking them on top of each other? I've thought about trying that but don't have any short mounting screws to experiment. The air would all be focused in one direction that way, but I wonder if the bottom fan would be going 9000rpm...lol

Fan stacking does not really improve CFM in a free flow enviroment, but it does benefit with resistance such as a heatsink. It creates more static pressure and reduces backflow. What I thought when putting 2 fans side by side like I did, was that you get the same increase in static pressure as fan stacking, but you ALSO get another air intake, versus more static pressure and one intake.

orion456, nice work, and that is an awsome idea. It does definately improve efficiency, although, due to the way my heatsink is designed, really the only way to get any decent temperature is to ram as much air through it as you possibly can.

:)
-0cer
 
Back