Bulldozer OC Guide!
Everything you need to overclock bulldozer properly.
By Sin0822Everything you need to overclock bulldozer properly.
Here is a preview video of what is to come:
Memory Scaling
CPU-NB Scaling
HT Link Scaling
High HTT and HT Link Scaling
Higher memory and CPUNB + HTLink Scaling
Multiplier + HTT Scaling
Voltage Scaling

I am pretty sure by now everyone has seen Bulldozer’s tip top performance….. There is one pro though, and that is that Bulldozer overclocks like Sandy Bridge for the most part, but even better in many cases. Even on air/water you will be looking at 4.8 GHz-5.2 GHz per CPU, even with an 8-core CPU. That will undoubtedly scale with voltage and cooling, as Bulldozer holds the max CPU frequency World Record, this CPU is really fun to overclock. Now this might seem kind of crazy, that AMD was able to increase the core count, yet increase the overclocking potential of the CPU, and in the end that might just save AMD. From what I have seen Bulldozer needs to be overclocked a lot, and tuned very finely, to produce any comparable results. That is what I am going to show you today, my results on air/water, and I will update this guide with LN2 cooling results. I used an Antec Kuhler 920, it’s a decent CPU cooler, it’s one of those all-in-one solutions. It has its limitations, but it does a pretty good job of cooling, but if you have a high quality air cooler, they will do about the same. Here is what you need to use, or what I used to get overclocking!
Materials:
• Motherboard, with 990FX Chipset- I used GIGABYTE 990FXA-UD7. If you have the UD5 or UD3 you can copy my settings as well.
• CPU FX series is what this guide pertains too, I used an FX 8120 (3.1ghz stock, 3.4ghz turbo, 4ghz max turbo)
• Memory, high speed dual channel is best; I used Kingston HyperX as well as some G.Skills for max clock.
• CPU Cooler, you want a good cooler, AMD FX runs on the hotter side. I used Antec Kuhler 920, it comes with everything, and I think AMD is offering the same thing basically.
• Good powerful PSU, if the CPU gets hot, that is because it’s using more power, and that power comes from your PSU, I used Corsair AX1200, but any 600W+ will do fine if you have a nice single GPU.
• GPU, I used GIGABYTE GTX 570, you can use whatever.
• Storage. Doesn’t really matter, I used a cheap MicroCenter 64GB SSD, to speed up my loading and boot time, and you will see why soon.
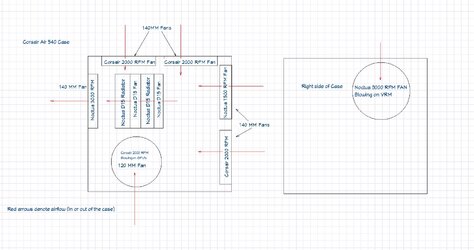
• Case, I used a custom made display case, you can’t buy it, so please don’t ask. It has terrible cooling, but it showcases the system very nicely, I used it without its cover, but if you are going to go for a 24/7 OC, like I am sure most will, you need good cooling in your case.
• You need a Bulldozer BIOS, you need to update the BIOS to the latest!!!!!! I used a special BIOS for my testing BIOS G2, it’s not publicly available, and it’s made for benching LN2 only, but I redid my tests on BIOS F6E and the water OC was the same.
• You need to get a Stress testing program, something that will test out all cores to 100%, intel Burn Test(IBT) is my favorite, but Prime95 is good, so is LinX(basically same as IBT), or even OCCT, even though it hasn’t been updated in years still loads very heavy.
• You need some benchmarks, 3DMarK Vantage I think was just made free, it has a good test suite, SuperPI XS MOD 1.5, HyperPI, Cinebench, and wPrime. Pick one or two of the light ones, like SuperPI and wPrime. Then pick one or two of the heavy ones, like CineBench or Vantage, these benchmarks act like more of a real world benchmark. When I mean heavy and light, I mean the benchmark’s size. It’s nice to use two, mix it up as different benchmarks react to different things. If you’re a gamer pick up 3DMark, pick benchmarks that fit your needs. You can use whatever benchmark you want, the purpose is to figure out if your performance is increasing or decreasing.
• Patience, you need to be patient, overclocking isn’t the hardest thing to do, and its not the easiest. If you just want a cookie cutter template, yea that is fine, take one of mine. But If you really want to tune your system well you need to understand that every CPU is different. You need to work to overclock, and test out different speeds, voltages, and settings.
You have to update your BIOS on any board to pop in a bulldozer CPU here are the BIOS link for GIGABYTE:
Official BIOS has only 2 characters like F5, and Beta has 3 like F6E, GIGABYTE recommends using the official BIOS releases.
990FXA-UD7
990FXA-UD5
990FXA-UD3

Methods of Overclocking:
1. Multiplier Overclocking: it’s the easiest thing to do, just increase the multiplier. Up until now you need an AMD Black Edition CPU to OC the multi or the FX edition, to really get anywhere. You can do just this with bulldozer, but its heavily recommended that you use both HTT (FSB/CPU Host Clock) in conjunction with CPU Multiplier.
2. HTT increase: or formerly known as Front Side Bus, it’s the basic host clock that is multiplied by every multiplier present (CPU, HTT, CPUNB, DRAM). So it affects everything.
3. Increasing the Voltage: On air you only need a touch of the CPU-NB VID, and the CPU VCore. On the GIGABYTE boards you increase them over a base voltage(VID), and that base voltage is listed. I will talk about it more later, but please be careful.
4. Secondary Multiplier OC: This basically means OCing the CPU-NB multiplier, the HT-Link Multiplier, and the DRAM multiplier. The purpose is to get those segments up to a faster speed, to try and increase the overall system performance.
Voltages:

You will be surprised on what voltages BD will be stable at.
#1 CPU VCore: Stock varies, but safe on air up to 1.45-1.5v or 55C, whichever comes first. For 24/7 keep it under 1.4v or 45C, whichever comes first. That is my recommendation to avoid electron migration and voltage/heat degradation. This voltage can be increased on the GIGABYTE boards by setting a Plus (+) or Minus (-) value on top of a predetermined voltage. After disabling Core Boost, that voltage WILL decreased to 1.175 from 1.375 (or something along those lines), so that changed my final voltage as the offset was different. That means if you set all your settings from a fresh CMOS clear, your vcore will change significantly, so disable core boost and restart and then set your settings.
#2 CPU NB VID: Stock 1.175, safe on air up to 1.35v. I have no idea why AMD did this, but I also have no idea why they released BD. But AMD boards seem to have two Northbridge’s, but in different senses of the word. Everyone thinks of a Northbridge as being the first chipset paired with a Southbridge, and the 990FXA Northbridge is just that, and it has its own NB voltage. BUT, AMD CPUs have a Northbridge as well, built into the CPU. It handles things other than the CPU cores, and it has a heavy impact on HTT(FSB), CPU NB clocks, and can help memory overclocking.
#3 NB Voltage: This voltage is the 3rd voltage that might need to be changed. It controls the voltage of the Northbridge of the board. Its stock 1.1v, but you can safely take it up to 1.2v. It can help one get a higher HTT/FSB than 265mhz, as well as help with high memory clocks.
#4 DRAM Voltage: This is the voltage applied to your memory modules. The stock is 1.5v, but if your memory is like mine and rated at 1.65v and you don’t want to use the XMP/Profiles, then please just increase this.
NB/PCIe/PLL Voltage Control: Not an important setting. I’d leave it be.
CPU PLL Voltage: Like the setting above, it won’t help you on air/water.
LLC (Load Line Calibration): A setting used to counter the drop of voltage under loads, the droop varies with loading, but it is used to keep the CPU within TDP when loaded. But it also helps drop temperatures. If you do not have LLC available, then please find out how much the drop under 100% load is compared to idle voltage, and set the voltage that much higher so that your load voltage is what you want it to be.
!Warning!:
I take no responsibility if you kill your hardware, overclocking is up to you, and overclocking will void your warranty. Heat is a deadly thing. For our CPUs it will kill them as fast if not faster than voltage. So please keep temps under 60C at all times. If you are coming over from Intel, please be advised that AMD uses different materials and processing to develop their CPUs. AMD max temp is about 55-60C, while Intel might be 80C. So please don’t go over that, if you do performance will drop off the deep end, and your CPU's lifespan will be reduced.

Overclocking Settings:

#1 CPU Clock Ratio: better known as the multiplier. Stock varies with the CPU, but max is 35X on this board with this ES CPU. It is “multiplied” by the CPU Host Clock (HTT/FSB) to provide you your final CPU frequency. A user can just OC with the multiplier if they would like, in fact they can hit the same clocks on lower voltage than if they used HTT/FSB as well, but performance will be higher with higher HTT/FSB.
#2 CPU Northbridge Frequency: Stock value is at 11X, maximum of 20X, and that is multiplied by the HTT/FSB to give you the CPUNB frequency, stock is 2200. This isn’t really as effective as it was for the Phenom 2s. It doesn’t impact performance as much, nor does it limit your OC, nor will it help your OC. You would think that with 8 cores, this frequency would need to run at 3-4ghz, but on air/water you won’t be able to successfully pull off over 2800 stable. Later on I will show you my testing with this changed.
Disable Core Performance Boost. It is like turbo.
#3 CPU Host Clock: This is the Front Side Bus, or better known on AMD as HTT. It is the base bus frequency that is multiplied by all the multipliers. On air you are looking at around 275-300mhz max. It is good to use a combination of HTT and multiplier for CPU clocking, it will improve performance rather than just using multiplier alone. It is also important to note that NB Voltage can help raise the maximum limit. For the same CPU frequency with decreased multiplier and increased HTT, we will need a bit more Vcore, than if it was just multiplier X stock (200mhz) HTT.
PCI-E Clock: You can just leave at 100, above that can/will corrupt your HDD and even GPU in many cases.
#4 HT Link Frequency: Stock at 2600mhz, 11x multiplier, 13x is maximum multiplier. I found it odd that this clock is set high at stock. I will show performance gain if there are any with increasing this clock. It is not hard to increase this clock over 3ghz, but it won’t help much.
DRAM E.O.C.P: is like automatic memory/system OC.

Profile1 is the Intel XMP equivalent, and it will also change your memory voltage. Setting this to anything other than disable will change up the CPU Multiplier, the HT and CPU NB Multipliers, as well as DRAM multiplier, and HTT/FSB. I have listed the multipliers that it changes and what too for each memory setting. You can note that under DDR3 2000, everything is left at stock. It is interesting to note that this setting keeps the HT Frequency and CPUNB frequency equal to each other. We will look at the impact this has in a little bit.
#5 Set Memory Clock: this will allow you to manually set up your memory multiplier, the maximum is 9.33 which will result in a 1866mhz memory speed. You need to increase HTT/FSB more to get higher memory frequencies.

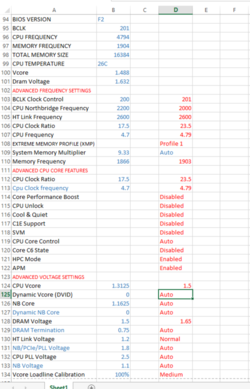
Here are the DRAM timings, and how one can match up the timings on this screen to those written on your memory module. Above is a shot of my G.Skill DDR3 2200 memory, those are the XMP profile timings, that were set when I selected “Profile1”.
How do we OC Bulldozer?
Well overclocking bulldozer is pretty simple, here are simple steps to help you OC. First read them, and then read my performance charts, and then try them.
#1 First for the GIGABYTE 990FXA boards, disable Core Boost, save and restart. Then go back into the BIOS. Now set the multiplier for the OC you want, but JUST the CPU multiplier. Set something modest like 4.5ghz. Then increase the Vcore to something higher than needed, like 1.45v, but not higher and ONLY if you have good cooling. If you have LLC option set it to the highest or second to highest. Restart and you should be able to boot in if you didn’t change the HTT/FSB or any of the other multiplier.
Be aware that the reviews posted used a bit too much voltage for their OCes, they used brute force. If you are lucky you can get something like this without changing the HTT/FSB or other settings.

#2 Decrease that high Vcore until you fail to POST(get into the BIOS). Try 3 voltage steps lower at a time, so from 1.45v down to 1.3v, and then go one step after that. Keep going until you fail to POST. Then get back into the BIOS, as the GIGABYTE boards have auto OC recovery and it works pretty well. Set your vcore 2-3 notches higher. So if you went down to 1.2v and it failed now push back up to like 1.24v or something.

#3 Now go into advanced BIOS features menu and disable: C1E, K8 Cool& Quiet, C6 support, and any other features there that you don’t need. Then boot into windows, if you fail to get past the windows loading screen, then please increase the voltage a bit more.
#4 get into windows and run a stress testing suite for about 30mins with every core being loaded to the max. if you pass, restart and go into the BIOS. Now you want to tune the finer things, and increase the host clock(HTT/FSB). So lower the multiplier of the CPU, and increase the host clock, something like 230mhz to 250mhz is a good point to start. At this point the CPU-NB multiplier needs to be changed, please make sure it’s under 2.7ghz. At this time HT multiplier needs to be changed as well. Also your DRAM multiplier needs to be changed.
#5 Now that you have an understanding at what voltage and frequency your processor is kind of stable at, then you can fiddle with the finer knobs. Try using the DRAM EOCP for memory if you don’t know how to set your timings, but make sure you always watch the CPU NB frequency, as if it’s too high the system will fail to boot. You also will need to increase the CPU-NB voltage; I set to 1.3v for the heck of it, but too high can cause performance issues. If you want a high HTT/FSB you might need to bump the Northbridge voltage as well as CPU NB. DRAM Voltage can be changed as well.
#6 Get back into windows and test, if you fail to boot, at the same frequency you had before for the CPU, that could be due to the increase HTT/FSB, I had to increase vcore to keep up with lower multi and higher HTT/FSB even at the same CPU frequency.
#7 Now you are in windows, run a few benchmarks, write those numbers down. Go back into the BIOS and change up the timings, mix up or match the HT Link and CPU NB frequencies, or try them at different levels. You can try increasing the voltage or decreasing them as well. Go back into windows and run your benchmarks. If performance is higher than you are on the right track, if it is lower, then go back.
By now you can probably pull something off like this:

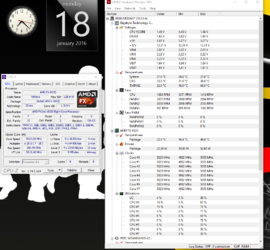
My Performance Findings of Finer Tuning (CPUNB, HT Link, Multi, Voltage, HTT, DRAM):
Below I will go through some charts of my results. Each benchmark was run more than once, as the results are pretty all over the place with Bulldozer, so they were averaged. I ran SuperPI 1M, wPrime 32M, CineBench 11.5 CPU, and 3DMark Vantage CPU Test 1. My results are probably lower than most have seen, but they are not for showing how BDs performs, you can just look at different reviews, they are just for internal comparison. Windows 7 was put off disc, no updates, just stock windows 7, with all drivers installed. Also not the latest BIOS was used, so it has a kind of outdated CPU Microcode and the CPU is ES. Please look at a performance review if you want to see how BD performs against another processor.
First off memory speed’s impact:

So you can see that the memory speed changed alone has a nice impact on performance, there is a huge jump from 1333 to 1600, but not that big from 1600-1866. Some are thinking, that is due to lower CPUNB and HT Link speed, and plz look at CPU NB Scaling for more on that, as I raise the CPU NB alone with memory at 1866.

Other than in SuperPI we don't see any steady scaling of any of the other benchmarks. 3DMark Vantage is close, but not very good. What we did see though, is that CPU NB isn't really bottlenecking the memory speed at 1866. Also please note that we can't pull off a CPU NB speed at or above 2.8 GHz, not on air. In fact with the 8.4 GHz record set, they used a 2.4 GHz CPUNB speed. While CPUNB speed probably will greatly improve performance at a higher level due to the increase in core count, sadly either this uarch doesn't take advantage of it or it will help only under subzero results. I do think that CPU NB helps performance when slightly increased; it’s probably not a coincidence that the DRAM E.IO.C.P auto sets it around 2300-2400mhz. CPU NB Speed can help performance, especially subzero, you can maybe hit 3-4ghz.

I kept the CPUNB constant, as well as the speed, and kept memory at 1866. Only thing changed was HT Link speed, and it doesn't seem to be clock limited like the CPUNB is under air/water at 2.8 GHz. For the last two results, I increase the CPU NB, once to come close to a higher HT Link, and once to match HT Link. You see the results are very inconsistent, but that the 2796 HTLink frequency seems to do well, the stock is 2600, and increasing the CPU NB a slight bit seems to help as well. So I am going to suggest, that on air cooling, you take the HT Link to about 2.6-2.8ghz, and either set CPU NB at 2600 or 2400 to match or be close to HTLink.

HT Link and CPU-NB speeds have been changed together, with a much higher memory speed. The result is miniscule at best in all benchmarks, except for Cinebench and 3DMark Vantage. We can see from this that there is a very small increase in performance having those settings close together. So yea it helps.

In the past tests I used HTLink with DRAM of 1866 and HTT of 233, well let’s increase those a bit more, because HT Link is the one frequency we can change a lot, I wanted to see if it made a difference changing it with even higher busses. Here is something I find fascinating, can you see it? The performance is best when the HT Link equals the CPUNB in this round.

As we increase the HTT we see that Cinebench as well as 3DMark CPU test seems to scale almost perfectly, even with lower memory speed for some of the tests. We also see a need for higher voltage to remain stable as the same CPU frequency. Even with lower CPUNB and HT link speed for the increase HTT (multiplier limited) we see that performance in those benchmarks still increase. SuperPI seems to have no change, but SuperPI seems to like a higher multiplier.
Conclusion: HTT(FSB) needs to be raised for best performance, even if you can only use the multiplier.

Here is voltage scaling. You can see a steady rise in temperatures of load, but compared to change in idle temperatures that change is very small. That is because what is missing is current at idle, at load there is much more current than at idle, even if the frequency is the same. Some food for thought. Note that performance decreases for the most part as we go down. There is a sweet spot in there if you can find it.
Time for Optimized OC:
So now you are supposed to take those analysis of the different comparison tests, and find your most optimum OC. we put all that you just saw together, and you get this overclock:


You can copy those results for your CPU if you like.

Higher Overclocking on Air/Water:

So that is an easy 5ghz, we were stable at 5ghz.
Here is the MAX OC ON AIR/WATER:

Now if that gives you confidence for Bulldozer OCing I don’t know what will!
Stability is subjective at best, one guy might say his system is stable with 3 hours of IBT, another with 12, and another with 24. Each will tell each other either your isn't totally stable or that you over did it. Personally i think whatever you do i fine, i don't care if you call it stable, it has nothing to do with me. BUT please note that overclocking in general isn't meant to be stable. One day your system will be good, a week down and its not at the same voltage, because you ran it at 70C with 1.5v on air, and it passed IBT for 24 hours straight.
Thanks for reading, and till next time!
Also if you are looking to buy a GIGABYTE UD7 right now, GIGABYTE has a deal on Newegg for $214 after MIR
LN2 session is happening tonight, should have some type of results like max CPU clock up tomorrow, wish me luck!
Last edited by a moderator:
")