• Welcome to Overclockers Forums! Join us to reply in threads, receive reduced ads, and to customize your site experience!

[Build Log] Phanteks Enthoo Primo Z97

Overclockers is supported by our readers. When you click a link to make a purchase, we may earn a commission. Learn More.
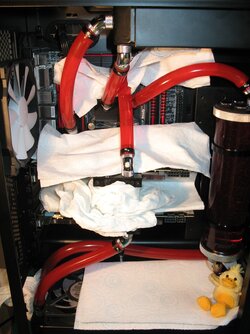
I then did a test loop without filling her up with water to check if my routing plan worked okay. It was then I realised I forgot to order one of the two snakes I listed in the opening post, so I had to make an adjustment with the knowledge it wasn't going to be quite as tidy as I had hoped :) So I filled her up and did my leak test

Leak testing.jpg

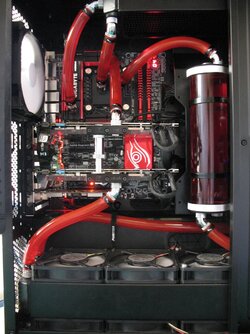
And this is what she looks like now. Might as well mention that I decided no to do push/pull on the top as would have meant having to remove fans just to change the memory or whatever. Got 3 spare GTs now!

Loop.jpg

- - - Updated - - -

I've just installed the remaining hardware and connected the other drives. And now I'm doing a clean install of Win10.
 
Hi,

Is it normal to have different air-water deltas on the rads? When I did a quick 45 minute run on Aida with both GPUs and CPU at full load simultaneously, I got a delta difference of approx. 3.5c between the two rads. Delta top rad 5c. Delta bottom rad 8.5c.

The water source for the bottom rad is from the CPU. The water source for the top rad is from GPU.

Not sure if this is relevant, but the radiator port locations used for the G1/4 temp sensors is not consistent when compared to where the water is leaving the rads.

Thanks

Edit: Both rads are set up as air intakes from the perspective of case airflow. Bottom rad is push/pull whilst top rad is only push

Thanks again :)
 
Last edited:
Generally there is only a 1-2c difference through out the loop after thermal saturation (usually 1 hour full load).

It looks like your top rad fittings are located at front bottom and front side. This is likely reducing the top rads ability to cool as water will enter the side and potentially out the bottom without ever passing through the radiator.

This is all speculation as it's hard to see clearly if this is how you are configured. I would recommend relocating the top side fitting to rear side (or rear bottom) forcing the water to pass though the radiator.


EDIT: As an optimist I see this as an opportunity. (to fix that fan cable that's bothering the hell out of you LOL)
 
Last edited:
Oh...I never considered that.

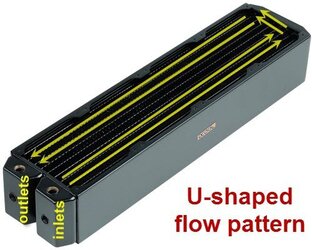
Do you know of any available diagrams that show the route taken by the water through a UT60 as I can adjust accordingly? (Not that I'm doubting you. Just need to be able to picture how it works in my head). Or I could drop an email to Alphacool as they would probably have something..

Edit: Just found this pic on an overclock.net thread. Would this be correct? If so, it clearly demonstrates my noob error :D

alphacool flow pattern.jpg

Source: http://www.overclock.net/t/1499542/help-with-water-cooling-full-parallel-loop/10#post_22517601

Thanks for your help and guidance. Much appreciated. :)
 
Last edited:
And Blaylock,

Just read your post again. Where you said "As an optimist I see this as an opportunity. (to fix that fan cable that's bothering the hell out of you LOL)" kinda sums up how I feel. Not so much with a dumb cable, but more in the satisfaction that I've learnt something about how the water is channelled through the rad and how that can impact overall efficiency of a loop. (That is the whole point of being a geek I think ;) Making this type of mistake pleases me as it improves my knowledge.

And yes, you were correct, I do have both the inlet and outlet hoses connected to the same side on the top rad. On the hand, the bottom is just fine and dandy!
 
Yep, that's exactly how the rad is going to flow.

Great looking build, glad you've learned some things and had no major mishaps :)
 
With the top rad providing the water to my CPU, it could also explain why my temps for the CPU at full load were a few degrees higher than I had expected...
 
Glad to see you have corrected it. I would also recommend if you'd like to move your top radiator back so it looks flushed up top and reroute your tubing so it all connects at the side portion of the radiator as you've demonstrated already with one of the tubing from the CPU block.

Nonetheless, nice build.
I reasonably happy with it for a first attempt. I'm interested to know if there is technical reason to move the rad as opposed to aesthetics. Would it improve thermal efficiency of the loop for example?

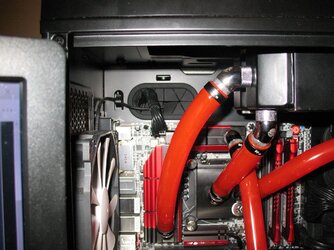
I was original going to have the rad about two inches further over to the left as it would have looked better. Only when I physically had the rads did I realise it was not possible due to way the mounting plate is on the top Phanteks case. I would have had to make a whole new bracket and couldn't see the point, (I'm probably going to sell the case when I tear down the loop in 5 months or so as I really don't like the case at all). Please see pic at bottom of this post.

The were a couple of reasons I did not want the rad flush:
  1. It would have blocked access to the mobo 12v CPU power connection and it's associated cable management access hole.
  2. Having the rad there with hose so close to the fan could disrupt the airflow through the chassis (front to back).

I could reconsider if it were to increase thermal capabilities of the loop though.

Thanks for your continued support! :)

top rad position.jpg
 
Last edited:
Today I ordered a Bitspower 60 degree angled fitting (plus a spare in case it is faulty) so that I can change that hose location on the rad. It'll make it easier to fit the hose with the 60 degrees fitting and I should be able to do it with only a minimal drain of the system. Also a ordered a couple of 3-way fan cables to tidy things up a bit too. They're arriving in the morning as I paid for express delivery. That way I can sort this out this weekend - Just got to be strong and decline any offers to go fishing. I'll be able to have a drink on Saturday though while I'm bleedin' bleeding the bleedin' system again
:D:clap:

Sadly no 90 degree fittings or snakes available (no local stock) as I would have adjusted the hose position from the CPU to top rad to make it all look a bit prettier. I can do that in a few months time during maintenance.
 
A little off-topic I know.

I just dug out an ancient 12-year-old PSU to power up my pump for the leak test later on today. It is so tiny. Has two 70mm fans for airflow!!! My...how things have evolved on the PSU front! I've actually got older models hidden away somewhere too lol
 
A little off-topic I know.

I just dug out an ancient 12-year-old PSU to power up my pump for the leak test later on today. It is so tiny. Has two 70mm fans for airflow!!! My...how things have evolved on the PSU front! I've actually got older models hidden away somewhere too lol

That's exactly what I do as well. Have a 10+ yr old 400w PSU laying around that I use to test products with or run the pumps during leak test.
 
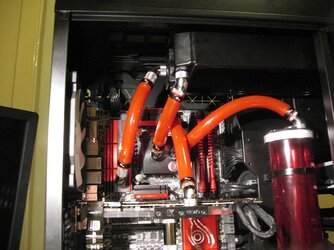
Right. Sorted. The flow now goes into the rear channel of the rad and comes back out the front and to the cpu. Should be flowing right through the entire U-shaped internal chamber now. Sorry about the fuzzy pic. Had a couple of drinks ;)

top rad hoses.jpg
 
Back