Hi all, first post. Thought I would share with you all my water cooling experience.
Started out with the following gear which consisted of:
Case: CoolerMaster Cosmos Pure
MB: Asus Rampage Extreme III
CPU: I7 950 @ 3.07GHz
CPU cooler: CoolerMaster V10
RAM: Crucial Ballistix DDR3 1600
GPU: Asus Radeon HD 5850
PSU: CoolerMaster 700W Silent Pro
Used this setup all stock for about a year an a half with windows 7 ultimate.
Since the V10 cooler is so heavy it had started to sag and I noticed it was not sitting level anymore. This however had not effected performance. I could still get initial idle temperatures of 27 Degrees C which panned out to be around 31-40 degrees with a load of 50-60. So the cooler was still perfectly secured to the cpu and mainboard.. I checked it numerous times and ensured the mobo was secured to the case...
This was when I got sick of the V10 and its huge, cumbersome nature and ventured into water cooling. I lurked the net researching the topic for about a month and slowly gathered a check list of what I needed and the key points to consider.
I decided to go for a single CPU loop with a 360 Radiator and a reservoir. I had considered getting a motherboard block as the NB and SB temps are always around the 54 and 60 degrees Celsius marks respectively. However this seems to be the usual and is nothing to be worried about so I didn't bother.
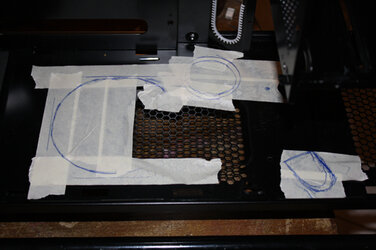
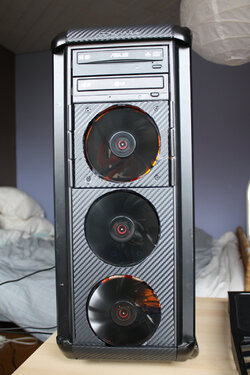
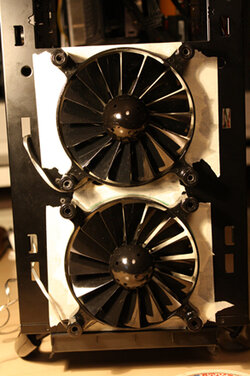
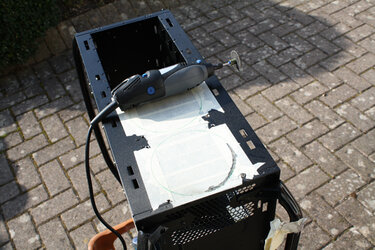
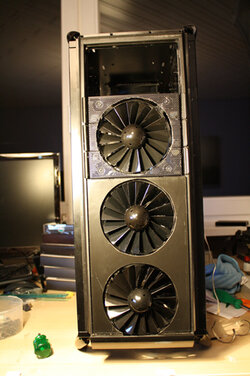
While pondering and thinking about the system I added some case fans for better air flow. For two of the fans I used a dremel to make the cut outs in the case and for the third i used three 5.25" covers to make a custom fitment in the drive bays. For these Fans I used Coolermaster Turbine Mach 0.8. This gave me the opportunity to try out the dremel as I had never used one before.

In this pic you can also see where I cut away one of the drive bay sections leaving 3 HDD bays intact. This was a pre mod making room for the soon to come pump.
Pre-mod result:
So after all the research, pondering, lists, online orders, pre-mods... I ended up with:
Rad: EK-CoolStream XT 360
Pump: Laing DDC-T1
CPU wb: Swiftech APOGEE HD
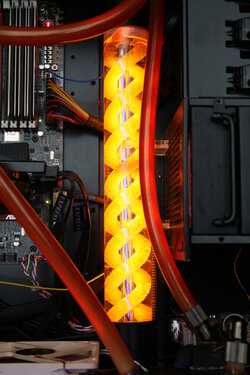
Res: FrozenQ Liquid Fusion Amber
Pipe: 1/2 with fittings to suit
Plus to shown in the pic are the extra fans I bought for the radiator and to replace the stock cas fans. From Noctua I bought 3 NF-F12 PWM's and two NF-S12B's. These plus the three mach 0.8's makes for a total of 8 fans!
I set up a test loop to make sure the rad, pump, frozenQ, and water block, were all properly sealed and water proof. I let it run for 12 hours plus in total over two days. After which I drained all the parts and made sure they were all clean and gunk free.
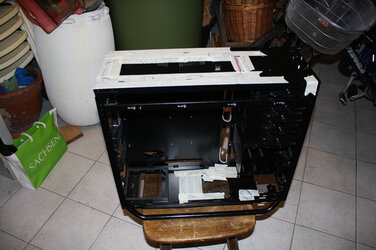
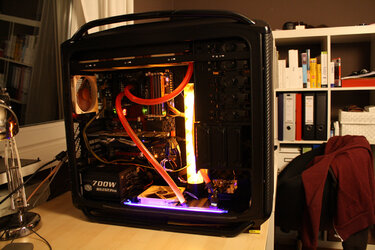
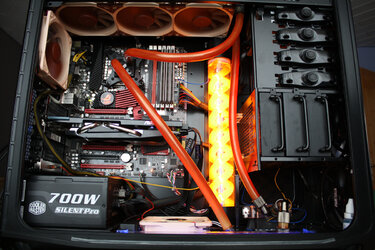
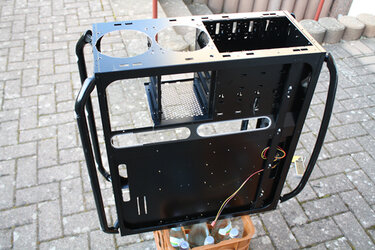
Next step I stripped down the case and removed everything down to two of the front case fans. I had already a plan of where each component would be placed and (hopefully) fit. So I tried out various configs with the FrozenQ and radiator. The problem here was I really wanted to 400mm Liquid Fusion and a 360mm rad however there were clearance issues with them as there would be no way to have a refill pipe leading to the top of the case as there was less than a centimeter gap between the rad + fans and FrozenQ. I solved this by having the radiator as far to the left as possible and the frozenQ all the way to the right. Made for a tight squeeze and hard install but it worked like a charm!
Now because the fittings screw into the bottom of the FrozenQ this meant i had to cut holes so that some piping was able to run underneath he case. The Cosmos pure sits up off the ground high enough to make running pipes underneath the case no problem at all.
Holes to be cut out for the running of pipes underneath the case:
Over all:
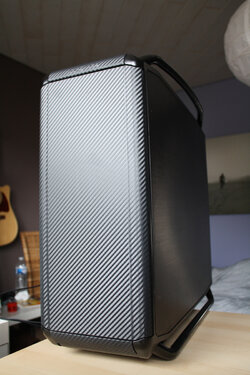
After the holes where cut Checked the radiator to make sure it woudl fit properly.. After a few niggles here and there and a few extra cuts it fit perfect. Next I installed the pump and frozenQ and secured the fittings and pips that ran underneath the case. Aft this I did a few cosmetic mods using stick on 3M Carbon Fibre film. This was used for all the cut outs that I make to the case (Can be seen in the pics).
Once I was satisfied with the placement of pipes and fittings underneath the case and the location of the pump and frozenQ.. I proceed with securing the radiator. After this I removed the V10 cooler and seated the waterblock to the cpu using arctic 5 thermal compound. I went with a small blob in the centre of the cpu and the secured the water block to the mobo.
After this I installed the mobo, psu, and pther components into the case.
Last things were conecting the remaining pips between the CPU, FrozenQ, and radiator.
Next came testing. All the fittings were wrapped in paper-towel and the pump was powered up with the PSU using the paper-clip trick.I left it running for about 3 hours before I went to bed which i then switched it off. Woke up in the morning and checked everything.. All dry so I was satisfied it was all water tight.
onto the final pics:
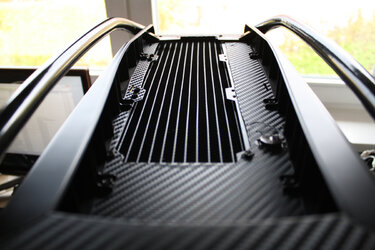
Top of case- Radiator and filling port
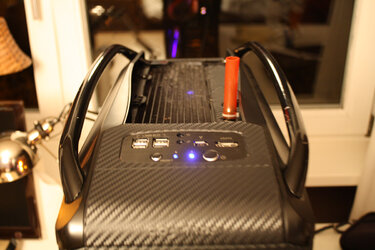
With a simple yet effective filling port extension.
My cable management isn't too bad but still could be alot better! Though I'm not too fussed about it.
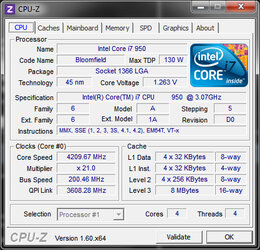
Very first temp reading after sitting in bios for 10 minutes was 26 degrees C.
After booting into windows I was still getting a constant 26-27 degrees. After a bit of use It stayed at around 33 Degrees and load temps where around mid 40s.... after over clocking to 3.7GHz temps did increase to an idle of 45 and load of 60.
After which i decided to re-apply the thermal compound. This was where i got caught out. My second re-seat left me with worse temperatures than before!! I ended up re-seating the water block another two times before i was happy. With arctic 5 there is a 200 hour burn in period so hopefully i will see an improvement in temps once burned in.
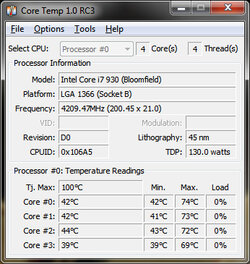
I'm now running the 950 @ 4.2GHz. I ran Prime95 on blend for 3 hours with no problems with max temp of 72.
Over all this build was loads of fun and the end result was totally worth it.
Few Questions:
How could I make this system better? I was thinking of two things:
1. A higher flowing pump
2. Three more fans in a pull config for the top of the radiator.
Also worth noting that at this clock speed I have disabled Hyper threading. Other wise temps would be too high for my liking! (80+)
Opinions/advice welcome
Started out with the following gear which consisted of:
Case: CoolerMaster Cosmos Pure
MB: Asus Rampage Extreme III
CPU: I7 950 @ 3.07GHz
CPU cooler: CoolerMaster V10
RAM: Crucial Ballistix DDR3 1600
GPU: Asus Radeon HD 5850
PSU: CoolerMaster 700W Silent Pro
Used this setup all stock for about a year an a half with windows 7 ultimate.
Since the V10 cooler is so heavy it had started to sag and I noticed it was not sitting level anymore. This however had not effected performance. I could still get initial idle temperatures of 27 Degrees C which panned out to be around 31-40 degrees with a load of 50-60. So the cooler was still perfectly secured to the cpu and mainboard.. I checked it numerous times and ensured the mobo was secured to the case...
This was when I got sick of the V10 and its huge, cumbersome nature and ventured into water cooling. I lurked the net researching the topic for about a month and slowly gathered a check list of what I needed and the key points to consider.
I decided to go for a single CPU loop with a 360 Radiator and a reservoir. I had considered getting a motherboard block as the NB and SB temps are always around the 54 and 60 degrees Celsius marks respectively. However this seems to be the usual and is nothing to be worried about so I didn't bother.
While pondering and thinking about the system I added some case fans for better air flow. For two of the fans I used a dremel to make the cut outs in the case and for the third i used three 5.25" covers to make a custom fitment in the drive bays. For these Fans I used Coolermaster Turbine Mach 0.8. This gave me the opportunity to try out the dremel as I had never used one before.
In this pic you can also see where I cut away one of the drive bay sections leaving 3 HDD bays intact. This was a pre mod making room for the soon to come pump.
Pre-mod result:
So after all the research, pondering, lists, online orders, pre-mods... I ended up with:
Rad: EK-CoolStream XT 360
Pump: Laing DDC-T1
CPU wb: Swiftech APOGEE HD
Res: FrozenQ Liquid Fusion Amber
Pipe: 1/2 with fittings to suit
Plus to shown in the pic are the extra fans I bought for the radiator and to replace the stock cas fans. From Noctua I bought 3 NF-F12 PWM's and two NF-S12B's. These plus the three mach 0.8's makes for a total of 8 fans!
I set up a test loop to make sure the rad, pump, frozenQ, and water block, were all properly sealed and water proof. I let it run for 12 hours plus in total over two days. After which I drained all the parts and made sure they were all clean and gunk free.
Next step I stripped down the case and removed everything down to two of the front case fans. I had already a plan of where each component would be placed and (hopefully) fit. So I tried out various configs with the FrozenQ and radiator. The problem here was I really wanted to 400mm Liquid Fusion and a 360mm rad however there were clearance issues with them as there would be no way to have a refill pipe leading to the top of the case as there was less than a centimeter gap between the rad + fans and FrozenQ. I solved this by having the radiator as far to the left as possible and the frozenQ all the way to the right. Made for a tight squeeze and hard install but it worked like a charm!
Now because the fittings screw into the bottom of the FrozenQ this meant i had to cut holes so that some piping was able to run underneath he case. The Cosmos pure sits up off the ground high enough to make running pipes underneath the case no problem at all.
Holes to be cut out for the running of pipes underneath the case:
Over all:
After the holes where cut Checked the radiator to make sure it woudl fit properly.. After a few niggles here and there and a few extra cuts it fit perfect. Next I installed the pump and frozenQ and secured the fittings and pips that ran underneath the case. Aft this I did a few cosmetic mods using stick on 3M Carbon Fibre film. This was used for all the cut outs that I make to the case (Can be seen in the pics).
Once I was satisfied with the placement of pipes and fittings underneath the case and the location of the pump and frozenQ.. I proceed with securing the radiator. After this I removed the V10 cooler and seated the waterblock to the cpu using arctic 5 thermal compound. I went with a small blob in the centre of the cpu and the secured the water block to the mobo.
After this I installed the mobo, psu, and pther components into the case.
Last things were conecting the remaining pips between the CPU, FrozenQ, and radiator.
Next came testing. All the fittings were wrapped in paper-towel and the pump was powered up with the PSU using the paper-clip trick.I left it running for about 3 hours before I went to bed which i then switched it off. Woke up in the morning and checked everything.. All dry so I was satisfied it was all water tight.
onto the final pics:
Top of case- Radiator and filling port
With a simple yet effective filling port extension.
My cable management isn't too bad but still could be alot better! Though I'm not too fussed about it.
Very first temp reading after sitting in bios for 10 minutes was 26 degrees C.
After booting into windows I was still getting a constant 26-27 degrees. After a bit of use It stayed at around 33 Degrees and load temps where around mid 40s.... after over clocking to 3.7GHz temps did increase to an idle of 45 and load of 60.
After which i decided to re-apply the thermal compound. This was where i got caught out. My second re-seat left me with worse temperatures than before!! I ended up re-seating the water block another two times before i was happy. With arctic 5 there is a 200 hour burn in period so hopefully i will see an improvement in temps once burned in.
I'm now running the 950 @ 4.2GHz. I ran Prime95 on blend for 3 hours with no problems with max temp of 72.
Over all this build was loads of fun and the end result was totally worth it.
Few Questions:
How could I make this system better? I was thinking of two things:
1. A higher flowing pump
2. Three more fans in a pull config for the top of the radiator.
Also worth noting that at this clock speed I have disabled Hyper threading. Other wise temps would be too high for my liking! (80+)
Opinions/advice welcome
Attachments
-
 5.jpg34.5 KB · Views: 869
 -
 6.jpg100 KB · Views: 876
 -
 IMG_8993.JPG153.5 KB · Views: 1,056
 -
 IMG_9016.JPG152 KB · Views: 884
 -
 IMG_9021.JPG208.1 KB · Views: 885
 -
 IMG_9043.JPG245.9 KB · Views: 1,264
 -
 IMG_9045.JPG190.3 KB · Views: 868
 -
 IMG_9051.JPG189.2 KB · Views: 903
 -
 IMG_9052.JPG200.1 KB · Views: 909
 -
 cpu.jpg65.1 KB · Views: 843
 -
 Core_Temp.jpg44.1 KB · Views: 828
 -
 1.jpg40.4 KB · Views: 944
 -
 2.jpg74.3 KB · Views: 912
 -
 3.jpg75.7 KB · Views: 1,203
 -
 IMG_8983.JPG44.5 KB · Views: 885
Last edited:

 ... I thought that I want one too , then I checked price and I decided that I can live without it