- Joined
- May 15, 2006
I've been thinking of this idea for some time now, and I finally got around attempting to create a custom cable. Yes, attempting. Tonight was a complete failure. I have some more parts on the way, to make this simpler.
Parts needed:
Straight SATA connectors (Mouser - 538-67489-8005; Manufacturer - 67489-8005)
or
90 degree SATA connectors (Mouser - 538-67489-1005; Manufacturer - 67489-1005)
Small solid wire (Mouser - 566-9976-100-10; Manufacturer - 9976 010100)
Very small heatshrink (Mouser - 602-221364-4BK; Manufacturer - FIT221B3/64 BK100)
A lot of patience (Mouser - ????????; Manufacturer - You)
------------------
As mentioned, this is a failed attempt, but I learned from it which should (hopefully) make next time cleaner. For this attempt, I'm using the straight SATA connector with 20" 26 AWG solid core wire. If you attempt this, I would strongly suggest solid core as it is much easier to work with.
Here is the equipment I used. One of the alligator clips on the holding tool has heatshrink over each half. This makes it grip a lot better and prevents it from cutting into materials (wire).

Close-up of the soon-to-be-mangled SATA connectors.
20 inches of 26 AWG solid core wire cut and ready to go. Since my wire stripper couldn't do 26 AWG wire, I had to use the cutters on it instead.
Close-up of thevictim SATA connector.
First wire attached. I put solder on the bare wire and used the soldering tip to move the blob around and coat it. I then heated up the blob and "flicked" it off so there was very little solder left on the wire. I held the tinned wire in place and simply held the soldering tip on for a few seconds to solder them together.
I used the tool to also hold my solder. Made this much easier. I also realized that my glasses are in the picture, nice.
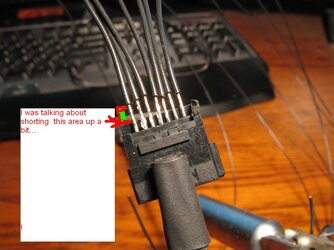
Close-up of the finished soldering job. You can see on the right side where I melted a bit of the plastic. I didn't see it and ended up hitting it with the soldering iron a few times. I'll learn for next time.
But Thideras, those look great, how is that a failure?
First, I hit the connector with the iron. While this doesn't impede on connecting it to a controller or hard drive, it looks bad and shows how inexperienced I am with this type of connector. To fix this, I'll simply solder it in reverse order and flip the connector around. The second I didn't take a picture of because I didn't think of it. One of the wires did come undone, but that wasn't helped by me attempting to mash on the wrong sized heatshrink. Which brings me to the next part, you need really small heatshrink for this. I used 1/16" and it was far too large (easily 2x). I ordered 3/64" tonight, to see if that will work better.
This portion is the easy part. The other side of the connector has to be assembled before I can solder it. Meaning, I have to have the sleeving for the cable, heatshrink for each wire and heatshrink for the sleeving. I could see this being near-impossible on short cables.
Parts needed:
Straight SATA connectors (Mouser - 538-67489-8005; Manufacturer - 67489-8005)
or
90 degree SATA connectors (Mouser - 538-67489-1005; Manufacturer - 67489-1005)
Small solid wire (Mouser - 566-9976-100-10; Manufacturer - 9976 010100)
Very small heatshrink (Mouser - 602-221364-4BK; Manufacturer - FIT221B3/64 BK100)
A lot of patience (Mouser - ????????; Manufacturer - You)
------------------
As mentioned, this is a failed attempt, but I learned from it which should (hopefully) make next time cleaner. For this attempt, I'm using the straight SATA connector with 20" 26 AWG solid core wire. If you attempt this, I would strongly suggest solid core as it is much easier to work with.
Here is the equipment I used. One of the alligator clips on the holding tool has heatshrink over each half. This makes it grip a lot better and prevents it from cutting into materials (wire).

Close-up of the soon-to-be-mangled SATA connectors.

20 inches of 26 AWG solid core wire cut and ready to go. Since my wire stripper couldn't do 26 AWG wire, I had to use the cutters on it instead.

Close-up of the

First wire attached. I put solder on the bare wire and used the soldering tip to move the blob around and coat it. I then heated up the blob and "flicked" it off so there was very little solder left on the wire. I held the tinned wire in place and simply held the soldering tip on for a few seconds to solder them together.

I used the tool to also hold my solder. Made this much easier. I also realized that my glasses are in the picture, nice.

Close-up of the finished soldering job. You can see on the right side where I melted a bit of the plastic. I didn't see it and ended up hitting it with the soldering iron a few times. I'll learn for next time.

But Thideras, those look great, how is that a failure?
First, I hit the connector with the iron. While this doesn't impede on connecting it to a controller or hard drive, it looks bad and shows how inexperienced I am with this type of connector. To fix this, I'll simply solder it in reverse order and flip the connector around. The second I didn't take a picture of because I didn't think of it. One of the wires did come undone, but that wasn't helped by me attempting to mash on the wrong sized heatshrink. Which brings me to the next part, you need really small heatshrink for this. I used 1/16" and it was far too large (easily 2x). I ordered 3/64" tonight, to see if that will work better.
This portion is the easy part. The other side of the connector has to be assembled before I can solder it. Meaning, I have to have the sleeving for the cable, heatshrink for each wire and heatshrink for the sleeving. I could see this being near-impossible on short cables.
Last edited: