• Welcome to Overclockers Forums! Join us to reply in threads, receive reduced ads, and to customize your site experience!

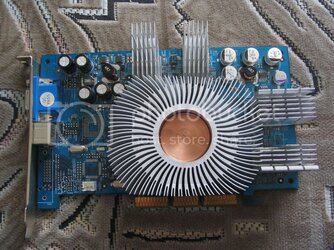
GeForce4 Ti cooling (not stock), 54k - beware

Overclockers is supported by our readers. When you click a link to make a purchase, we may earn a commission. Learn More.
Ven0m said:
There are no radioshack stores in Poland, but there are lots of other electronics shops around.

:bang head sorry didnt notice that..

and to answer on th prog and switch thing.. you are getting pretty deep for this particualr card.. although testing and meesing around it would be cool..

i just think a simple vmod and better fan controller would be better though.. good luck !!
 
yeah I just modded my 4200 with the passive vm101 from aerocool and it runs 320/540 with no fans and no artifacts but I am in a big tower with quiet 120mm case fans so temps stay under 26C in the case with some airflow.


how do you run the card at different clocks for 2d mode?
 
el said:
yeah I just modded my 4200 with the passive vm101 from aerocool and it runs 320/540 with no fans and no artifacts but I am in a big tower with quiet 120mm case fans so temps stay under 26C in the case with some airflow.


how do you run the card at different clocks for 2d mode?

Your mod sounds cool, so can we see some...
PICS, PICS, PICS :D

2d / 3d - I use rivatuner low-level speed settings + rivatuner launcher and monitor - now my bindings are:
ctrl + shift + 1 - stock speed (250/446)
ctrl + shift + 2 - passive (150/300)
ctrl + shift + 3 - OCed (320/580)
ctrl + shift + 4 - high OC (328/594)
ctrl + shift + v - speed monitor

It works pretty well. I was thinking about making an application that would monitor newly run applications and change speed settings. Problem is unstability, when you change speed a lot when game is on. So now it's crtl+shift+3 before game and 2 after. With this heatsink my card can run passive at pretty high clock rates, but I don't want to stress it without a need.
 
Ven0m said:
Your mod sounds cool, so can we see some...
PICS, PICS, PICS :D

2d / 3d - I use rivatuner low-level speed settings + rivatuner launcher and monitor - now my bindings are:
ctrl + shift + 1 - stock speed (250/446)
ctrl + shift + 2 - passive (150/300)
ctrl + shift + 3 - OCed (320/580)
ctrl + shift + 4 - high OC (328/594)
ctrl + shift + v - speed monitor

It works pretty well. I was thinking about making an application that would monitor newly run applications and change speed settings. Problem is unstability, when you change speed a lot when game is on. So now it's crtl+shift+3 before game and 2 after. With this heatsink my card can run passive at pretty high clock rates, but I don't want to stress it without a need.

do you have any guides on how to work riva tuner? the software creator is so great creating the software, he just happened to make one of the most complicated interface in the freaking world of software. sorry i'm a little **** messing around for 2 hours and getting no where, Why is it that everytime i change the setting on the clocks it won't let me save the profile?
 
warlock110 said:
do you have any guides on how to work riva tuner? the software creator is so great creating the software, he just happened to make one of the most complicated interface in the freaking world of software. sorry i'm a little **** messing around for 2 hours and getting no where, Why is it that everytime i change the setting on the clocks it won't let me save the profile?

hehe I haven't seen any guides, but I use it for pretty long and got used to how it works, so let's call it "guide by me":
Before everything - open speed monitor (you may configure it too)
- click launcher tab
- click +
- rivatuner module activation item
- choose proper name, like speed monitor
- click on associated key and make some combination (ctrl + shift + v in my case)
- module type - low level module
- module name - hardware monitoring
Now you have set monitoring, enable it and for a while (during setting OC speds) keep in visible place

To save profile - go to overclocking settings (I preffer low-level), set OC, click test, wait. When speed is tested, apply it.
Now, "save overclocking profile" icon is enabled, click it and set proper name for profile. Before any overclocking I suggest to save default settings somewhere.
Make set of profiles.
Now, it's time to bind for keys.
- go to launcher
- click +
- regular item
- enter proper name (like in my case "OCed (320/580)" )
- click on associated key and make some combination (ctrl + shift + 3 in my case)
- click associated I/I clock frequencies, choose proper profile
- if desired, choose other options / profiles
- click Ok
Ok, that's all. In main appwindow, I suggest to choose settings, I've set it to send to tray on close and to run at Windows startup. Restart RivaTuner to save settings.
You can open monitor again and play a bit with shortcuts. :)
 
Ven0m said:
hehe I haven't seen any guides, but I use it for pretty long and got used to how it works, so let's call it "guide by me":
Before everything - open speed monitor (you may configure it too)
- click launcher tab
- click +
- rivatuner module activation item
- choose proper name, like speed monitor
- click on associated key and make some combination (ctrl + shift + v in my case)
- module type - low level module
- module name - hardware monitoring
Now you have set monitoring, enable it and for a while (during setting OC speds) keep in visible place

To save profile - go to overclocking settings (I preffer low-level), set OC, click test, wait. When speed is tested, apply it.
Now, "save overclocking profile" icon is enabled, click it and set proper name for profile. Before any overclocking I suggest to save default settings somewhere.
Make set of profiles.
Now, it's time to bind for keys.
- go to launcher
- click +
- regular item
- enter proper name (like in my case "OCed (320/580)" )
- click on associated key and make some combination (ctrl + shift + 3 in my case)
- click associated I/I clock frequencies, choose proper profile
- if desired, choose other options / profiles
- click Ok
Ok, that's all. In main appwindow, I suggest to choose settings, I've set it to send to tray on close and to run at Windows startup. Restart RivaTuner to save settings.
You can open monitor again and play a bit with shortcuts. :)


That's so cool :) thanks alot man, saved me alot of trouble there, BTW what do you get for your 3Dmark score 01 and 03? my card is kindda crap, @ 290/600 it's getting 10K on 3Dmark01, and 1300 on 3Dmark03, kindda dissapointing because my old Abit 9550 did 3300+ on 3Dmark03, this is not what i'm expected, i'm gonna get a new card but i guess this one can be my spare card. Maybe something is wrong, my CPU is @ 3.8ghz and my RAM is dual channel 1GB @ 210mhz, it shouldn't be the bottle neck of this card.

Although check the scores of other people, i have seen them @ my range, but for some reason others are scoring well over 2K on 3Dmark 03 with systems not as good as mine :(
 
what are you using for the mounting mechanism? my guess as to the whole process:

- you marked holes for drilling through the card onto the heatsink.
- you drilled the holes then tapped them (but i don't have a tap :().
- you used 4 headless screws, 4 washers, 4 springs and 4 nuts - the washers and springs went on the card underside, the screws through the card and into the heatsink, then the nuts tightened down onto the springs for pressure.
- the heatsink didn't fit when installed so it had to have areas cut off :)
- happy ending.

i'm not brave enough to start drilling with my first vga heatsink attempt, i'll just be using 1u copper parts attached with zip-ties. i guess since i can't tap holes, i'll pull the old trick of driling holes then jb-welding some headless screws to stick out the bottom of the heatsink - that way instead of screwing in the mounting system from the card underside, the mounting screws are already there, you just need to add washers, springs and nuts from the underside. i guess screws with large-enough heads would suffice, but they wouldn't be common for such small hole sizes (i guess?).

nice mod, i'm glad to see people trying it and finding success. i always hated vga vga heatsinks with 50 grams of aluminum and a 40mm fan. you could screw a piece of aluminum siding onto the card and still do better than most stock coolers.
 
yeha - almost :D
So there, story begins:
Yes, I drilled holes through card, but in plexiglass template. These card holes have metal enforcements, plexi is soft, so there was no risk. Problem was finding proper drill - these holes are weird. 2mm drill was way too small, while 2.5mm was too big and couldn't fit. Fortunatly my grandpa had 2.45mm drills, which fit perfectly. After making a template, I clemped it to heatsink. At first I thought it wouyld fit perfectly, but I found that there would be serious problems with drilling, so I rotated template a bit to make holes fit gaps between fins. Holes were drilled and tapped (my dictionary is poor, so if 'tap' isn't word I wanted, it was process of making machine screw fit the hole :) ). I used 2.5mm machine screws, but I tapped them a bit to reduce diameter to fit hole (not very needed, but I wanted to minimize tensions). These were normal machine screws, around 15mm long I think. There was also set of washers, but no springs. My grandpa told me that using springs would be better, but I just trusted my hand to make screws apply proper pressure (after process, card wasn't bent). Of course, before mounting, base of sink was lapped up to grit around 2000.
Then it happened - OMG, it will not fit, ever aaaaaa :D
So there was quest for tools - a set of files, sharp knife, metal saw. Part of heatsink was cut off and corrected with a file, but ther some nasty spikes appeared. I cut them off without problems. Heatsink was done.
Then it happened again - aaa, fan won't fit. Enclosure of this fan is pretty interesting and too big to fit. I had to cut it a bit. Dang, it's some crazy hard plastic. Again, file and knife helped.
Ok, fan fits, but it falls off because it lacks attachments :D So we grab driller, some screws, nuts. Then we grab metal sheet (chrome-nickel I think), cut and bend to make new attachments, mount to heatsink with screws.
Happy ending #1

CM cooler part - fan was removed, cooler cut into 8 pieces. Using some files, bases heights were decresed, to reduce weight. Then I flettened bases by lapping with sanding paper, starting with very low grid to repair bumps from file up to something around 2000. Card and sinks were cleaned with alcohol, mounted with thin thermo-conductive 3M tape. I didn't want to use glue, just in case I wasn't satisfied with mod.
Happy ending #2

Still waiting for happy ending #3, as I hadn't got time to finish remaining 4 sinks (used only 4).

If only you have tools and time and you want to make it, everything can be done (well, almost). And screws - you can get any screws you want, I guess.

warlock - just now I'm after Windows reinstall and during drivers testing. System is untweaked, drivers - second I try - 45.23 (I'll probably end with some 60s or 70s as they have better image quality). Benchmarked @ 320/580, image quality set to high, CPU is Barton 2500+ running at stock ~1.8GHz. Memory runs at 2.5-3-3-6, 166MHz, but I'll change it to 2-2-2-5 in some future, as it's BH-5. Just for fun I benchmarked with programs I use every day - Firefox opened on this page and Folding at Home running, results are 11.5k in 01 and 1.9k in 03.

After Xp --> Mobile mod, which I'm planning to apply soon, I should be able to hit something around 13k / 2k, or very possibly around 10k in 01, as new drivers result in bad 3dMark scores. Personally I don't care 3dMark results, when I can play most of games I want at reasonable quality (like UT2k4 1024x768, details to max except lod or CS: Source 1024x768 with details to high and anizo to 4 silently or anizo 8 at higher fan speeds). Of course, you can hit much better scores with special drivers, but what's the point in installing drivers that give so ugly image that they can be used only for better 3Dmark scores?
 
Last edited:
tap is the right word, because you use a tap to do the tapping :)

i guess i'll have to go borrow a tap for the operation - i'd rather not jb-weld some screws into the heatsink in case i want to re-use it for something else, which would mean sawing and lots of filing to get a flat base again. hopefully the zip-tie method will be able to exert enough pressure for starters.
 
Nice job.
Maybe try putting in a slot cooler. IT'll run pretty much siliently and also help support the added weight of the card. Besides that I should take a fair amount of the warm air and kick it out the back of the case.
 
Update:
vga_recent.jpg
I decided to remove Nidec fan some time ago - it was way too noisy. Now it's chilled by some pretty silent 80x25mm fan at 5v sitting on PCI slots.

TODO:
- add remeining 4 RAMsinks
- make custom card mounting bracket with less air restriction to replace stock
 
still workin on this card?? nice!

btw, whats with the vacant DVI slot?? I could send you my snapped-in-half FX5600 and PCI backplate, and you can de-solder my DVI slot from my fx5600, solder it onto your ti4200, and then take my backplate... it should work

I say you get a spacer to screw in between the fins of the heatsink, and then screw a fan into the spacer.
 
I'm not sure why you even need a fan on that GeForce 4. I have a GeForce 4 that runs fine with passive cooling (think of a Pentium 1 heatsink, but without the fan). It has never gotten too hot to touch. Maybe it has to do with the fan I installed in the front of the case...
 
With high OC it is pretty hot, other thing is that I have no case fans right now, as I have no case. (sig is misleading) Mobo is placed vertically and it doesn't help with passive airflow; still that fan rotates at <1000RPM according to my bet. I think it might work passive, but high OC in games and pasive cooling is too much. Small fan that I can't hear at all does its job. Airflow is close to none, but it's enough to keep this heatsink cool.
I don't work much on this card, just change some stuff from time to time.

I don't really need DVI, as I have CRT display. Custom bracket was just meant to end just after VGA connector, to help with airflow. Thanks for offer anyway.

Too bad that I haven't got camera...
 
Just had a friend do a similar mod with a Ti 4800. Weird thing is when the owner was trying to get the stock sink off he bent the board a bit too much and heard a pop sound. Tried heating, cooling and everything we could think of but it wouldn't budge. So, he used a 12 ounce hammer. When I came over I cleaned the GPU and noticed it did say Ti- 4800, but then later on start up it called out Ti 4600. Maybe the pop sound? At any rate it runs at 4600 speeds + now completely stable and has an aluminum AMD HSF on it now.
 
Cool that it works. 4800SE used to be something like 4400.
Stock cooler removing is often pretty problematic. I had to use pincers and slightly scratched PCB, but no tracks were broken, so I fixed it with non-conductive paint. These Ge4 were pretty good cards, I can still play most of games, and if someone has one with fast RAM, like 4600, 50FPS in Doom3 on medium should be possible to achieve.
 
Last edited:
Hey glad to see your still getting some life from this. I had an 80mm fan attched to mine on the backside being held by like 2 cms of glue gun so it wasnt directly touching. It worked well and I got decent clocks. I know have a 4600 with a fan below it, glued to a old modem aiming up.
 
Back