• Welcome to Overclockers Forums! Join us to reply in threads, receive reduced ads, and to customize your site experience!

Higher GPU Watercooling temps than stock air cooler.

Overclockers is supported by our readers. When you click a link to make a purchase, we may earn a commission. Learn More.

JarlBalgruuf

New Member
Joined
Nov 18, 2016
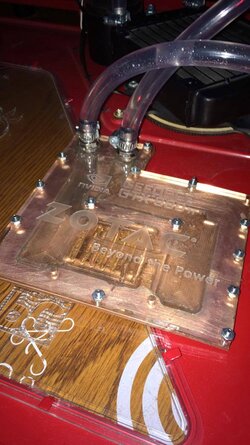
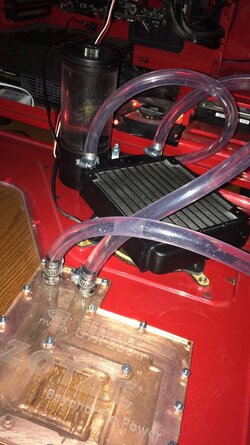
So I have spent the past 2 weeks making a custom waterblock for my GPU since only one company makes one and is asking $200 for it. (Zotac GTX 980 ti Amp extreme) . I milled out the copper and acrylic and made the block. The highest temp ive ever gotten with my air cooler is 71 C after hours of playing BF1. After I mounted my waterblock and got the loop all running, I booted my PC and launched BF1, I immediately noticed that my idle temps were around 40 C, as compared to my Air coolers 28-30 C. Within 5 minutes of playing BF1 I was up to 73 C. (Highest temp ive seen yet). Why is it that my watercooling is not working as it should?. Things ive checked: Fan is pulling air out of radiator, not blowing in. I am getting good flow through the waterblock. The thermal paste was applied correctly and the waterblock is mounted correctly, just as the stock cooler.
The only thing I can think of is the air bubbles, Ive bled it out 3 times and there are still a few little bubbles in the block. Does anyone have any idea what my problem might be? And do air bubbles really impact temps that extremely?

Note: The pictures were taken right after took the block off because I saw the higher temps. 15133796_1329921550386651_162754854_o.jpg 15133891_1329921840386622_1009040337_o.jpg
 
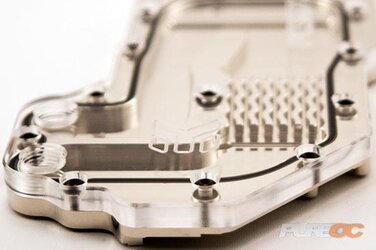
It looks like you just ran a ball nose endmill through heat transfer area. You need thin fins to transfer the heat.
You also need a gasket groove. That is a leak waiting to happen.

Looks like a great project but needs a little more planning. Does this touch the VRM section of the card?

You may be able to improve this block but I would need some measurements.
 
I'm going to guess part of the issue is the block itself (as was said above) and the single 120mm radiator trying to cool 250W worth of heat.
 
It looks like you just ran a ball nose endmill through heat transfer area. You need thin fins to transfer the heat.
You also need a gasket groove. That is a leak waiting to happen.

Looks like a great project but needs a little more planning. Does this touch the VRM section of the card?

You may be able to improve this block but I would need some measurements.

Thanks for replying! , I did use a 1/8" ball nose endmill (Didn't have any other bits at work). I used a sealant around the block so leaks aren't an issue. I saw some blocks without thin fins so I didn't think it would be a huge problem. And no this doesn't touch the VRM side. I'm probably going to fan cool it if I can get this working correctly. The stock cooler just has a fan blowing overtop of the VRM side.

- - - Updated - - -

Here is an EKWB block I saw with large fins. ek_fc5870_8-260x173.jpg
 
How thick is the material in the transfer section?

If you stand the block up in a vise on the cnc, Run a jewlers saw in a long arbor you should be able to create the fins you need.

That sealant will eventually leak. The copper and the acrylic expand at different rates. It will fail. Draw your groove and then calculate the overall length. Adjust it so you can buy a stock buna o-ring.

I would also like to see a pic of the contact side of the block.

As EarthDog said, you do not have enough rad.
 
Last edited:
How thick is the material in the transfer section?

If you stand the block up in a vise on the cnc, Run a jewlers saw in a long arbor you should be able to create the fins you need.

That sealant will eventually leak. The copper and the acrylic expand at different rates. It will fail. Draw your groove and then calculate the overall length. Adjust it so you can buy a stock buna o-ring.

I would also like to see a pic of the contact side of the block.

As EarthDog said, you do not have enough rad.

The copper itself is .125" (1/8") thick. and the acrylic is 1/4" thick. the channels are milled .1" into both the copper and acrylic. so the channels are .2" tall total. I didn't do any milling on the contact side, it is just flat. I used the thermal pads and paste when I mounted it.
 
Looking at the copper I am guessing that you are doing this on a home CNC router? Do you have access to a bridgeport mill or other milling equipment?
 
120 mm rad is light...but temps shouldn't be in the 70s. My Titan X P AIO mod only has a 120 mm rad, but it stays in the mid 40s for temp when drawing 300 W.

I would check:
- make sure you Are making good contact with the GPU die
- make sure you don't have stagnant water around the GPU (if you have an IR camera you check...or you can carefully use your finger at idle)


I used an Intelitek Prolight 1000 mill to do the main milling and a drill press to do the drilling for the mounting holes. The smallest bit we had for the mill was 1/8". Ive seen other blocks with large fins so I don't think that's what the problem is. I am getting good flow as well. It may not be getting good contact with the GPU die as JrClocker mentioned. I will remount it tonight and try again. and post the results.
 
Back