VogonPoetry
New Member
- Joined
- Jun 5, 2016
Well, I finally did it! Air cooling has treated me well for a very long time, but my interest in WC finally peaked and I just had to go for it. I took a good hard look at all those AIO coolers that are so popular, but most of them don't perform much better than a top shelf air cooler and even the best of them aren't super impressive. Plus, most of them depend on ridiculously fast fans to dissipate a respectable amount of heat, at the cost of being unacceptably loud. AIO's are just not for me I guess. Thus began about 5 solid months of research, planning, and pricing a custom loop. The research process was, and still is, a blast. I've learned WAY more about cooling in general than I ever imagined I would need to know, even some pretty obscure stuff. Maybe later I'll dig through the dozens of bookmarks I've accumulated over the last several months and compile a list of sources that helped me the most.
The whole idea of this loop is maximum rad surface area I can stuff into the chassis and low(ish) noise. I'm aware the loop is overkill for the hardware I'm cooling, but 'why the hell not?' Very little effort was put into aesthetics aside from the black/orange color scheme.

^ All tubed up, no water. Ignore the fan cables toward the bottom, they're hidden now.

^ Had to trim the EK CPU backplate thanks to my silly old motherboard.

^ During the initial fill process, burping out the air. Not real happy with how awkward the connections on the CPU block look. Not real pleasing to look at, but whatever. Also ignore the random photobombing SATA cable, this was during the leak test and nothing but pumps and fans were hooked up so unused cables were tucked wherever they'd be out of the way. Thanks to magical hidden zip ties, that tube on the bottom-right no longer lays on the GPU like it does in these pics. Looks a little better.

^ The 7th forward-facing g1/4 outlet on the XSPC GPU block helped a lot making that run up to the front rads. Could have been a lot uglier than it looks now. Also check out that awkward little run between the res and pump top inlet. I'm happy with how it worked out but I panicked a little figuring out how to orient the pump inlet since the res pretty much HAS to be mounted exactly where it is, otherwise I'd have to drill holes for the res brackets somewhere else, which I'd rather not do.

^ A view of the jump between the side and front rads. I invented at least 7 new curse words over 45 minutes getting that one little piece of tubing in there. I could only use one hand due to the tight quarters, it takes 50 frickin' lbs of pressure to get that tubing to seat into a fitting, both fittings are 45* rotarys on each end so as soon as I began pushing the tubing on they immediately turned sideways and the tubing popped off, and all of this had to be done by FEEL since once my hand was in that tiny space I couldn't see a damn thing. Needless to say, if I ever have to replace that tubing I'll rig it up differently.

^ In case anyone's curious, a 240x30mm rad DOES fit in the very front cavity of the Enthoo Primo where the factory 140mm intake fans would normally be with ports facing upwards and downwards with the filter and front mesh installed. I'm not doing it this way, but in case anyone was considering it, there you go, it works.


^ How I rigged up the dedicated drain port on the UT60 bottom rad. Cool feature, Alphacool.

^ Just a demonstration of how crowded the fittings get on the Coolplex Pro res. No way in hell those fittings would have fit in there if they weren't both rotary. Also a fancy American beer, unrelated.

^ All 4 rads were flushed for over 2 hours each. About 15 minutes of shaking with hot water and vinegar, drained and ran more water through to clear out the vinegar, then a couple of hours in the bathtub hooked up to the pumps. Drilled a hole in the bottom of a clean 5 gallon bucket just barely big enough for the g1/4 end of a 3/8" barb to fit through, then screwed a ball valve on the exposed threads inside the bucket with an extra o-ring so I could reach in and shut off the flow while I changed rads without losing any water. Filled the bucket with distilled water and sat it on the ledge of the tub above the pump on the floor below hooked up to an extra power supply. Used 3 sections of cheap vinyl 3/8ID tubing to run from the barb on the bucket to the pump, then to the rad, then the last section returning to the bucket had an inline fuel filter for a riding mower spliced in to catch any particles. Pumped through the rad in one direction for an hour, then swapped tubes to flow the other direction for another hour, tilting the rad around until all the air bubbles went away. Rads were surprisingly clean, very little came out during the vinegar shake smaller than a grain of sand, and by the end the fuel filter caught just a little bit more. Not at all as bad as some of the horror stories I've heard about rads full of huge globs of flux and debris. Well done Alphacool for not leaving a bunch of junk inside your rads! Same process applied to CPU and GPU blocks minus the vinegar and shaking.

^ A vew of the bottom of the case after bolting in the UT60-360 with the base and filters uninstalled. Not real happy about that last fan being half blocked. Wish that area had holes like the rest of it.

^ Remember that clever drain port I put on the other end of the bottom UT60 rad? Guess I didn't need it after all. Hooray for poor planning! I REALLY need to paint that power supply.
Alright, now here's all the TL;DR details and thoughts:
# Chassis
Phanteks Enthoo Primo SE black/orange. A real pleasure to build in. Very well thought out with only minor QC issues like the orange paint on the forward panel being slightly thinner than the orange paint on the motherboard tray and PSU cover. Finally bought a chassis that didn't immediately give me buyer's remorse.
# Rads
Alphacool XT45 480mm push/pull top
Alphacool UT60 360mm push/pull bottom
Alphacool ST30 240mm push front
Alphacool ST30 240mm push side
The original idea was going to be 3 rads, XT45-480 top, UT60-480 bottom, and ST30-240 side, but shortening the bottom to a 360 gave enough room at the front of the case to add a fourth ST30-240 rad, thus gaining an additional 120mm surface area in the loop and leaving enough room in the end of the UT60 to take advantage of its wonderful 7th drain port. Also glad I went with a 480 top rad instead of a 420 as the narrower width stands away from the motherboard tray far enough to get your hand in there and sneak cables around.
# Fans
Cougar Turbine CF-T12 Orange 120mm (60cfm/1.73mmH2O@1200rpm). 18 on the rads, 1 more at the rear for exhaust because why not. They're not the most impressive specs on paper but they fit the minimal-effort black/orange color scheme of the case. All the rads are low FPI, their sound level is very good with the fan controller, I've already trusted them in 2 systems for several years now, and frankly at $26USD for a box of 4 fans ($6.50USD each) that's too good to not use. I need 18 fans for the loop so $117 total for these Cougars vs. ~$300+ for Vardar's, NB's, SP120s, etc and wouldn't fit the color scheme? Pretty easy decision. All hooked up to x2 NZXT Sentry Mix 2 fan controllers on the lowest speed with a bunch of 2-way splitters.
# Fittings
Alphacool black straight, 45* rotary, and 90* rotary 3/8-5/8 compressions, 2 ball valves, 90* rotary male-female, straight male-male rotary extenders, plugs, and a couple 3/8 barbs to be used only for flush/fill/drain. Boy am I disappointed with these fittings. Don't get me wrong, they function perfectly, none of them leaked a bit, and they're very inexpensive compared to Bitspower, EK, etc. but that's where the good aspects end. The female threads on most compression collars were gritty and full of burrs, making them catch as they were tightened down. I even had to use a brass brush from a gun cleaning kit on 2 of the male collar threads because they gooped paint on so thick the collars wouldn't even begin to thread on. The black finish is wildly inconsistent from one fitting to another ranging from flat dark grey to glossy black, and all of the 90s and 45s have very obvious machining marks, areas where solder/weld was too thick, and paint runs. Some fittings have the old gold Alphacool logo, some have the new blue logo. Comparatively, all 4 of the Alphacool radiators have perfect finishes and look outstanding so such a disparity to their other products is unexpected to say the least.
# Tubing
Primoflex LRT UV Pearl Orange 3/8-5/8". I went with this orange tubing after a lot of reading about people's bad experiences with dyes, pre-dyed fluid, nanofluid, etc. I decided just using orange tubing with regular distilled water was a much better idea than clear tubing with orange fluid. I'm happy with it, but man was it a pain to work with. The thick walls make it very rigid, as opposed to 3/8-1/2" and super hard to push onto fittings. The good news is, it makes really tight turns without kinks.
# Pumps + Top
x2 Alphacool VPP655 D5 solo's on an EK Xtop Dual D5 Serial top. This top is a pretty new product and there's surprisingly very little information about it. I'm aware that dual D5's are probably overkill for this build but 'why the hell not?' I'm seriously surprised how quiet both of these pumps are full throttle. The first time I used it to flush the rads outside of the system I felt compelled to constantly touch it to convince myself it was running at all. I suspect the overall mass/weight of the whole assembly helps with this a bit, but more than that the rubber saddles on EK's brackets dampen the vibes and noise significantly. With both pumps running on speed 5, holding it up by the brackets I can barely feel the vibes. By the way, I really underestimated how high the pump was going to sit in the case. Specifically the height of the inlet port relative to the bottom outlet on the res. Made it work anyway. See pics. The Xtop Dual comes with brackets for mounting the assembly to 120 or 140mm fans. The brackets therefore were 140mm long and of course hang over the fan they're mounted to 1cm on each end. This caused clearance issues in the case with the PSU cover panel. Had to cut them down to 120mm length and spray paint them. Worked like a charm.
# Reservoir
Alphacool Coolplex Pro 25LT. Chosen mostly because of the 50mm width vs more common 60-70mm tubes. I noticed in other peoples' water builds in the Enthoo Primo case that using wider tubes on the factory res bracket could crowd the GPU a bit. Turns out going to a 50mm tube was a bit of an overreaction; there's plenty of room for a wider res like a Bitspower water z-multi (which is what I wanted) with no issue. The GTX980 is only 10.5" (if I recall? Correct me if I'm wrong) but some GPUs obviously are a ton longer and may even require the res bracket to be removed completely. This res normally comes with 3 ports on one end and 1 port on the other, but since I wanted to use 2 ports on both ends (return and dedicated fill on the top, outlet to pump and drain valve on the bottom) I got another similar Alphacool res pretty cheap so I could steal the 3 port end from it and stick it on this one. Works well enough, but being so narrow the fittings get very crowded. There's not quite enough room to fit more than 1 regular 3/8-5/8 compression fittings on each end, but barbs do fit next to each other just fine, and obviously my rotary 90* and extender+ball valve fit well enough.
# CPU block
EK Supremacy EVO Acetal/Nickel, no silly circles. Luckily it comes with the recommended jet and forcing plate for LGA1366 CPUs already installed. Chosen based on good delta temps, reasonable restriction compared to other blocks, and plain good looks.
# GPU block + backplate
XSPC Razor full cover GTX 980 block and backplate. I honestly would have preferred EK's FC-980 block for the lower restriction and better deltas. Full disclosure, I was relying on my Newegg credit line to purchase most of the components of the loop and the ModMyMods vendor stocks this XSPC block/backplate on the Newegg Marketplace. I found some head-to-head benchmarks of both blocks and decided the XSPC block was competitive enough to the EK block and went for it so I could charge it to my Newegg credit line. Will I regret getting this instead of the EK block I wanted? We'll see, my guess is probably not. Props to XSPC for supplying a pair of ridiculously bright blue LEDs with the block, but it would have been nice if I could've chosen a different color since those magnificent blue LED's look goofy with my orange theme. BIG props to XSPC for putting a forward-facing 7th port on it too, came in really handy for making that run up to the front rads.
# Other
Silver kill coil from ModMyMods
Gelid GC Extreme TIM on both CPU and GPU
Ironically, I ordered a tube of Gelid GC Extreme TIM not knowing that EK includes a tube of it with their Supremacy EVO CPU block. Not complaining, extra is good. The XSPC GPU block also came with K3 TIM which also happens to be fairly decent stuff.
# Future?
Flow meter. I want to see specifically the flow rate of the loop. Mostly out of curiosity but also as an indicator of flow degradation?
Temp sensors for the water. Again, mostly for curiosity rather than necessity.
UV strips to make the tubing light up
Replace the smoke plexi window on the Enthoo Primo with clear so I can actually SEE my fancy WC stuff
# Lessons Learned
-Buy lots of extra plugs. I ordered 10 extra black plugs to match the build, but that wasn't enough. Turns out Alphacool and XSPC ship silver plugs with black rads, res, and GPU block? What the hell guys?
-Buy lots of extra 30mm screws. These rads came with enough 30mm's for one side and enough 35mm's for the other side (example, the 480 rad came with 16x30 and 16x35), but the 35mm's were always way too long and didn't use a single one of them, thus the number of 30mm screws I needed DOUBLED in the case of push/pull rads, but obviously I didn't have enough. Had to resort to using only 2 screws per 120mm fan in opposite corners, which bothers me, meanwhile I have a ton of matching 30mm screws ordered to fix that.
-Alphacool XT, UT, and Monsta rads have 6 ports on the inlet/outlet end. 2 on each side and 2 on the end. The plugs you install on the sides will stand maybe 2mm above the flat surface of the shroud. So if the rad is mounted directly to the chassis like I did with the XT45-480 it won't sit perfectly flush. This potentially leaves a really thin gap between the chassis and the rad, creating a tiny space for air to suck through instead of being pulled through the rad. Not a problem for Push with fans on the bottom side, but potentially a problem for Pull with fans on the other side of the chassis. I'm going to have to order at least a 3mm thick 480 gasket to seal that gap.
Yes, I'm aware that the blue motherboard and red memory really kill the color scheme, but when I move to x99 they'll be replaced.
# System specs for anyone curious
Phanteks Enthoo Primo SE Orange/Black
Old as dirt ASUS P6X58D Premium motherboard
Old as dirt Intel i7 920 Bloomfield D0 step CPU (stock 2.66Ghz, OC 4.3Ghz @ 1.312v, 71C peak core temp, still room to go faster)
GSKILL Ripjaws 12GB (4GBx3) DDR3 1600 (haven't OC'd yet, kept close to the 1600Mhz mark)
EVGA GTX 980, formerly with ACX 2.0 cooler (still using mild OC from when it was air cooled, haven't increased yet since water loop built. Peak 42C in Furmark @ 124% p. limit)
PC Power & Cooling Silencer 850w PSU
x2 NZXT Sentry Mix 2 Fan Controllers
x4 Kingston V300 120GB SSDs in RAID0 (That's right, x4 SATAIII SSD's RAID0'd on a mobo with SATAII ports. Go ahead and laugh.)
Seagate 1TB scratch drive
Intel 9301CT Gigabit NIC, mobo's onboard Marvell gigabit chip is pathetic
AOC G2770PQU 144Hz 1080p monitor
AudioSource 100w 2-channel receiver, Bose full range speakers
Thanks for reading!
The whole idea of this loop is maximum rad surface area I can stuff into the chassis and low(ish) noise. I'm aware the loop is overkill for the hardware I'm cooling, but 'why the hell not?' Very little effort was put into aesthetics aside from the black/orange color scheme.
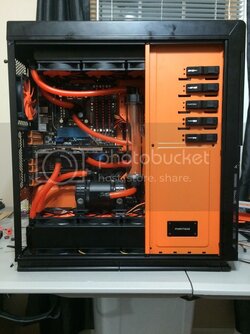
^ All tubed up, no water. Ignore the fan cables toward the bottom, they're hidden now.
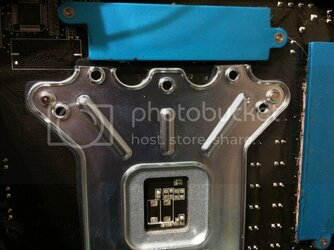
^ Had to trim the EK CPU backplate thanks to my silly old motherboard.
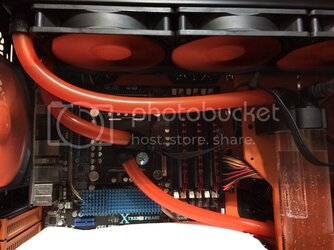
^ During the initial fill process, burping out the air. Not real happy with how awkward the connections on the CPU block look. Not real pleasing to look at, but whatever. Also ignore the random photobombing SATA cable, this was during the leak test and nothing but pumps and fans were hooked up so unused cables were tucked wherever they'd be out of the way. Thanks to magical hidden zip ties, that tube on the bottom-right no longer lays on the GPU like it does in these pics. Looks a little better.
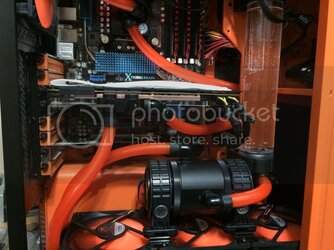
^ The 7th forward-facing g1/4 outlet on the XSPC GPU block helped a lot making that run up to the front rads. Could have been a lot uglier than it looks now. Also check out that awkward little run between the res and pump top inlet. I'm happy with how it worked out but I panicked a little figuring out how to orient the pump inlet since the res pretty much HAS to be mounted exactly where it is, otherwise I'd have to drill holes for the res brackets somewhere else, which I'd rather not do.
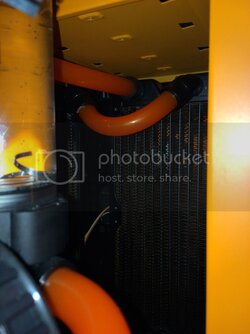
^ A view of the jump between the side and front rads. I invented at least 7 new curse words over 45 minutes getting that one little piece of tubing in there. I could only use one hand due to the tight quarters, it takes 50 frickin' lbs of pressure to get that tubing to seat into a fitting, both fittings are 45* rotarys on each end so as soon as I began pushing the tubing on they immediately turned sideways and the tubing popped off, and all of this had to be done by FEEL since once my hand was in that tiny space I couldn't see a damn thing. Needless to say, if I ever have to replace that tubing I'll rig it up differently.
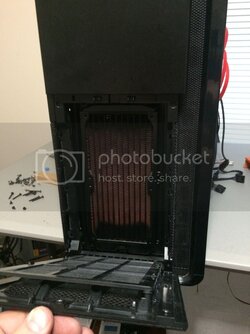
^ In case anyone's curious, a 240x30mm rad DOES fit in the very front cavity of the Enthoo Primo where the factory 140mm intake fans would normally be with ports facing upwards and downwards with the filter and front mesh installed. I'm not doing it this way, but in case anyone was considering it, there you go, it works.
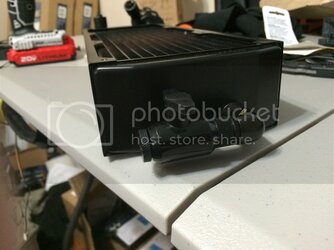
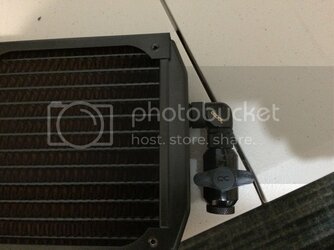
^ How I rigged up the dedicated drain port on the UT60 bottom rad. Cool feature, Alphacool.
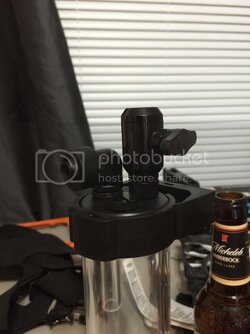
^ Just a demonstration of how crowded the fittings get on the Coolplex Pro res. No way in hell those fittings would have fit in there if they weren't both rotary. Also a fancy American beer, unrelated.
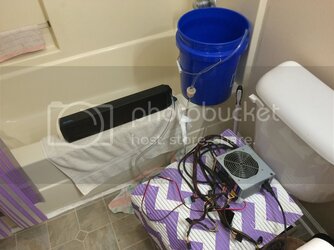
^ All 4 rads were flushed for over 2 hours each. About 15 minutes of shaking with hot water and vinegar, drained and ran more water through to clear out the vinegar, then a couple of hours in the bathtub hooked up to the pumps. Drilled a hole in the bottom of a clean 5 gallon bucket just barely big enough for the g1/4 end of a 3/8" barb to fit through, then screwed a ball valve on the exposed threads inside the bucket with an extra o-ring so I could reach in and shut off the flow while I changed rads without losing any water. Filled the bucket with distilled water and sat it on the ledge of the tub above the pump on the floor below hooked up to an extra power supply. Used 3 sections of cheap vinyl 3/8ID tubing to run from the barb on the bucket to the pump, then to the rad, then the last section returning to the bucket had an inline fuel filter for a riding mower spliced in to catch any particles. Pumped through the rad in one direction for an hour, then swapped tubes to flow the other direction for another hour, tilting the rad around until all the air bubbles went away. Rads were surprisingly clean, very little came out during the vinegar shake smaller than a grain of sand, and by the end the fuel filter caught just a little bit more. Not at all as bad as some of the horror stories I've heard about rads full of huge globs of flux and debris. Well done Alphacool for not leaving a bunch of junk inside your rads! Same process applied to CPU and GPU blocks minus the vinegar and shaking.
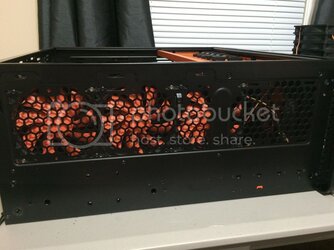
^ A vew of the bottom of the case after bolting in the UT60-360 with the base and filters uninstalled. Not real happy about that last fan being half blocked. Wish that area had holes like the rest of it.
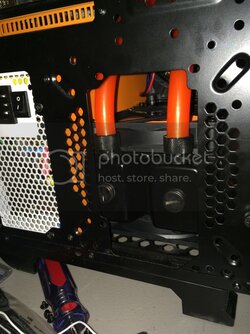
^ Remember that clever drain port I put on the other end of the bottom UT60 rad? Guess I didn't need it after all. Hooray for poor planning! I REALLY need to paint that power supply.
Alright, now here's all the TL;DR details and thoughts:
# Chassis
Phanteks Enthoo Primo SE black/orange. A real pleasure to build in. Very well thought out with only minor QC issues like the orange paint on the forward panel being slightly thinner than the orange paint on the motherboard tray and PSU cover. Finally bought a chassis that didn't immediately give me buyer's remorse.
# Rads
Alphacool XT45 480mm push/pull top
Alphacool UT60 360mm push/pull bottom
Alphacool ST30 240mm push front
Alphacool ST30 240mm push side
The original idea was going to be 3 rads, XT45-480 top, UT60-480 bottom, and ST30-240 side, but shortening the bottom to a 360 gave enough room at the front of the case to add a fourth ST30-240 rad, thus gaining an additional 120mm surface area in the loop and leaving enough room in the end of the UT60 to take advantage of its wonderful 7th drain port. Also glad I went with a 480 top rad instead of a 420 as the narrower width stands away from the motherboard tray far enough to get your hand in there and sneak cables around.
# Fans
Cougar Turbine CF-T12 Orange 120mm (60cfm/1.73mmH2O@1200rpm). 18 on the rads, 1 more at the rear for exhaust because why not. They're not the most impressive specs on paper but they fit the minimal-effort black/orange color scheme of the case. All the rads are low FPI, their sound level is very good with the fan controller, I've already trusted them in 2 systems for several years now, and frankly at $26USD for a box of 4 fans ($6.50USD each) that's too good to not use. I need 18 fans for the loop so $117 total for these Cougars vs. ~$300+ for Vardar's, NB's, SP120s, etc and wouldn't fit the color scheme? Pretty easy decision. All hooked up to x2 NZXT Sentry Mix 2 fan controllers on the lowest speed with a bunch of 2-way splitters.
# Fittings
Alphacool black straight, 45* rotary, and 90* rotary 3/8-5/8 compressions, 2 ball valves, 90* rotary male-female, straight male-male rotary extenders, plugs, and a couple 3/8 barbs to be used only for flush/fill/drain. Boy am I disappointed with these fittings. Don't get me wrong, they function perfectly, none of them leaked a bit, and they're very inexpensive compared to Bitspower, EK, etc. but that's where the good aspects end. The female threads on most compression collars were gritty and full of burrs, making them catch as they were tightened down. I even had to use a brass brush from a gun cleaning kit on 2 of the male collar threads because they gooped paint on so thick the collars wouldn't even begin to thread on. The black finish is wildly inconsistent from one fitting to another ranging from flat dark grey to glossy black, and all of the 90s and 45s have very obvious machining marks, areas where solder/weld was too thick, and paint runs. Some fittings have the old gold Alphacool logo, some have the new blue logo. Comparatively, all 4 of the Alphacool radiators have perfect finishes and look outstanding so such a disparity to their other products is unexpected to say the least.
# Tubing
Primoflex LRT UV Pearl Orange 3/8-5/8". I went with this orange tubing after a lot of reading about people's bad experiences with dyes, pre-dyed fluid, nanofluid, etc. I decided just using orange tubing with regular distilled water was a much better idea than clear tubing with orange fluid. I'm happy with it, but man was it a pain to work with. The thick walls make it very rigid, as opposed to 3/8-1/2" and super hard to push onto fittings. The good news is, it makes really tight turns without kinks.
# Pumps + Top
x2 Alphacool VPP655 D5 solo's on an EK Xtop Dual D5 Serial top. This top is a pretty new product and there's surprisingly very little information about it. I'm aware that dual D5's are probably overkill for this build but 'why the hell not?' I'm seriously surprised how quiet both of these pumps are full throttle. The first time I used it to flush the rads outside of the system I felt compelled to constantly touch it to convince myself it was running at all. I suspect the overall mass/weight of the whole assembly helps with this a bit, but more than that the rubber saddles on EK's brackets dampen the vibes and noise significantly. With both pumps running on speed 5, holding it up by the brackets I can barely feel the vibes. By the way, I really underestimated how high the pump was going to sit in the case. Specifically the height of the inlet port relative to the bottom outlet on the res. Made it work anyway. See pics. The Xtop Dual comes with brackets for mounting the assembly to 120 or 140mm fans. The brackets therefore were 140mm long and of course hang over the fan they're mounted to 1cm on each end. This caused clearance issues in the case with the PSU cover panel. Had to cut them down to 120mm length and spray paint them. Worked like a charm.
# Reservoir
Alphacool Coolplex Pro 25LT. Chosen mostly because of the 50mm width vs more common 60-70mm tubes. I noticed in other peoples' water builds in the Enthoo Primo case that using wider tubes on the factory res bracket could crowd the GPU a bit. Turns out going to a 50mm tube was a bit of an overreaction; there's plenty of room for a wider res like a Bitspower water z-multi (which is what I wanted) with no issue. The GTX980 is only 10.5" (if I recall? Correct me if I'm wrong) but some GPUs obviously are a ton longer and may even require the res bracket to be removed completely. This res normally comes with 3 ports on one end and 1 port on the other, but since I wanted to use 2 ports on both ends (return and dedicated fill on the top, outlet to pump and drain valve on the bottom) I got another similar Alphacool res pretty cheap so I could steal the 3 port end from it and stick it on this one. Works well enough, but being so narrow the fittings get very crowded. There's not quite enough room to fit more than 1 regular 3/8-5/8 compression fittings on each end, but barbs do fit next to each other just fine, and obviously my rotary 90* and extender+ball valve fit well enough.
# CPU block
EK Supremacy EVO Acetal/Nickel, no silly circles. Luckily it comes with the recommended jet and forcing plate for LGA1366 CPUs already installed. Chosen based on good delta temps, reasonable restriction compared to other blocks, and plain good looks.
# GPU block + backplate
XSPC Razor full cover GTX 980 block and backplate. I honestly would have preferred EK's FC-980 block for the lower restriction and better deltas. Full disclosure, I was relying on my Newegg credit line to purchase most of the components of the loop and the ModMyMods vendor stocks this XSPC block/backplate on the Newegg Marketplace. I found some head-to-head benchmarks of both blocks and decided the XSPC block was competitive enough to the EK block and went for it so I could charge it to my Newegg credit line. Will I regret getting this instead of the EK block I wanted? We'll see, my guess is probably not. Props to XSPC for supplying a pair of ridiculously bright blue LEDs with the block, but it would have been nice if I could've chosen a different color since those magnificent blue LED's look goofy with my orange theme. BIG props to XSPC for putting a forward-facing 7th port on it too, came in really handy for making that run up to the front rads.
# Other
Silver kill coil from ModMyMods
Gelid GC Extreme TIM on both CPU and GPU
Ironically, I ordered a tube of Gelid GC Extreme TIM not knowing that EK includes a tube of it with their Supremacy EVO CPU block. Not complaining, extra is good. The XSPC GPU block also came with K3 TIM which also happens to be fairly decent stuff.
# Future?
Flow meter. I want to see specifically the flow rate of the loop. Mostly out of curiosity but also as an indicator of flow degradation?
Temp sensors for the water. Again, mostly for curiosity rather than necessity.
UV strips to make the tubing light up
Replace the smoke plexi window on the Enthoo Primo with clear so I can actually SEE my fancy WC stuff
# Lessons Learned
-Buy lots of extra plugs. I ordered 10 extra black plugs to match the build, but that wasn't enough. Turns out Alphacool and XSPC ship silver plugs with black rads, res, and GPU block? What the hell guys?
-Buy lots of extra 30mm screws. These rads came with enough 30mm's for one side and enough 35mm's for the other side (example, the 480 rad came with 16x30 and 16x35), but the 35mm's were always way too long and didn't use a single one of them, thus the number of 30mm screws I needed DOUBLED in the case of push/pull rads, but obviously I didn't have enough. Had to resort to using only 2 screws per 120mm fan in opposite corners, which bothers me, meanwhile I have a ton of matching 30mm screws ordered to fix that.
-Alphacool XT, UT, and Monsta rads have 6 ports on the inlet/outlet end. 2 on each side and 2 on the end. The plugs you install on the sides will stand maybe 2mm above the flat surface of the shroud. So if the rad is mounted directly to the chassis like I did with the XT45-480 it won't sit perfectly flush. This potentially leaves a really thin gap between the chassis and the rad, creating a tiny space for air to suck through instead of being pulled through the rad. Not a problem for Push with fans on the bottom side, but potentially a problem for Pull with fans on the other side of the chassis. I'm going to have to order at least a 3mm thick 480 gasket to seal that gap.
Yes, I'm aware that the blue motherboard and red memory really kill the color scheme, but when I move to x99 they'll be replaced.
# System specs for anyone curious
Phanteks Enthoo Primo SE Orange/Black
Old as dirt ASUS P6X58D Premium motherboard
Old as dirt Intel i7 920 Bloomfield D0 step CPU (stock 2.66Ghz, OC 4.3Ghz @ 1.312v, 71C peak core temp, still room to go faster)
GSKILL Ripjaws 12GB (4GBx3) DDR3 1600 (haven't OC'd yet, kept close to the 1600Mhz mark)
EVGA GTX 980, formerly with ACX 2.0 cooler (still using mild OC from when it was air cooled, haven't increased yet since water loop built. Peak 42C in Furmark @ 124% p. limit)
PC Power & Cooling Silencer 850w PSU
x2 NZXT Sentry Mix 2 Fan Controllers
x4 Kingston V300 120GB SSDs in RAID0 (That's right, x4 SATAIII SSD's RAID0'd on a mobo with SATAII ports. Go ahead and laugh.)
Seagate 1TB scratch drive
Intel 9301CT Gigabit NIC, mobo's onboard Marvell gigabit chip is pathetic
AOC G2770PQU 144Hz 1080p monitor
AudioSource 100w 2-channel receiver, Bose full range speakers
Thanks for reading!