• Welcome to Overclockers Forums! Join us to reply in threads, receive reduced ads, and to customize your site experience!

Coolermaster tubing diameter

Overclockers is supported by our readers. When you click a link to make a purchase, we may earn a commission. Learn More.

itsacondition

New Member
Joined
Jul 23, 2019
Hi.. I'm about to start my first attempt into liquid cooling. I bought a coolermaster kit that seemed to fit and included a reservoir, add to that a EK liquid cooling GPU card along with a bunch of EK fittings and little pieces. does anyone by any chance know what tubing diameters for this kit is? cant seem to find an answer anywhere. thanks.

View attachment 214080
 

Attachments

  • Coolermaster 240.jpg
    Coolermaster 240.jpg
    87.1 KB · Views: 202
I guess I should include the model etc. I figured coolermaster sort of uses the same size tubing throughout their line. This was ML Maker 240 RGB but it came in several different versions. this was the only one that had a reservoir pump instead of the a cpu block pump.

- - - Auto-Merged Double Post - - -

thank you so much. I came across several version of those specs but none seemed to includes tubing ID /OD only length.
 
??
Compression Fitting ID 3/8"
Compression Fitting OD 5/8"

The standard screw end that goes into the blocks are G 1/4" - The other end is a LOT more complicated.. You have Thin Wall tubing and Thick Wall Tubing. Thin wall can easily be bent ( Place a piece in the palm and bend) where a thick wall will not. The fitting ID is the inside and the OD is the outside - from the link ED listed 3/8" x 5/8" = 10mm x 16mm which is Thick Wall tubing and connectors.
If you are looking to replace the tubing, 3/8" x 1/2" = 10mm x 13mm clear - is carried at all home improvement stores (USA). The connectors are also cheap and you have many options to choose from.
 
yeah.. like I said, everything I came across listed the 1 meter length (including the complaints that it was too short) but no ID/OD info. The backstory is that in my haste I ordered EKWB fittings and tubing in the standard 10-13 sizes then, once I found out the Coolermaster ID/OD, became unsure about mixing connection sizes (aesthetics only since flow rate will remain the same) and emailed EKWB to please change my order to 10-16 fittings and tubing. I then came to the further conclusion that the thinner tubing would probably been a much better choice since this is all supposed to fit into a Q500L coolermaster mid size case. l wonder what will wind up being shipped lol.

Live and learn I suppose. Either way, its my first real dive into liquid cooling /overclocking so either it will be fun, a complete disaster or both. Thanks for the detailed feedback.
 
If you are in a real..real pinch. The 1/4” x 3/8” will fit INTO the 3/8” x 5/8” tubing. Use the smaller tubing to extend the regular size. This will not damage the pump or fittings. Insert about 1”-1/12” inside the other tube. Use zip ties to close the connection between the 2 pieces - at least 1 per connection. This will help until you can get more tubing or later when you redo your system :)
Or any tubing at the hardware store that has a 3/8” OD will work.
 
Kinda amped for my first liquid cooling build. I had this ol' Asrock Z77 extreme 4 that was given to me a few years ago along with a EVGA 780 GPU. It had a I5 chip in it and I upgraded that to a I7-3770K. Everything came out of a huge tower (kind ugly) and was transplanted into a tight Q500L CoolerMaster case, upgraded the PSU from 650w to 850w, added (6) 80mm fans and a CoolerMaster Hyper 212 CPU Air Cooler. All good except the GPU leaves a little to be desired. I ran HWMonitor and GPU heat was triggering temp limiter explaining less than optimal performance. I know its an old card and an old board but whatever, I want to squeeze those parts for everything they got before I change up. Most of the added items will transfer to new mobo/chipset GPU anyways. Just by chance, I stumbled on a 780 cooling block on Ebay that I picked up cheap and that was the first stroke. EKWG did its job too and I suddenly realized I need a lot more than just that GPU block and ordered a bunch black nickel fittings and whatever. What a candy store lmao... All good but was still battling how I am going to fit all that into that tiny case. That resolved itself thanks to amazon where I practically fell over an Anidee case that seemed to fit the bill.

so the current list what its going to be is
Anidees AI Crystal Cube AR V3 Dual Chamber Tempered Glass
(comes with (5) Anidees RGB Fans and fan controller w/remote)
Asrock Z77 Extreme 4 MOBO
I7-3770K chip
24gb RAM
EVGA 850w PSU
EVGA GTX 780 GPU
EKWB GTX 780 Water block
500 Gb 870 EVO SSD
1TB 870 EVO SSD
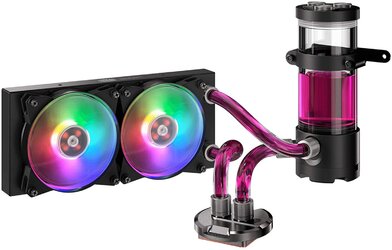
CoolerMaster MasterLiquid Maker 240 CPU Water Cooling Kit,
(Water Block, Reservoir-Pump, Dual MF Pro 120 RGB Fans, 240 Copper Radiator)

Lets see how that all comes together. Once its set up though, I hope there will be some room to OC.
anything special I should do to get a baseline other than HWMonitor? I read though the FAQ on this board, but there are a lot of programs and a lot of choices. Pretty sure there is no need to go all validated for submitting official benchmark scores, but at least ro be sure that the baseline consists of relevant data sets. Thanks.
 
So can someone help me with the math here? The case comes with a hub and 5 rgb fans. The cooler master with 2 rgb fans and pump

The cooler master pump will go into the CPU 1 (4 pin) header. The anidees hub will connect to (4 pin) chassis fan header. Now I am leaning towards just buying 3 extra anidees fans to replace the cooler master fans so everything gets connected to the anidees hub. The hub will control color and I can control speed based on temp with bios. Does that sound right or is there a better way to sync everything without having to buy more anidees fans? I do not have rgb headers on the MOBO.Thank you.
 
You donÂ’t have to place the pump on cpu#1(4pin) BUT it does help and make sure to set it to max 100%. You want the pump (pumping water) running @ max rpm and not dropping/increasing because of temps. That is what the fans are for.. I donÂ’t have any RGB stuff but from what I have read - you want to have only 1 program working the colors. You can always pick up a power fan (4pin -> 2x 4pin) splitter that is ~ $1.99(basic) or $4.99(sleeved & in color)..
You have 7 RGB fans? And can only connect 4 to a RGB header?
 
Ah.. good to know @The pump. Thanks. 100% constant would be the (3 pin) power fan header I have?

The anidees connections are proprietary and I could not find a conversion plug. I could connect the cooler master fans directly to the mobo but since the anidees hub controls the rgb for whatever is plugged into it, the lighting from the cooler master fans wonÂ’t sync. In the end I have 8 outlets on the hub and only 5 being used so I figured anidees fans to replace the coolermaster fans will be the easiest. The hub comes with a remote so that will serve to select colors but I need to make sure that there are temp triggers. IÂ’m hoping that will come from the (4 pin) chassis header.

Reading about people frying their mobo with poorly thought out fan connections is a warning sign to make sure you get it right. That is something that is not on my list of things to do so trying to avoid that.
 
For max power.. go into the bios and set that (cpu#1 or whatever it’s connected to) to run at max. It should be under the monitoring tab in the bios. Many “new” mb list the max amp allowed on xxx fan connector. The most is 1 amp = 12w iirc … I’ll look up the spec’s on your mb and try to give you a proper how to.. I’m old and it’s already bed time for me. I’ll talk a lot more tomorrow:)
 
lol thank you for your input. Just waiting on a few more little parts and then I can start the build.

*Private Hudson lmao..
 
If you go to AsRock and Down Load the manual or have the book.. On page 39 -> Your "4 pin RGB Header" is really a - Consumer Infrared Module Header - (CIR1, Gray). This should not be used as it can & may damage your RGB equipment!! Go to section 3.5 (page 70) Hardware Health Event Monitoring Screen <- It's called the same in the BIOS :). Set CPU#1 fan to full on - {Auto sets it to PWM} (CPU_FAN1 & CHA_FAN1 support PWM) all the others are 3 pin. -> https://resources.pcb.cadence.com/b...rategies-for-cpu-cooling-and-case-ventilation.
I went to http://anidees.com/product/ai-crystal-cube-ar-3/ But could not find a picture of the 5 Pin fan connector :-(
I went to PPCS -> https://www.performance-pcs.com/fan...ct_list_limit=48&product_list_order=price_asc <-> You can also try Frozen CPU https://www.frozencpu.com/cat/l1/g36/Fans.html?id=hrhWpa6u.
I found that a 4 pin (PWN) + 3/4 pin (RGB) connection was the most found fans for 120mm RGB fans. I have several Cooler Master Sickle flow fans (NON RGB) that are great - https://www.coolermaster.com/catalog/coolers/case-fan/sickleflow-120-argb-3in1/ ..
** I found 1 - 5 Pin fan controller - https://www.performance-pcs.com/lig...x-ii-aurora-digital-rgb-controller-black.html
^^ If you wish to run fans from other makers, I found several that will work with many of them.
https://www.performance-pcs.com/fan...n-pwm-fan-hub-remote-control-rgb-led-hub.html
https://www.coolermaster.com/catalog/coolers/rgb-accessories/masterfan-argb-and-pwm-hub/
https://www.performance-pcs.com/lig...cm-extension-cable-for-asus-motherboards.html
https://www.performance-pcs.com/lig...b-multi-function-controller-bpta-drgbmfc.html

I noticed that the extra 3 pin (RGB) connector allows each fan to have it's own color.. You can also set this up in windows with & without RGB on your MB as several have their own software.

I hope this helps :thup: :popcorn:
 
Wow.. That's a lot of research my friend. Thank you. Fans and RGB can be ridiculously complex. I wonder where the hell ISO standards are when you really need them... The Anidees case came with 5 fans and 2 LED strips as well as a 8 + 2 (led) connection fan hub.

https://www.amazon.com/gp/product/B07NWHCN69/ref=ppx_yo_dt_b_asin_title_o02_s00?ie=UTF8&psc=1

The fans are some kind of 6 pin proprietary design so to keep thing simple, I just ordered 3 more Anidees fans

https://www.amazon.com/gp/product/B07Y6HP9FZ/ref=ppx_yo_dt_b_asin_title_o00_s00?ie=UTF8&psc=1

to fill the hub out instead of trying to coordinate the 2 rgb corsair fans that came with the cooling liquid cooling kit. The remote that is included seems to allow you to do whatever you want in terms of lighting and fan speeds. I was concerned however about loosing the temperature control because wireless remote is great but I do not want to be in charge of trying to maintain fan/heat removal efficiency. So that will be associated by whatever header I choose (CPU_FAN1 & CHA_FAN1 are my only options I guess) and the settings for that header. Its a shame the board doesn't offer a 5v RGB header. that would have been great instead of a (CIR1, Gray).

I will post some pics and update once I install everything. hopefully the water block and increased airflow will help cool down that GPU so the temp limiter wont kick in. I also out that the card uses 250w @ max. from what I understand the PCI connection offers about 75w and the 8 pin about 150w. if you use the secondary 6 pin on the same cable, its still only 150w max. in order to get proper Wattage supplied, you should connect a separate 6 plug cable for an additional 150w thus supplying more than the card draws. IDK.. that's what I understood anyways. I guess that is part of my reasoning for not abandoning the GPU for a newer one since I don't even know how it works when its running properly lol.
 
I just started and thought, itÂ’s better to have options, so I looked further to try and help. The biggest thing I want you to know was that the 4 pin (IR header) that looks like a RGB connector was really not. I have seen these on several of my mb but pasted it off as I never need to use it just like the TPM header. Then it was this, ECT,ECT.

This is a place of help and I feel that this a great community to be a part of :)
 
So do I :)

Since this appears to be a “grasshopper” situation, I actually have another question..

On my MB there is a pin labeled PLED which is where I have my pins PLED+ and PLED- plugged into. There is another 3 pin header though also labeled PLED. This is confusing to me. Are some case panels fitted with a 3 pin PLED header and mine is 2 or is that something entirely different?

https://download.asrock.com/Manual/Z77 Extreme4.pdf

9CF1B022-1BE5-4E45-AD9E-0F3844E6C960.jpeg
 
From reading the manual. You appear to be correct in this. I have only used the 2 pin version so this could be for Dell/HP that use custom parts.
 
So just thought I would share some updates. I installed the liquid cooling system, low and behold.. it works pretty good. When I originally started perusing liquid cooling I began with a waterblock for the gpu because I was hitting the temp limiter. During the course of that, I found I had the card powered incorrectly too. So after I finally had all the parts together -
and the block, of course, did not fit the card. So I kept the gpu unchanged but liquid cooled the cpu.

D09AC335-19A5-47FB-B0D8-90B69ECF1B8B.jpeg

i like the red, white and blue and everything looks pretty good cpu temps ready for OC. As far as the cooler master aio kit, itÂ’s great experience I wish there was a stand available because the mounting clamp is hoaky and undermines the neatness of everything else. It also scratched the reservoir cylinder. Kind of dumb.

A87AD956-2B6F-4666-8008-358738CF9FEE.jpeg

AnywaysÂ… the case was just a little to small and with the reservoir cylinder mounted the GPU would not fit so I was forced to move the gpu to the second PCIe slot. The card did not like that so I pulled the reservoir and put the GPU back in its place.

Here are a few benchmark stats. I think I need to just bite the bullet and buy a new card. Stupid expensive though. I have been stalking ebay and might try to revive a bricked one.:rofl:
0D259482-EF85-4B99-AF78-AFEB0F82F4D1.jpeg
492E0B26-8504-472C-8BA4-D90AB5C362AF.jpeg
 
Back