- Joined
- Nov 30, 2008
Sorry for the overly descriptive title. When I was searching that mobo, a lot of thread titles showed up from forums, so I thought I'd put it in the title in case someone is googling for answers. Fryes had a special on this combo of an E2200 + the ECS GF7100PVT-M3 for $80 + shipping not to long ago. NewEgg (where I got mine) had this for $120 - $20 combo bonus + free shipping. So I'm sure a ton of people have it. I bought it for a budget system, but like everything else, I started monkeying around with it. Just a note - both Fryes and NE reported the mobo as a GF7100PVT-M but most people recieved the GF7100PVT-M3.
OC'ing on the ECS mobo is a pain in the butt because it doesn't let you do things like change the fsb (except through the BSEL setting) or vcore. You can however do things like set the RAM timings/voltage, Vnb, etc.
The bios gives you the option to change the BSEL settings which negates the need to do a BSEL mod if you have this mobo:

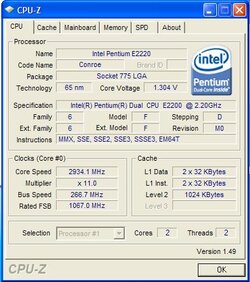
I changed mine from 800 to 1066 and it brought me up to 2.93GHz. I could surf the web, run programs, etc but when I would run prime95, my system would crash. I figured since I could boot and use the computer it must have been some issue with the vcore. Unfortunately you can't up the voltage on that mobo without a voltmod. But that was relatively simple (special thanks to imperiousleader for the advice on the issue too who just did a voltmod on his own cpu).
First, you'll need something like a circuitwriter pen (what I used):
http://www.parts-express.com/pe/showdetl.cfm?Partnumber=341-236
You'll also need a very small amount of electrical tape.
Step 1: Find the Voltage Identification Definition (VID) of your cpu. You can do this using coretemp ( http://www.alcpu.com/CoreTemp/ ) which is a free download. I got confused in this step because a lot of the tutorials said "default voltage" and my cpu ran at a lower voltage than this.
Step 2: Find your cpu's data sheet on http://processorfinder.intel.com/ ... E2200: http://download.intel.com/design/processor/datashts/316981.pdf and find the page that lists all the VID values. On the E2200 datasheet, it's page 15. My VID was 1.3125 ... after looking at the values, I decided to bump up my vcore by 0.1 since it was simplest. That would be the 1.4125 settings. If changing to 1.4 requires two changes while 1.4125 only requires 1, I suggest taking the easier route.

You'll notice values of 1 or 0 across the chart for your current VID and the voltage bump you want. To change a 0 to a 1, you put a small piece of electrical tape on the pin. To change a 1 to a 0, you connect it to a neighboring VSS pin with the circuitwriter pen (from what I underdstand, you can also use tin foil and superglue ... making sure not to get any glue on the pins themselves. I suggest the circuitwriter).
So for my purposes, all I had to do was connect the VID4 pin to a neighboring VSS pin to make it a 0.
Step 3: Find out where the pins you need to alter are located on your cpu. The datasheet will have a diagram later on. For the E2200, it's on pages 39 and 43. Keep in mind, the diagram is a mirror image, so you'll have to reverse it. You can tell this by the location of the notches and arrow on the diagram vs on your chip:
Page 43 shows that VID4 is on 4 - AK and there is a VSS pin right next to it. Using the chart on page 39, you can find where that it located (keeping in mind it is a mirror image):
Step 4: Make the changes. If you're using a circuitwriter, I suggest taping off the area around your 2 pins, then applying the ink. The ink is very watery and will spread ... that combined with how small the pins are makes taping around it necissary. If you're using foil, you would superglue between the pins and attach the foil to it's touching both pins. If you're using electrical tape to turn a 0 into a 1, just cut a small piece of tape and cover only that pin. If you get too much ink on, just wipe it clean with an alcohol pad ( > 70%).
My changes required shorting out one pin:
Step 5: Restart and make sure everything is ok in bios. I confirmed the voltage was up by 0.1 and also just monitored the temps for a while to be safe (thought at that voltage, I didn't expect any problems):
After that, my system ran stable at 2.93GHz, which is a nice boost. I was still on the crappy stock heatsink + fan, so the temps were a little high. The next time I make an order from NE, I'll probably pick up an aftermarket h/f and lower the voltage 0.03 or so to bring the temp down. But now that I have the new system in my sig, this rig is pretty much just a dust collector, so it's not a real priority.
after 11.5 hours:
Average CPU temp @ 100% load: 68 C
Average vcore @ 100% load: 1.37
Note - in addition to the stock h/f, it's winter here and I had my heater running all night as I slept (when I ran prime 95) so the room was also pretty warm.
More info:
http://sg.vr-zone.com/articles/-intel-core-2-duo-voltage-boost/3904-1.html?doc=3904
http://www.ocforums.com/showthread.php?t=586596
OC'ing on the ECS mobo is a pain in the butt because it doesn't let you do things like change the fsb (except through the BSEL setting) or vcore. You can however do things like set the RAM timings/voltage, Vnb, etc.
The bios gives you the option to change the BSEL settings which negates the need to do a BSEL mod if you have this mobo:

I changed mine from 800 to 1066 and it brought me up to 2.93GHz. I could surf the web, run programs, etc but when I would run prime95, my system would crash. I figured since I could boot and use the computer it must have been some issue with the vcore. Unfortunately you can't up the voltage on that mobo without a voltmod. But that was relatively simple (special thanks to imperiousleader for the advice on the issue too who just did a voltmod on his own cpu).
First, you'll need something like a circuitwriter pen (what I used):
http://www.parts-express.com/pe/showdetl.cfm?Partnumber=341-236
You'll also need a very small amount of electrical tape.
Step 1: Find the Voltage Identification Definition (VID) of your cpu. You can do this using coretemp ( http://www.alcpu.com/CoreTemp/ ) which is a free download. I got confused in this step because a lot of the tutorials said "default voltage" and my cpu ran at a lower voltage than this.
Step 2: Find your cpu's data sheet on http://processorfinder.intel.com/ ... E2200: http://download.intel.com/design/processor/datashts/316981.pdf and find the page that lists all the VID values. On the E2200 datasheet, it's page 15. My VID was 1.3125 ... after looking at the values, I decided to bump up my vcore by 0.1 since it was simplest. That would be the 1.4125 settings. If changing to 1.4 requires two changes while 1.4125 only requires 1, I suggest taking the easier route.

You'll notice values of 1 or 0 across the chart for your current VID and the voltage bump you want. To change a 0 to a 1, you put a small piece of electrical tape on the pin. To change a 1 to a 0, you connect it to a neighboring VSS pin with the circuitwriter pen (from what I underdstand, you can also use tin foil and superglue ... making sure not to get any glue on the pins themselves. I suggest the circuitwriter).
So for my purposes, all I had to do was connect the VID4 pin to a neighboring VSS pin to make it a 0.
Step 3: Find out where the pins you need to alter are located on your cpu. The datasheet will have a diagram later on. For the E2200, it's on pages 39 and 43. Keep in mind, the diagram is a mirror image, so you'll have to reverse it. You can tell this by the location of the notches and arrow on the diagram vs on your chip:

Page 43 shows that VID4 is on 4 - AK and there is a VSS pin right next to it. Using the chart on page 39, you can find where that it located (keeping in mind it is a mirror image):

Step 4: Make the changes. If you're using a circuitwriter, I suggest taping off the area around your 2 pins, then applying the ink. The ink is very watery and will spread ... that combined with how small the pins are makes taping around it necissary. If you're using foil, you would superglue between the pins and attach the foil to it's touching both pins. If you're using electrical tape to turn a 0 into a 1, just cut a small piece of tape and cover only that pin. If you get too much ink on, just wipe it clean with an alcohol pad ( > 70%).
My changes required shorting out one pin:


Step 5: Restart and make sure everything is ok in bios. I confirmed the voltage was up by 0.1 and also just monitored the temps for a while to be safe (thought at that voltage, I didn't expect any problems):

After that, my system ran stable at 2.93GHz, which is a nice boost. I was still on the crappy stock heatsink + fan, so the temps were a little high. The next time I make an order from NE, I'll probably pick up an aftermarket h/f and lower the voltage 0.03 or so to bring the temp down. But now that I have the new system in my sig, this rig is pretty much just a dust collector, so it's not a real priority.

after 11.5 hours:
Average CPU temp @ 100% load: 68 C
Average vcore @ 100% load: 1.37
Note - in addition to the stock h/f, it's winter here and I had my heater running all night as I slept (when I ran prime 95) so the room was also pretty warm.

More info:
http://sg.vr-zone.com/articles/-intel-core-2-duo-voltage-boost/3904-1.html?doc=3904
http://www.ocforums.com/showthread.php?t=586596