• Welcome to Overclockers Forums! Join us to reply in threads, receive reduced ads, and to customize your site experience!

Project Quadteron

Overclockers is supported by our readers. When you click a link to make a purchase, we may earn a commission. Learn More.

harlam357

Senior Fold-a-holic
Joined
Sep 22, 2004
First of all... let's start with the parts.

Code:
Mobo       - $720  (Supermicro H8QGi-F - Superbizz)
CPUs       - $1920 (4xMC 6174 - $480 each used on eBay)
32GB RAM   - $288  (8x2x2GB G.Skill 1600MHz CL8 - $36 each at Newegg on sale)
HS         - $240  (4xNoctua NH-U9DO A3 - $60 each at Provantage)
PSU        - $170  (Corsair AX750 - Newegg)
HD         - $0    (500GB WD - already owned)
Case       - $150  (Cooler Master HAF932 - Newegg)

Total      - $3488

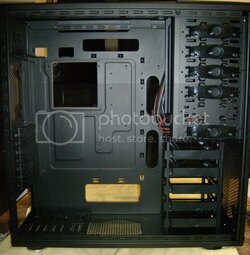
First, the HAF932 bare from the factory.

HPIM2520_1.jpg

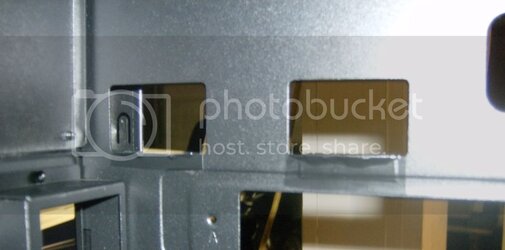
The HAF supports a two power supply configuration with an upper and lower PSU mounting bay. The upper bay has support tabs that need to be removed to allow installation of the Supermicro SWTX board.

HPIM2518_1.jpg

A quick dremmel run and some electrical tape to hide the rough edges and the upper tabs are gone.

HPIM2522_1.jpg

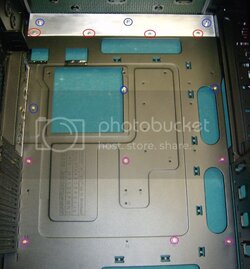
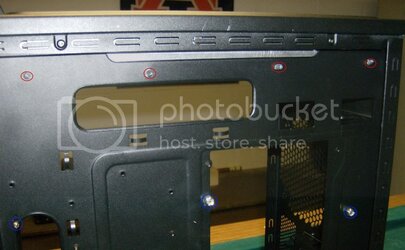
The basic problem with mounting an SWTX board inside this case is the lack of surface to secure the upper mounting points on the motherboard. To combat this we created a 2" extension out of 0.032 aluminum.

The red circles represent where the extension will meet the original manufactured motherboard tray. The blue circles represent the mounting/standoff positions necessary to secure the SWTX motherboard. The standoffs were tapped with a 6-32 tap but they didn't hold well so the standoffs were secured with a 6-32 lock nut and loctite.

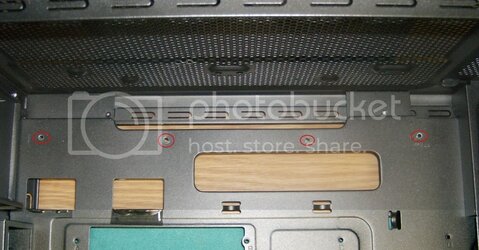
HPIM2525_1.jpg

Here's the holes drilled in the original motherboard tray where the extension will be attached with steel rivets.

HPIM2527_1.jpg

This is picture of the case with the extension mounted and all necessary standoffs in place.

The red circles represent where the extension will meet the original manufactured motherboard tray. The blue circles represent the mounting/standoff positions necessary to secure the SWTX motherboard. The pink/fuschia circles represent standoff mounts that already work with an SWTX motherboard.

HPIM2528_1.jpg

Here's the backside of the motherboard showing all the custom mounts that had to be drilled and tapped. All but one custom standoff was secured by a 6-32 nut and loctite.

The red circles represent the points where the 2" extension attaches to the original mobo tray with steel rivits. The blue circles represent the other mounting points in the mobo tray that had to be drilled and tapped. This case is tight for an SWTX mobo. The mounting points are right on the edge of the openings in the mobo tray... but it's doable. All I can say is this... my mobo is in there... SOLID. :D

HPIM2536_1.jpg

Overall I'm really happy with the case... especially for the price. I do want to say this though... Cooler Master fans suck. The 140mm on the back already broke on me, but to be perfectly honest I don't count on manufacturer case fans anyway. They always break. Delta, Panaflo, Scythe S-Flex, Yate Loon... those are real fans that will serve you well for a long time. Although I am using the included 230mm fans... at least until they die.

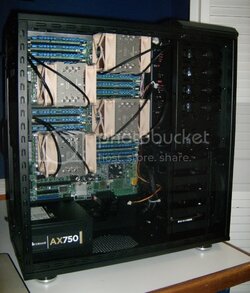
Here's the end result. Believe it or not... this only took ~3 hours to do. Big props to my father who is the handy man. I couldn't have done it so quickly without him. :)

HPIM2550_1.jpg
 
Last edited:
Thanks for the kind words everyone! :) Hopefully the notes and pics will help anyone else out who decides to go with a HAF932.

As DarkWarrior said, the heatsinks are made for G34 so no mods necessary to mount them. These are the sinks that fit 92mm fans. Not the 120mm version. So, with that said, if one goes with ram that has tall heat spreaders like the RipJaws X that I used there is a spacing conflict with two heatsinks and two ram modules in middle of the board. If one looks closely you can see only three blue ram modules in both the center ram banks. I had to remove the heat spreaders from two modules to fix the conflict. That was a fun experiment. I had never removed heat spreaders before. But, with a hair dryer and some patience it wasn't too difficult.

Good to know, I have the same Noctuas as you... Odd, I thought they mounted facing the top, and not to the rear... I will find out soon once I drill the holes and mount my board... How did you remove your heat spreaders from the ram? I may have to do that too, but I have the other SM board with half the ram slots so I will have to see what clearence I have
 
Good to know, I have the same Noctuas as you... Odd, I thought they mounted facing the top, and not to the rear... I will find out soon once I drill the holes and mount my board... How did you remove your heat spreaders from the ram? I may have to do that too, but I have the other SM board with half the ram slots so I will have to see what clearence I have
Whats taking you so long Steve?:p I'm up and running BOINC!:D

Great Post H, 4P makes me drool on myself( Actually its just a habit I can't break:drool:) Its surprising how many cases can fit these huge Mobo's!
 
so can you adjust which way the heatsink faces on these things? I am looking at one of the cheaper supermicro boards but it has two the processors sitting right next to each other. For thermal stability, I am not interested in being forced to put the hot air from one heatsink through another heatsink. My assumption was that they would be forced to do this, but if I can change which way the fans blow, I might be able to get around this.
 
so can you adjust which way the heatsink faces on these things? I am looking at one of the cheaper supermicro boards but it has two the processors sitting right next to each other. For thermal stability, I am not interested in being forced to put the hot air from one heatsink through another heatsink. My assumption was that they would be forced to do this, but if I can change which way the fans blow, I might be able to get around this.
Others can step in here, but the Supermicro H8QGL-IF+ is so cold I wondered why I put 4 CM 212+'s on it. I would look into the smallest cheapest HS/Fan you could get, that's made for that Mobo or socket. Your talking about no OC...unless you use a Custom BIOS firmware. I am postitive I could remove my fans and run without them.
 
so can you adjust which way the heatsink faces on these things? I am looking at one of the cheaper supermicro boards but it has two the processors sitting right next to each other. For thermal stability, I am not interested in being forced to put the hot air from one heatsink through another heatsink. My assumption was that they would be forced to do this, but if I can change which way the fans blow, I might be able to get around this.

You can adjust the Noctua units I used on Tanker, and I have seen other builds with the heatsink/fan combo turned as well. You just have to have the room on the mobo layout, of course.

I aimed Tanker's hsf's all up, because:

*that's the direction hot air wants to go naturally anyway. I can move the air I need to from the cpu's, with 4 fans.

and

* the rear exhaust fan is a single 140 mm fan. The hsfs I used were 4 (or 8 if you wanted to double them up), 120 mm fans. The one rear fan would be unable to exhaust that quantity of hot air I wanted.

When running benchmarks, the two lower cpu's are at 30-33°C and the two upper cpu's are at 34-36°C, in this configuration.

There is a LOT of warm air coming through the vented top of Tanker's case, as well as being expelled by the rear exhaust case fan.

The above is just my theory of how to move a lot of air through Tanker's case, but it's guesswork. You can only find out what works for cooling a case, by making tests on a specific set up. Blowing the hot air toward the rear of a 4P case may actually be better than blowing it upward. I did not test this configuration. Also untested is having the two lower hsfs blowing to the rear, and the two upper hsf's blowing upward. That might work well, also.
 
Hot air through cases is peculiar thing. I have A Big CM Stacker case, with mesh sides to allow air through. It comes with a removable insert that holds 4 120MM optional fans. I tried them blowing in, blowing out, 2 on the top blowing in and 2 on the bottom out and vice versa..checking each time the CPU temp only(didn't matter what the GPU's was)

In the end I removed the whole insert so there were none, and that surprisingly gave me the lowest CPU temp.:eek: Somehow they were not working well with the other 3 fans in there.( Top out, Back out and Front in) The plain mesh sides allowed the best air flow.

As a side note the fans in any combination kept the GPU cooler.

^ H, I am glad they started making cases all black inside, it looks so much better then silver.
 
Last edited:
Norcalsteve said:
How did you remove your heat spreaders from the ram?

Used a hair dryer to heat up the thermal tape attaching the spreader to the ram modules. Then carefully, with your hands - nothing sharp, pry the spreader from one side of the stick. You may have to heat > pry > heat > pry > etc several times before you get it all the way off the stick. Be patient is all I can say. Once you do one stick the second will go faster after you get comfortable with the amount of pressure you can use.

Posidon42 said:
so can you adjust which way the heatsink faces on these things?

Yes, the mounting can work in either direction. I went with this configuration because I didn't want one sink's exhaust blowing directly into another sink. I had it setup this way when I was running the rig on the bench. In fact, I just dropped the board in with everything still mounted. I also discovered that it is impossible to attach the fans on the topmost heatsink with the board already mounted. So it just made sense to leave it as is. Initial results show that the cpu temps while folding are just about the same as they were when running on the bench. Hottest cpu is 43C. So, I'm happy with that and see no compelling reason to change at this point in time.
 
Thanks, Harlam. If I convince my wife to let me liberate some cash from one of our accounts, I hope (intend is too strong of a word) to build another SM-4P, to be housed in a HAF 932 that currently is a 2600K rig. I'll take an easier way of mounting standoffs. I'll just drill the backplate and fasten the standoffs to the back with 6-32 nuts.
 
Sure, no problem. Posted this to give others ideas of how to tackle mounting their own boards.

Yeah, that's what I did with the standoffs that could actually be mounted on the existing mobo tray. But, how do you plan to secure the top of the motherboard to the case? The mobo tray doesn't extend that far up.
 
Yeah, when I ordered my HAF I thought the mobo tray did extend all the way to the top... even based on the pics from tuigi's HAF build I couldn't quite tell... and Newegg pics were pretty well useless.

This method just worked out really well all around. Already had the aluminum (it's actually a piece of a roof panel), the rivets, and the tap. All I had to buy were the 6-32 nuts we used ($1.09). I'm not sure how easy it is to find aluminum like that at retail. Again, it's thin, 0.032. But everything else we used should be readily available.
 
Back