• Welcome to Overclockers Forums! Join us to reply in threads, receive reduced ads, and to customize your site experience!

Help/Advice on a watercooling build

Overclockers is supported by our readers. When you click a link to make a purchase, we may earn a commission. Learn More.
You'll flush the air as long as your water flow is high enough. With the thick rads it might be better with the fittings on top actually.
 
I moved them to the bottom but now the tub runs connecting the radiators together are very tight. I had to stick with soft tubing for flexibility and as I'm starting to run low on hard tubing connectors, but now I think the connection from one of the front rads to a top rad is getting bent so tight that it collapses when the fan trays are fully slid into the case, so I might need to reconsider this.

With all the fittings on the bottom of the top radiators, won't air bubbles just flow to the top of the top radiators and get stuck there?

In other news, I think I'm going to need more hard tubing. I ended up cutting pieces shorter than I originally planned and I'm not quite happy with the result, and I don't have anymore long straight runs to get the water from the water blocks on the left side of the case to the radiator connections in the top right of the case. So it might be a few days until I'm able to post another update.
 
I think the best way is for trial error build how you think then fill loop up normal water run it see if it works . Then change what you dont like as its only water no loss or money spent on coolant .
 
I think the best way is for trial error build how you think then fill loop up normal water run it see if it works . Then change what you dont like as its only water no loss or money spent on coolant .

Sounds like a good strategy... I was able to close the loop for the first time last night (I decided to rush things and filled in a bunch of gaps with soft tubing out of impatience), but a quick follow-up leak test using EK's Leak Tester indicated a leak somewhere. I'm not sure where. I have a handful of really really short hard tubing runs (example in the screenshot below)... maybe one of them is too short to achieve a good seal. Is there a good way to find a leak without putting water in the loop or redoing each individual connection?

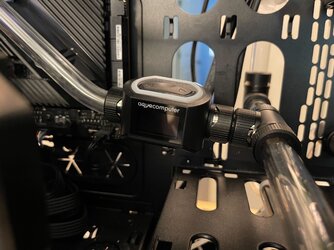
Another question - I got one of these flow sensors. I just kind of hacked it into place for now (see below). Does it need to be on a level run to get accurate measurements or does that not really matter?

One more question, tangentially related to my first: is there a minimum radius for acrylic bends? Then mandrels I've been using have a radius of 22mm. There are a few places where it would be useful to have even tighter bends without relying on angle fittings. I could experiment but I'm hesitant to wasting tubing trying to find out how tight I can go.

Image from iOS (2).jpg

- - - Auto-Merged Double Post - - -

Ok another question: I notice that sometimes my bends seem slightly hazy after cooling down. I read online that this effect can happen if you cool down the tubing too quickly by dunking it in water so I always let it air cool. But even when air cooling the bend it doesn't come out as clear as it originally was. Any tips on how to avoid that?
 
Wow that is small how did you manage to do that lol pixi fingers . I do not know for certain the answers im sure someone with more know how will reply
Can we see pic now of it all in place please
 
Catastrophe struck. A screw driver slipped and punctured one of my 480mm radiators. :rain:
 
Life goes on. I've ordered a replacement.

Can we see pic now of it all in place please

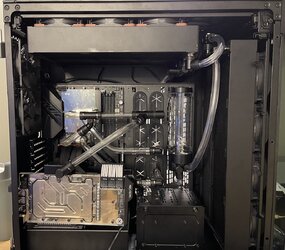
Sorry, I must've missed this the first time I read your post. I pulled out some of the soft tubing placeholder runs. Here's what it looked like as of last night.


I've changed my planned layout a bit from what I had originally planned with the pipe cleaners. The pump is hidden and mounted in the hard drive enclosure. From there water travels up a stack and into the main area of the case through the rubber pass throughs and visits the water blocks in parallel. Next thing to do (and I guess really the only major thing remaining) is to get the water from the water blocks back to the radiators. I keep going back and forth on how exactly I want to do that. Originally the runs were going to be horizontal but now that I decided to incorporate 45 degree bends I'm not sure.

Also, I have a pass-through fitting for that hole I drilled under the reservoir so that it looks nicer. But I removed it temporarily to rule it out as the source of the leak that I mentioned the other night.

The layout in these pictures bypasses the radiator that I broke (it's the front radiator furthest from the camera in the first image).

- - - Auto-Merged Double Post - - -

I'm not happy with how the run to the M2 waterblock turned out. It's not level and it's a little shorter than it needs to be. I don't have a long enough section of hard tubing to replace it at the moment, though.
 
You forget how big that case is wow looking very nice like the bends good work i could not do that at all well done . Used to put an egg in my car rad if it had small leak cant imagine the mess that would cause in a loop omg
 
Ok, I redid some of the bends I wasn't happy with and finally closed the loop in a way that I can be happy with. It's not as simplistic as my original plan, but also not messy. I like how the 45 degree angles ended up working out.

Still have some soft tubing for the radiators and reservoir. I can redo those runs with hard tubing when my replacement 480mm radiator gets delivered. I'm also ordering more acrylic tubing, I think it will look even better if I replace the angle adapters/fittings with bends.

Unfortunately, my leak tester still indicates that air is escaping the loop somewhere, but I have no idea where. I made sure to chamfer the outer edges of the hard tubing at each connection, wet the o-rings, and forced the tubes into each fitting pretty hard, etc.. I'm half-tempted to just start filling it with distilled water and keep a close eye out for leaks...

IMG_3135.jpg
 
I could be wrong but think the leak tester is used in conjunction with a filled loop to pressurize the loop without powering up the system. Take a few tissues and wrap them around each fittings and put some pressure in the loop. Look for damp or wet tissues instead of a leak.
 
I think it works both ways. I'd do it without water though......

Without water, the pressure will go down on the meter. With, it still goes down on the gauge, but now water can come out.

The instructions don't say.
https://www.ekwb.com/shop/EK-IM/EK-IM-3831109816738.pdf

That said, with it filled, I worry about putting pressure in the smaller space available... but, this is just a gut feeling.
 
I use a small power supply to circulate the loop when checking for leaks. My thoughts seen I seen this test kit originally was to use it when loop is filled and place z small bit of pressure in the loop similar to checking a car radiator fie leaks. I would think with the loop full and maybe an inch or so in the res then put something like 5lbs maybe 10lbs pressure on the loop you would find the leaks. Obviously too much pressure would cause liquid to spray on components which is something we don't want. Using it with just air finding a leak would be very difficult. My thought znd as stated I could be wrong.

EDIT

I did some googling, while at work not much time but seems most people are thinking along the same lines as you ED just air pressure. Doesn't quite make sense to me but can understand their thinking.
 
Using it with just air finding a leak would be very difficult.
Maybe. Certainly it's easier to see with water, but the gauge dropping should be pretty obvious too.

EDIT: Those instructions say to use water, now that I rubbed my eyes and read it more thoroughly.
 
Maybe. Certainly it's easier to see with water, but the gauge dropping should be pretty obvious too.

Yep, that's how I've been using it - to test individual sections of the loop while they're empty. I pump up the air pressure and if the needle doesn't move when I stop pumping then there's no leak. If the needle starts to drop back down to zero then there's a leak somewhere. So far it's been pretty reliable. The problem is that with just air there isn't a very easy way to see where the leak is...
 
Another casualty. My hands are getting a workout from tightening and loosening fittings. I hardly even know my own strength anymore.

Image from iOS (2).jpg
 
Replacement radiator is installed. Air pressure tests still indicate a slow leak somewhere.

IÂ’m going for it anyway.

Image from iOS (4).jpg
Image from iOS (3).jpg
Image from iOS (5).jpg
 
Still the leak sigh :( perhaps it will seal when water gets in and heats things up lol i dont know expansion:facepalm:

Youre going to pull more fancy tubing work top right rad looking very good i like

Does make me want to have a go just to try , be waste though as i need soft

Well done filllllllllllllllllllll
 
Got it filled and running (just with distilled water for now) and almost immediately found out that the radiator wasn't properly attached to its base. Reattached it and then had it running for about 15-20 minutes without leaking, but then I tried sliding the fan trays into place and that caused one of the connections to start leaking. I've drained it for the night and will play around with it more tomorrow.

I'm also getting a weird POST error code indicating general hardware failure. This is the first time I've tried to boot the system since installing the water blocks on the CPU and GPU. I didn't have any storage drives installed since I had broken my primary one earlier this afternoon. I'd expect the system to still let me access the BIOS despite that... I'm probably missing something dumb.
 
Back