- Joined
- Mar 12, 2002
Java programming with OpenGL #2 - Basic Shapes and Colors
Welcome to the second installment of my Java programming tutorial series! Today were going to be covering quite a bit of ground. I'm going to start by covering some basic project organization, and then move onto drawing some basic shapes. Once we cover that I'll spend the rest of the article discussing basic design and implementation.
The project is so simple at this point project organization might seem to be out of place, but I assure you this will save time later. Anyone who has worked on a large application can tell you the difference between understanding the program structure and not having a clue is a good organizational structure. Fortunately Java gives us a very useful organizational tool called a "package." The idea is that files that support each other should be located in the same package. We wouldn't want all of the abstract definitions in the main game package because it will just clutter it up.
Create a package now. Start by right clicking on your project and go to new > package

Now enter a name for your package I will use "demos" for these examples, and click ok.

Repeat these steps and create a second package called "primitives". Now that we have a few basic packages let's get our project back in order. Move the HelloWorld class into the demos package now. Simply click and drag the file in the file explorer down into the demo folder.

I highly recommend setting the project explorer to hierarchical view mode. To do this click the arrow on the far right of the package explorer and go to package presentation and select hierarchical.

From now on you will be putting the example files into the demos package and all of your basic objects will reside in the primitives package. Since we will only have a few files to work with for now we will move onto a new subject. Just be aware that you will be revisiting your projects organization often, so consider each class' placement early because moving it after it has been referenced in multiple files is much more difficult than putting it in the right place the first time.
Begin by creating a new class and call it "Demo1". Now go ahead and copy / paste all of the code from our introduction class. This is going to cause eclipse to throw up an error flag but have no fear! Simply hover your mouse over the red line under HelloWorld and a popup tip will appear. It will suggest "Rename type to Demo1" click that option to auto correct the file.

Now before we continue we need to add a few new GL calls before we can actually start drawing to our screen. Those methods are:
• glMatrixMode
• glLoadIdentity
• glOrtho
• glTranslate3f
• glDisable
glMatrixMode tells OpenGL what type of viewing we will be doing. glLoadIdentity forces OpenGL to initialize the values associated with the current matrix mode. glOrtho is the equivalent of g.translate in java it allows us to decide what the origin point will be. glTranslate3f allows us to assign an offset to all points defined. Finally glDisable is a wrapper method which can be passed any of OpenGLs functions and it will disable it for us.
So you need to add some code just before the display loop to complete the OpenGL initialization.
Now that OpenGL is fully initialized you're going to do a bit of basic shape drawing. You're going to add a few method calls just inside of our render loop glClear and glColor3ub. glClear which removes the one of OpenGL's static types in this case "COLOR_BUFFER_BIT" IE anything drawn to the viewport. glColor3ub takes 3 byte type inputs. Anyone who has done web or other graphics programming should familiar with 0-255/00-FF R G B values. If you are more comfortable using floats LWJGL also includes the method glColor3f which takes 0.0-1.0 range. I am most familiar with 0-255 RGB and will be casting to byte for readability.
Now that you have set the color to white go about drawing 3 basic shapes points, lines, and quads. To do this you will be using a few new methods glBegin, glVertex2i, and glEnd. glBegin tells OpenGL to get ready to draw a particular shape and requires input of one of its static ints. glVertex2i provides it with each pixel coordinate to draw the given shape from top left around clockwise. Finally glEnd tells OpenGL that the current shape has been drawn.
NOTE: While technically it is possible to call glBegin() and then define the correct number of points for multiple shapes it is preferred and safer to begin and end the glDraw for each object.

Ok well now you have seen how to handle drawing simple 2d shapes. With these simple shapes it's quite possible to draw far more complex shapes. The technique for drawing circles is quite a bit more complex, and requires calculating the points of a "TRIANGLE_FAN". In general you will be using textures with transparent edges to draw circles on top of a quad instead of running the circles numbers.
Try drawing some compound shapes now. First create a new class and call it Demo2. Then, as we did in the beginning of this tutorial copy / paste Demo1 into it and allow eclipse to fix the name for us. You're going to draw 2 thick lines in the shape of an X over top of a colored quad, and make the colors change randomly using Java's Random class. Insert this code below your OpenGL initialization block.


Colors are quite important when dealing with game objects. Since its possible to reach a situation where you might have to call 10 or more colors to draw a single shape you're going to spend a bit of time right now designing the first primitive class. Rather than remember the RGB values of every single color You're using in the game you will create a basic color library.
Begin by creating a new class in the primitives package and call it Color. Next you are going to give the class a static method. I mentioned in last issue that we like to avoid static as much as possible, however, due to the procedural nature of OpenGL having this color class instantiate an object just doesn't make sense.
This method will access the glColor3ub method provided by LWJGL. I have elected to use an array of ints as a parameter. The advantage of arrays are that you can give each array a unique name, and it carries all 3 of its associated values in one shot without all the overhead of a real object. Next define a list of public static final int [3] to represent your colors.
I have used a very simple naming convention for these colors. All the core colors begin with a c, dark shades begin with Dk, and light shades begin with Lt. This allows eclipse' intellisense to help us out when coding color changes IF you don't know exactly what color you want to use.
For the final example in this article you are going to implement the Color class. Go ahead and make a new class in demos package called Demo3. Again, copy / paste Demo1 into this and let eclipse fix the name. The only thing you're going to do differently from Demo1 is make a few calls to the color class. You will need to add an import for the color manager.

By now you should have created a working OpenGL window with multiple shapes and colors. While I wanted to cover object design in this article we've come a long way already, and I will leave that for next time. Please spend some time playing with these tools which you have created because you can learn a lot by playing with these methods. So play hard my friends!
Welcome to the second installment of my Java programming tutorial series! Today were going to be covering quite a bit of ground. I'm going to start by covering some basic project organization, and then move onto drawing some basic shapes. Once we cover that I'll spend the rest of the article discussing basic design and implementation.
The project is so simple at this point project organization might seem to be out of place, but I assure you this will save time later. Anyone who has worked on a large application can tell you the difference between understanding the program structure and not having a clue is a good organizational structure. Fortunately Java gives us a very useful organizational tool called a "package." The idea is that files that support each other should be located in the same package. We wouldn't want all of the abstract definitions in the main game package because it will just clutter it up.
Create a package now. Start by right clicking on your project and go to new > package
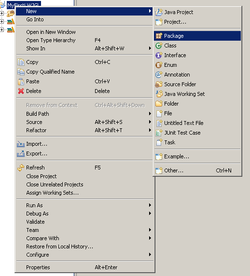
Now enter a name for your package I will use "demos" for these examples, and click ok.
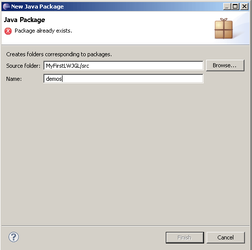
Repeat these steps and create a second package called "primitives". Now that we have a few basic packages let's get our project back in order. Move the HelloWorld class into the demos package now. Simply click and drag the file in the file explorer down into the demo folder.
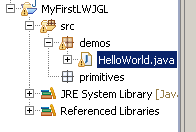
I highly recommend setting the project explorer to hierarchical view mode. To do this click the arrow on the far right of the package explorer and go to package presentation and select hierarchical.
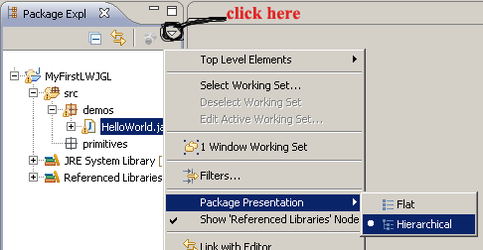
From now on you will be putting the example files into the demos package and all of your basic objects will reside in the primitives package. Since we will only have a few files to work with for now we will move onto a new subject. Just be aware that you will be revisiting your projects organization often, so consider each class' placement early because moving it after it has been referenced in multiple files is much more difficult than putting it in the right place the first time.
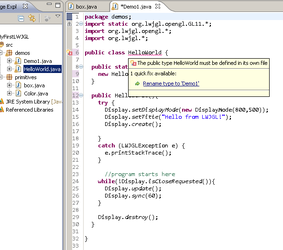
Begin by creating a new class and call it "Demo1". Now go ahead and copy / paste all of the code from our introduction class. This is going to cause eclipse to throw up an error flag but have no fear! Simply hover your mouse over the red line under HelloWorld and a popup tip will appear. It will suggest "Rename type to Demo1" click that option to auto correct the file.
Now before we continue we need to add a few new GL calls before we can actually start drawing to our screen. Those methods are:
• glMatrixMode
• glLoadIdentity
• glOrtho
• glTranslate3f
• glDisable
glMatrixMode tells OpenGL what type of viewing we will be doing. glLoadIdentity forces OpenGL to initialize the values associated with the current matrix mode. glOrtho is the equivalent of g.translate in java it allows us to decide what the origin point will be. glTranslate3f allows us to assign an offset to all points defined. Finally glDisable is a wrapper method which can be passed any of OpenGLs functions and it will disable it for us.
So you need to add some code just before the display loop to complete the OpenGL initialization.
Code:
    glMatrixMode(GL_PROJECTION);
    glLoadIdentity();
    glOrtho(0,800,500,0,1,-1    glMatrixMode(GL_MODELVIEW);
    glTranslatef (0.375f, 0.375f, 0.0f);
    glDisable(GL_DEPTH_TEST);
Now that OpenGL is fully initialized you're going to do a bit of basic shape drawing. You're going to add a few method calls just inside of our render loop glClear and glColor3ub. glClear which removes the one of OpenGL's static types in this case "COLOR_BUFFER_BIT" IE anything drawn to the viewport. glColor3ub takes 3 byte type inputs. Anyone who has done web or other graphics programming should familiar with 0-255/00-FF R G B values. If you are more comfortable using floats LWJGL also includes the method glColor3f which takes 0.0-1.0 range. I am most familiar with 0-255 RGB and will be casting to byte for readability.
Code:
while(!Display.isCloseRequested()){

  glClear(GL_COLOR_BUFFER_BIT);
  glColor3ub((byte)255,(byte)255,(byte)255);
Now that you have set the color to white go about drawing 3 basic shapes points, lines, and quads. To do this you will be using a few new methods glBegin, glVertex2i, and glEnd. glBegin tells OpenGL to get ready to draw a particular shape and requires input of one of its static ints. glVertex2i provides it with each pixel coordinate to draw the given shape from top left around clockwise. Finally glEnd tells OpenGL that the current shape has been drawn.
NOTE: While technically it is possible to call glBegin() and then define the correct number of points for multiple shapes it is preferred and safer to begin and end the glDraw for each object.
Code:
glBegin(GL_POINTS);
    glVertex2i(100,100);
glEnd();
glBegin(GL_POINTS);
    glVertex2i(150,100);
glEnd();
glBegin(GL_POINTS);
  glVertex2i(200,100);
glEnd();

glBegin(GL_LINES);
  glVertex2i(100,120);
  glVertex2i(200,220);
glEnd();
glBegin(GL_LINES);
  glVertex2i(200,120);
  glVertex2i(100,220);
glEnd();

glBegin(GL_QUADS);
  glVertex2i(250,200);
  glVertex2i(350,200);
  glVertex2i(350,300);
  glVertex2i(250,300);
glEnd();
glBegin(GL_QUADS);
  glVertex2i(400,200);
  glVertex2i(500,200);
  glVertex2i(500,300);
  glVertex2i(400,300);
glEnd();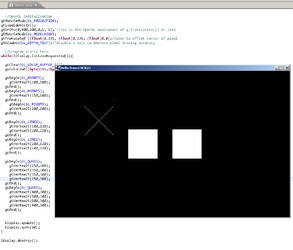
Ok well now you have seen how to handle drawing simple 2d shapes. With these simple shapes it's quite possible to draw far more complex shapes. The technique for drawing circles is quite a bit more complex, and requires calculating the points of a "TRIANGLE_FAN". In general you will be using textures with transparent edges to draw circles on top of a quad instead of running the circles numbers.
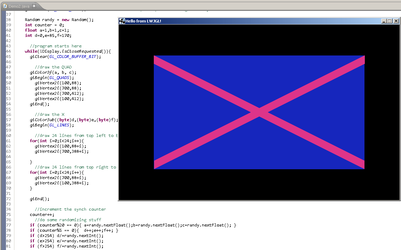
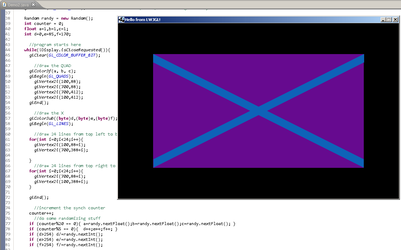
Try drawing some compound shapes now. First create a new class and call it Demo2. Then, as we did in the beginning of this tutorial copy / paste Demo1 into it and allow eclipse to fix the name for us. You're going to draw 2 thick lines in the shape of an X over top of a colored quad, and make the colors change randomly using Java's Random class. Insert this code below your OpenGL initialization block.
Code:
    Random randy = new Random();
    int counter = 0;
    float a=1,b=1,c=1;
    int d=0,e=85,f=170;

      //program starts here
    while(!Display.isCloseRequested()){
      glClear(GL_COLOR_BUFFER_BIT);

        //draw the QUAD
      glColor3f(a, b, c);
      glBegin(GL_QUADS);
        glVertex2i(100,88);
        glVertex2i(700,88);
        glVertex2i(700,412);
        glVertex2i(100,412);
      glEnd();

        //draw the X
      glColor3ub((byte)d,(byte)e,(byte)f);
      glBegin(GL_LINES);

      for(int i=0;i<24;i++){
        glVertex2i(100,88+i);
        glVertex2i(700,388+i);

      }
      for(int i=0;i<24;i++){
        glVertex2i(700,88+i);
        glVertex2i(100,388+i);
      }

      glEnd();

      counter++;
      if (counter%20 == 0){ a=randy.nextFloat();b=randy.nextFloat();c=randy.nextFloat(); }
      if (counter%5 == 0){  d++;e++;f++; }
      if (d>254) d/=randy.nextInt();
      if (e>254) e/=randy.nextInt();
      if (f>254) f/=randy.nextInt();

      Display.update();
      Display.sync(60);
    }
Colors are quite important when dealing with game objects. Since its possible to reach a situation where you might have to call 10 or more colors to draw a single shape you're going to spend a bit of time right now designing the first primitive class. Rather than remember the RGB values of every single color You're using in the game you will create a basic color library.
Begin by creating a new class in the primitives package and call it Color. Next you are going to give the class a static method. I mentioned in last issue that we like to avoid static as much as possible, however, due to the procedural nature of OpenGL having this color class instantiate an object just doesn't make sense.
Code:
  public static void setColor (int[] color){
    if (color.length==3){
      glColor3ub((byte)color[0],(byte)color[1],(byte)color[2]);
    }
  }
This method will access the glColor3ub method provided by LWJGL. I have elected to use an array of ints as a parameter. The advantage of arrays are that you can give each array a unique name, and it carries all 3 of its associated values in one shot without all the overhead of a real object. Next define a list of public static final int [3] to represent your colors.
Code:
//Color class coded by Darcy Viohl
/*
 *  OpenGL color wrapper class
 */

package primitives;

import static org.lwjgl.opengl.GL11.glColor3ub;

public class Color {
    //define colors

    //black & white
  public static final int[] cBlack  = new int[] { 0,0,0 };
  public static final int[] cLtGrey  = new int[] { 190, 190, 190 };
  public static final int[] cDkGrey  = new int[] { 95, 95, 95 };
  public static final int[] cWhite  = new int[] { 255, 255, 255 };

    //greens
  public static final int[] cGreen = new int[] { 48, 196, 30 };
  public static final int[] LtGreen  = new int[] { 98, 221, 87 };
  public static final int[] DkGreen  = new int[] { 5, 116, 11 };

    //reds
  public static final int[] cRed = new int[] { 196, 20, 20 };
  public static final int[] LtRed  = new int[] { 227, 83, 83 };
  public static final int[] DkRed  = new int[] { 124, 0, 0 };

    //blues
  public static final int[] cBlue = new int[] { 51,39,226 };
  public static final int[] LtBlue  = new int[] { 86, 216, 254 };
  public static final int[] DkBlue  = new int[] { 11, 25, 255 };

    //yellows
  public static final int[] LtYellow  = new int[] { 240, 240, 140 };
  public static final int[] DkYellow  = new int[] { 240, 240, 50 };

    //oranges
  public static final int[] LtOrange  = new int[] { 228, 186, 56 };
  public static final int[] DkOrange  = new int[] { 228, 122, 0 };

    //purples
  public static final int[] LtPurple  = new int[] { 180, 100, 246 };
  public static final int[] DkPurple  = new int[] { 99, 3, 185 };

    //pinks
  public static final int[] LtPink  = new int[] { 255, 194, 252 };
  public static final int[] DkPink  = new int[] { 232, 61, 91 };

    //method to set color, will utilize static internal colors
  public static void setColor (int[] color){
    if (color.length==3){
      glColor3ub((byte)color[0],(byte)color[1],(byte)color[2]);
    }
  }

}
I have used a very simple naming convention for these colors. All the core colors begin with a c, dark shades begin with Dk, and light shades begin with Lt. This allows eclipse' intellisense to help us out when coding color changes IF you don't know exactly what color you want to use.
For the final example in this article you are going to implement the Color class. Go ahead and make a new class in demos package called Demo3. Again, copy / paste Demo1 into this and let eclipse fix the name. The only thing you're going to do differently from Demo1 is make a few calls to the color class. You will need to add an import for the color manager.
Code:
//Demo3 class coded by Darcy Viohl
/*
 * This class will demonstrate simple shapes with
 * predefined colors.
 */

package demos;
import static org.lwjgl.opengl.GL11.*;
import org.lwjgl.opengl.*;
import org.lwjgl.*;
import primitives.Color;

public class Demo3 {

  public static void main(String[] args) {
    new Demo3();
  }

  public Demo3(){
    try {
      Display.setDisplayMode(new DisplayMode(800,500));
      Display.setTitle("Hello from LWJGL!");
      Display.create();

    }
    catch (LWJGLException e) {
      e.printStackTrace();
    }

      //OpenGL initialization
    glMatrixMode(GL_PROJECTION);
    glLoadIdentity();
    glOrtho(0,800,500,0,1,-1);//This is the OpenGL equivalent of g.Translate(x,y) in java
    glMatrixMode(GL_MODELVIEW);
    glTranslatef ((float)0.375, (float)0.375, (float)0.0);//used to offset center of pixel
    glDisable(GL_DEPTH_TEST);//disable z axis to improve pixel drawing accuracy

      //program starts here
    while(!Display.isCloseRequested()){

      glClear(GL_COLOR_BUFFER_BIT);

      Color.setColor(Color.cRed);
      glBegin(GL_POINTS);
        glVertex2i(100,100);
      glEnd();
      glBegin(GL_POINTS);
        glVertex2i(150,100);
      glEnd();
        glBegin(GL_POINTS);
        glVertex2i(200,100);
      glEnd();

      Color.setColor(Color.DkPurple);
      glBegin(GL_LINES);
        glVertex2i(100,120);
        glVertex2i(200,220);
      glEnd();
      glBegin(GL_LINES);
        glVertex2i(200,120);
        glVertex2i(100,220);
      glEnd();

      Color.setColor(Color.LtGreen);
      glBegin(GL_QUADS);
        glVertex2i(250,200);
        glVertex2i(350,200);
        glVertex2i(350,300);
        glVertex2i(250,300);
      glEnd();
      glBegin(GL_QUADS);
        glVertex2i(400,200);
        glVertex2i(500,200);
        glVertex2i(500,300);
        glVertex2i(400,300);
      glEnd();


      Display.update();
      Display.sync(60);
    }

    Display.destroy();
  }

}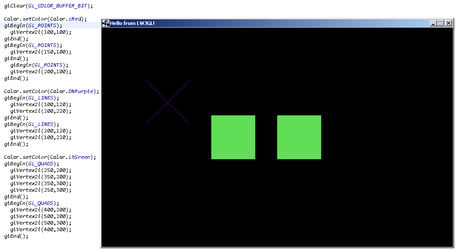
By now you should have created a working OpenGL window with multiple shapes and colors. While I wanted to cover object design in this article we've come a long way already, and I will leave that for next time. Please spend some time playing with these tools which you have created because you can learn a lot by playing with these methods. So play hard my friends!
Last edited: