• Welcome to Overclockers Forums! Join us to reply in threads, receive reduced ads, and to customize your site experience!

DIY Fan Controller for PWM Fans

Overclockers is supported by our readers. When you click a link to make a purchase, we may earn a commission. Learn More.
PWM Control Using Analog 0-5v input instead of potentiometer

I have a unique problem and have not been able to find a solution.
I am working on an older MSI 848P Neo2-V motherboard (MS-7108) which appears to be wired incorrectly.
The CPU Fan has a four pin fan header but the fan always runs at full speed.
The problem is the motherboard is wired direct from the output of the W83627THF chip with no additional circuitry.
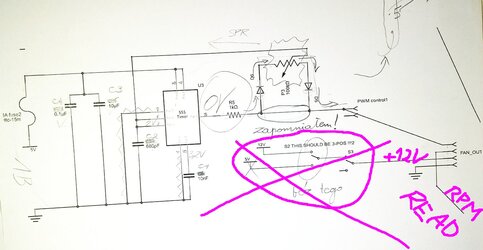
It is wired to the correct pin on the Winbond chip, unfortunately this does not output PWM, but a 0 to 5 volt analog DC voltage signal.
This output on other MSI boards researched is manipulated by an OP-Amp setup and varies the fans DC input voltage using a three pin header fan setup.
On this board the output is being sent directly to the fourth header pin, which is not a PWM signal but the analog DC voltage.
Using Speedfan, I am able to change the output voltage at this pin from 0 to 5 volts in .33 volt increments (15 steps).
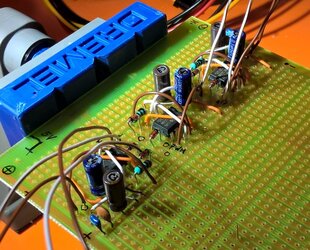
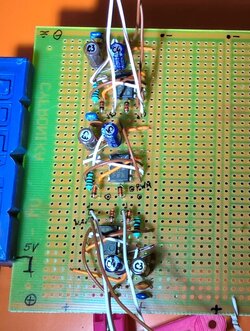
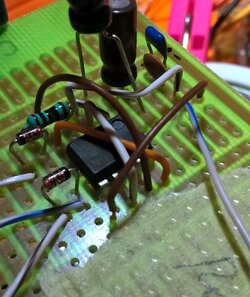
Is there a way to build this simple PWM Fan Controller using this analog voltage output in place of the potentiometer to vary the PWM output?
Any help appreciated - Thanks in advance - Rich
 
DIY is not about cheap, it`s all about being able tailoring stuff exactly to ones needs. Yes, that`s very cool.
Retail mostly simply don`t cut it (besides this, it`s often either crap or overpriced... or both).

I see the value of building the circuit as a learning experience, or a starting point for a specialized controller, but I don't think it's really the most elegant answer for the problem where it's usually applied.

If one assumes that the goal is to run high amperage fans beyond the current capacity of the motherboard, it's simpler to just run the hot wires to a molex connector and leave PWM and Tach on the mobo fan header.

In my limited understanding of PWM, the actual PWM signal is of negligible amperage, so there is little load on the fan header.

This is how I have operated some fairly absurd fans, including the push/pull with a pair of Nidec server fans (the huge ones Intel used to use on their crappy tower servers) on a Hyper 212.

I used a separate p/s for the fans, because I was afraid of overloading the marginal P/S I was using.

First time I started benching with that rig, my wife shot me some serious WTF looks, but it dragged a non-delidded 3570k kicking and screaming to 5ghz.

Still have that system, though I'm not running the monster fans currently - I can live with 4.5.

One of those Nidec's is in my wife's daily driver now - still freaks her out when she loads the system and the fan starts to ramp up.

The problem with this is that most motherboard PWM stepping is kind of rough. Some can't go all the way to off/sub 500 RPMs and it jumps in increments of 10%. On a fan that does 6000 RPMS that means that the difference between say 1500 RPMs (silent) and 2100 RPMs are huge in terms of noise. I think most who are trying to use this kind of set-up would like to do their benching with a 6000 RPM fan, but be able to set the fan at sub 1000 RPMs for daily internet use. A motherboard fan header just doesn't do this well and the auto fan function is garbage even on low RPM Noctuas.
 
Nice writeup, but b/c I am not able to connect the potentiometer properly, it's of no use to me. I don't understand the circuit diagram around the potentiometer wiring, and there were no clear photos from which I could deduce this.
The potentiometer I have is something like this:
1661029569942.png

How do I wire this using your circuit diagram?
Where do the 2 diodes go?
1. On the GND and VCC side of the potentiometer,
2. or between the GND side and the output of the potentiometer (top pin)
3. or between the VCC side and the output of the potentiometer (top pin)
 
Nice writeup, but b/c I am not able to connect the potentiometer properly, it's of no use to me. I don't understand the circuit diagram around the potentiometer wiring, and there were no clear photos from which I could deduce this.
The potentiometer I have is something like this:
View attachment 358851

How do I wire this using your circuit diagram?
Where do the 2 diodes go?
1. On the GND and VCC side of the potentiometer,
2. or between the GND side and the output of the potentiometer (top pin)
3. or between the VCC side and the output of the potentiometer (top pin)
Hi!
I've been off the forums for more than 5 years. Could you please link the schematic in question for me. I could take a look. I've completed a multi-fan controller based on a design found on this site.
 
I used to have a couple of Zalman controllers specifically to resolve this very same issue. I'm not techie enough to do what you guys are doing, which is definitely impressive. But if you're looking for a quick fix, I'm pretty sure you can still find these on eBay or Amazon. Being older products, they can be quite pricey nowadays though.
 
I believe this is the schematic in question


Here are some screen shots and pic of my board I had made for me.


I left the pot off till I use it.
Somehow I hated everything about the layout of the original schematic so I translated it to what I think is a proper form for a single PWM module and never loooked back. Take a look. The zoomed out photos of the prototyping board show 3 PWM modules which are NOT interconnected. I just skipped cutting them out.

Your original question was:
How to connect the potentiometer?
Answer: As it is with potentiometers you don't have to worry about the pins 1 and 3. If you swap them, you'll just see the adjustment of RPM works "the wrong way". Now, for the connections required:
Pin 1 of the pot has to be connected to one side of D3
Pin 3 (MIDDLE)* of the pot has to be connected to pin 2 AND pin 6 of the 555 timer AND to one lead of the C2 680 pF capacitor.
Pin 2 of the pot has to be connected to one side of D4

ONE MORE CONNECTION is required, which I learned the hard way. You need to connect the remaining leads of the D3 and D4 diodes. I even denoted it on the final checkup as "zapomnialem!" which is Polish for "I forgot":)


* following the convention on my schematic; somehow Fritzing designates the leads differently from the rest of the world :)
 

Attachments

  • irfan_20220912_191142.jpg
    irfan_20220912_191142.jpg
    148 KB · Views: 2
  • irfan_20220912_191137.jpg
    irfan_20220912_191137.jpg
    131.6 KB · Views: 4
  • irfan_20220912_191123.jpg
    irfan_20220912_191123.jpg
    156.7 KB · Views: 4
  • irfan_20220912_190654.jpg
    irfan_20220912_190654.jpg
    125.2 KB · Views: 3
  • irfan_20220912_190643.jpg
    irfan_20220912_190643.jpg
    122.2 KB · Views: 2
Last edited:
Back