[I don't know how to change this, but this is pretty much a project log]
This is a pretty monstrous computer case. I've been into PC modding for a while, I find the parts tend to go in and out pretty quick, but the major components of a case have been more or less standard for a long time. Though the main PC in this case though is pretty kick *** atm.
As a minor pre-face on the style of this build; I really focused on utility with this case. I don't swap parts often, but I like ease of access when I do, places to put cables, room to work.
I've been building my own PC's forever now, and things like changing the motherboard I found cumbersome in most traditional PC case design (big CPU heat-sinks are the worst)
Another thing I had been wanting to include forever in a build is two PC's in one case. Having one run as a server / media hub, and another as a game / work station really allows a focus in selecting PC parts, rather than trying to compromise and make a mega work station that does both tasks. (Really I just like the organization and reliability of my setup - even if it is overkill)
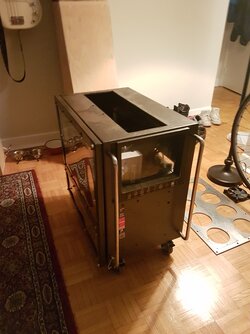
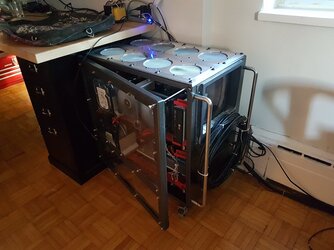
The case started as this; the pendant for T600M TOSNUC Milling machine (I fix these things so you will see a lot of random bits) This a huge box, that has roughly the same geometric proportions as a PC case (scaled up of course).

This stupid thing is already very heavy, the top steel is 5mm thick (two 2.5mm plates) The pendant was initially hung via that hole in the top with a swing arm assembly, it weighs probably eighty pounds normally (forty empty like this - or more, the final weigh in is mighty!)
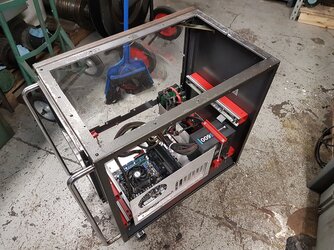
I had installed rails for the PC 'shelves' to run on; almost everything in this case is made in steel, it seemed like an alright decision early on, but the weight of this case grew quite fast.
Here you can see how it is roughly just a huge computer, its just an average mid-tower beside, all of the parts used in these photos are old stuff for reference (don't care if a whoops moment happens..)
The 'crash bars' added a nice bit of beef to the front end looks, I'm not totally designing this thing around aesthetics, but it doesn't hurt to try.
The rails give a nice amount of extension, the plan is too have the whole PC mounted on the tray, so in essence they can be swapped, removed for builds..etc. The real idea is making my life easier later.
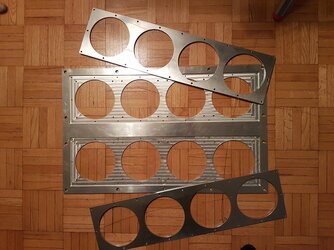
Here are the trays, these took a while to build, are both identical, and have a surprising number of pieces, once again pretty much all steel.
One thing to note is I used old PSU's, new ones are a bit longer, which caused some later grief, but solved with a riser to prevent the bottom of the PSU from being in the space the motherboard occupied
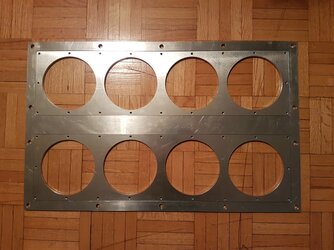
Each tray has a mountain mods motherboard tray (conveniently named so), room for eight 3.5" hard drives (I think you can get dual adapters for 2.5", so 16 for all that raid) one CD drive - cause I barely use it.. really just to load windows almost, but I can't use a USB CD drive, the transfer rate just isn't there.
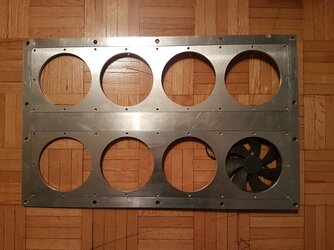
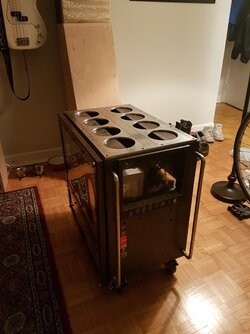
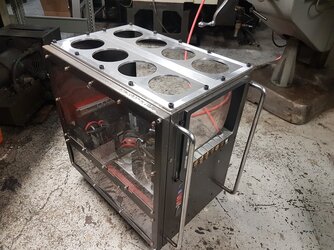
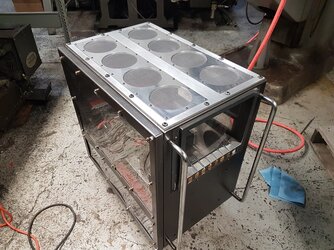
You can sort of see the fan grill at the top; this takes massive 172mm fans, I'll be running just three fans for the case (there are some internal fans, but the three 172mm fans are the only venting for the case)
Tray in, Tray out, pretty simple. The trays have a 'divited' position near the back of travel, they simply rest in place. I'll be working on a more rigid solution eventually, but it works fine, I really don't move the case much.
the door is starting to make a more permanent appearance. It initially held all of the front panel castings in the first photos.
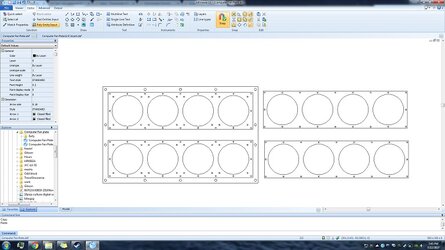
This was a real pain to do; finding where to put the holes for the mother board trays was an exercise in critical thinking, cutting them required multiple setups, getting something this big square with the machine was a unique challenge ( I think its 23" by 24".. Its quite close anyways)
Thankfully the hassle was worth it, very clean, and accessible, I like having access to the rear ports of my computers, and having a side access is a significant difference (like I can stay sitting in my chair)

What good is having a cool computer if you can't see into it? I thought so too, so I milled out the CRT window for the pendant from the front panel castings, screwed up the lower keyboard part during milling (this stuff was aluminum and pretty thin), replaced it.. with a big piece of steel
..and attached it, I wasn't super happy with this, my keyboard slot screw up and some poorly placed corner holes, but it had a gorgeous piece of curved tinted acrylic that had to be used (everyone has flat windows) and I have flat screens that could fit in there in the future, behind the acrylic for that CRT old school dome
Initially I had thought about putting the ports, LEDs, switchs, on the front of the case, but ports change, and the trays move (cables) so eventually I thought an external solution would be best.
I had been wanting a desktop headphone jack, near the keyboard, with volume control, so the external controls and a few other things became a combined idea.
This unit is going to sit on my desk at the head of my keyboard, probably forever, so I'm trying to make it look nice. It started life as a TEAC cassette player, its had some finish and milling work done to the face.
This part of the project has yet to come into fruition, but its happening.
There are a few of these pendants where I work, and a few front castings from machines that have received upgrades, I gave the front window another go, being much more careful with the bottom edge, and giving a frame to the window as well (reduce any light / air seepage)
Here is the first and second CRT frames I milled from those front panel castings.
The casting was thin, and brittle, and a little not straight, I cleaned up the frame edge on the mill for a better fit to the front of the case, but I could only cut so deep with any issues, so it is not perfect, but the bottom edge is the only one not totally level, so at least it will be hard to see
Almost too big!
By this point I'm sure I was tired (I did a large majority of this just after working a full day)
It did fit!
The crash bars just needed to be resetting with the CRT frame in place. I installed an old lower keyboard unit, mostly as filler / something interesting, this project is still evolving.
This was the worst part of everything. Drilling all of this holes was insane. Each hole because of the material and the need to use a hand drill, required around 7 drills to work up to size. I'm sure I spent ten hours between laying these out to finishing them.
But they are super important because all of the fresh air those huge 172mm fans demand comes in through here. Heat rises up, and with any luck the negatives of a mostly obstructed airflow (horizontal trays - vertical airflow ) are mitigated by natural convection
There is a roughly 1" between the tray and the front of the case, and the HDD section with the vertically arranged hard drives is pretty air flow friendly. There is enough room in the case that air flow stays high.
*
Painting! This is where all of this little pieces for the motherboard trays show up. Everything for two trays I think is in the shot, minus some hardware.
And installed!
I won't lie, I wasn't looking for red, it was just good quality paint, and steel rusts. I'll eventually get this whole thing powder-coated or something. It is still up in the air.
It still has a cool contrast with the red and silver though
Starting to look pretty cool. The wheels keep the holes on the bottom well above the floor, I will be installing a fine mesh to keep out all of the dust and such, but with the vertical ventilation setup I imagine the whole system collects less dust anyways (that's one of the hopes, I've cleaned enough GPU heatsinks)
The window!
This is probably not the final window, some cracks appeared in the installation, and I have a few other thoughts in mind for down the road.

With huge industrial fans a way to control them is nice, really this photo was just for my reference, but this stuff is interesting in a way, if you've read this far..
I'm really not sure on this, but I needed fan control, and this worked. Its basically a big current limiting voltage divider, and can clamp the fans to a certain level. The fans are 12v and I can run them as low as 6.3v with this, but I am still unhappy with the noise level.
I have some PWM stuff in the works, so more to come.
The dial is fully functional and really does the fan 'load'
Here all of the gawdy front fan stuff is wired in, the only non-functional part is that gold resistor, initially that was to be used for the gauge, but the circuit was the not the same as started.
A handy allen-key for opening the door, as much as it is a no no, I use a magnet to hold it.
The scale display resting on the case only adds about 0.2lb or less. This crazy thing really does weigh almost 140lbs, and there aren't even any computers inside!!
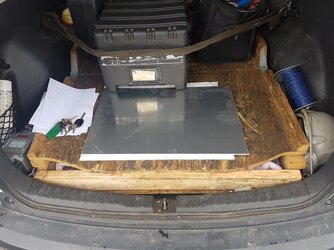
A great picture for scale, the back of my car (a CRV - not totally small) filled with PC case.
I've since added the PC portion of the case, I'll be tending this thread soon
This is a pretty monstrous computer case. I've been into PC modding for a while, I find the parts tend to go in and out pretty quick, but the major components of a case have been more or less standard for a long time. Though the main PC in this case though is pretty kick *** atm.
As a minor pre-face on the style of this build; I really focused on utility with this case. I don't swap parts often, but I like ease of access when I do, places to put cables, room to work.
I've been building my own PC's forever now, and things like changing the motherboard I found cumbersome in most traditional PC case design (big CPU heat-sinks are the worst)
Another thing I had been wanting to include forever in a build is two PC's in one case. Having one run as a server / media hub, and another as a game / work station really allows a focus in selecting PC parts, rather than trying to compromise and make a mega work station that does both tasks. (Really I just like the organization and reliability of my setup - even if it is overkill)
The case started as this; the pendant for T600M TOSNUC Milling machine (I fix these things so you will see a lot of random bits) This a huge box, that has roughly the same geometric proportions as a PC case (scaled up of course).


This stupid thing is already very heavy, the top steel is 5mm thick (two 2.5mm plates) The pendant was initially hung via that hole in the top with a swing arm assembly, it weighs probably eighty pounds normally (forty empty like this - or more, the final weigh in is mighty!)


I had installed rails for the PC 'shelves' to run on; almost everything in this case is made in steel, it seemed like an alright decision early on, but the weight of this case grew quite fast.

Here you can see how it is roughly just a huge computer, its just an average mid-tower beside, all of the parts used in these photos are old stuff for reference (don't care if a whoops moment happens..)

The 'crash bars' added a nice bit of beef to the front end looks, I'm not totally designing this thing around aesthetics, but it doesn't hurt to try.
The rails give a nice amount of extension, the plan is too have the whole PC mounted on the tray, so in essence they can be swapped, removed for builds..etc. The real idea is making my life easier later.

Here are the trays, these took a while to build, are both identical, and have a surprising number of pieces, once again pretty much all steel.
One thing to note is I used old PSU's, new ones are a bit longer, which caused some later grief, but solved with a riser to prevent the bottom of the PSU from being in the space the motherboard occupied
Each tray has a mountain mods motherboard tray (conveniently named so), room for eight 3.5" hard drives (I think you can get dual adapters for 2.5", so 16 for all that raid) one CD drive - cause I barely use it.. really just to load windows almost, but I can't use a USB CD drive, the transfer rate just isn't there.

You can sort of see the fan grill at the top; this takes massive 172mm fans, I'll be running just three fans for the case (there are some internal fans, but the three 172mm fans are the only venting for the case)
Tray in, Tray out, pretty simple. The trays have a 'divited' position near the back of travel, they simply rest in place. I'll be working on a more rigid solution eventually, but it works fine, I really don't move the case much.
the door is starting to make a more permanent appearance. It initially held all of the front panel castings in the first photos.


This was a real pain to do; finding where to put the holes for the mother board trays was an exercise in critical thinking, cutting them required multiple setups, getting something this big square with the machine was a unique challenge ( I think its 23" by 24".. Its quite close anyways)

Thankfully the hassle was worth it, very clean, and accessible, I like having access to the rear ports of my computers, and having a side access is a significant difference (like I can stay sitting in my chair)

What good is having a cool computer if you can't see into it? I thought so too, so I milled out the CRT window for the pendant from the front panel castings, screwed up the lower keyboard part during milling (this stuff was aluminum and pretty thin), replaced it.. with a big piece of steel

..and attached it, I wasn't super happy with this, my keyboard slot screw up and some poorly placed corner holes, but it had a gorgeous piece of curved tinted acrylic that had to be used (everyone has flat windows) and I have flat screens that could fit in there in the future, behind the acrylic for that CRT old school dome

Initially I had thought about putting the ports, LEDs, switchs, on the front of the case, but ports change, and the trays move (cables) so eventually I thought an external solution would be best.
I had been wanting a desktop headphone jack, near the keyboard, with volume control, so the external controls and a few other things became a combined idea.
This unit is going to sit on my desk at the head of my keyboard, probably forever, so I'm trying to make it look nice. It started life as a TEAC cassette player, its had some finish and milling work done to the face.
This part of the project has yet to come into fruition, but its happening.
There are a few of these pendants where I work, and a few front castings from machines that have received upgrades, I gave the front window another go, being much more careful with the bottom edge, and giving a frame to the window as well (reduce any light / air seepage)

Here is the first and second CRT frames I milled from those front panel castings.

The casting was thin, and brittle, and a little not straight, I cleaned up the frame edge on the mill for a better fit to the front of the case, but I could only cut so deep with any issues, so it is not perfect, but the bottom edge is the only one not totally level, so at least it will be hard to see
Almost too big!
By this point I'm sure I was tired (I did a large majority of this just after working a full day)

It did fit!
The crash bars just needed to be resetting with the CRT frame in place. I installed an old lower keyboard unit, mostly as filler / something interesting, this project is still evolving.


This was the worst part of everything. Drilling all of this holes was insane. Each hole because of the material and the need to use a hand drill, required around 7 drills to work up to size. I'm sure I spent ten hours between laying these out to finishing them.
But they are super important because all of the fresh air those huge 172mm fans demand comes in through here. Heat rises up, and with any luck the negatives of a mostly obstructed airflow (horizontal trays - vertical airflow
) are mitigated by natural convectionThere is a roughly 1" between the tray and the front of the case, and the HDD section with the vertically arranged hard drives is pretty air flow friendly. There is enough room in the case that air flow stays high.
*

Painting! This is where all of this little pieces for the motherboard trays show up. Everything for two trays I think is in the shot, minus some hardware.


And installed!
I won't lie, I wasn't looking for red, it was just good quality paint, and steel rusts. I'll eventually get this whole thing powder-coated or something. It is still up in the air.
It still has a cool contrast with the red and silver though

Starting to look pretty cool. The wheels keep the holes on the bottom well above the floor, I will be installing a fine mesh to keep out all of the dust and such, but with the vertical ventilation setup I imagine the whole system collects less dust anyways (that's one of the hopes, I've cleaned enough GPU heatsinks)

The window!
This is probably not the final window, some cracks appeared in the installation, and I have a few other thoughts in mind for down the road.

With huge industrial fans a way to control them is nice, really this photo was just for my reference, but this stuff is interesting in a way, if you've read this far..

I'm really not sure on this, but I needed fan control, and this worked. Its basically a big current limiting voltage divider, and can clamp the fans to a certain level. The fans are 12v and I can run them as low as 6.3v with this, but I am still unhappy with the noise level.
I have some PWM stuff in the works, so more to come.
The dial is fully functional and really does the fan 'load'

Here all of the gawdy front fan stuff is wired in, the only non-functional part is that gold resistor, initially that was to be used for the gauge, but the circuit was the not the same as started.
A handy allen-key for opening the door, as much as it is a no no, I use a magnet to hold it.
The scale display resting on the case only adds about 0.2lb or less. This crazy thing really does weigh almost 140lbs, and there aren't even any computers inside!!

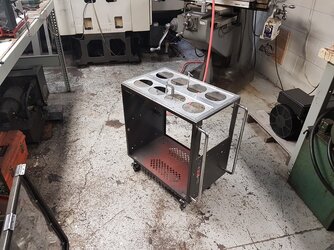
A great picture for scale, the back of my car (a CRV - not totally small) filled with PC case.
I've since added the PC portion of the case, I'll be tending this thread soon
Last edited:

")