• Welcome to Overclockers Forums! Join us to reply in threads, receive reduced ads, and to customize your site experience!

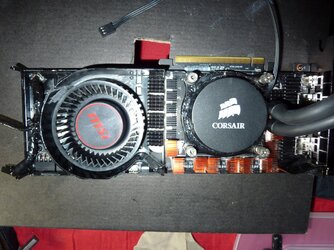
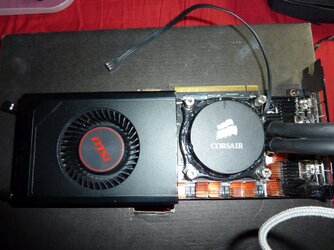
My New Vega 56 Cooling Mod

Overclockers is supported by our readers. When you click a link to make a purchase, we may earn a commission. Learn More.
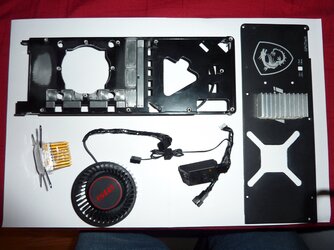
Cool, I didn't know it came apart that much. Yeah I'm guessing it's aluminum. It might just be playing a trick on me because the weight of the HS makes it feel like its not. Is it just a plate or does it have fins too? Are you planning to attack some heatsinks to the plate?
 
The front plate doesn't have any fins and to me it feels kind of heavy to be aluminum also but maybe it's a aluminum alloy. I've been re-thinking about this over and over again and want this to be good but also easier than the first time.

So what I might do this time is use the original shroud and front plate. Cut a large enough hole in the shroud for the head of the H55 to fit in, also cut the front plate around the dies to give the head clearance. It won't fit without cutting the front plate.

I will try using the original blower fan but reduce it's rpm's with some high 3 amp diodes I have and branch off the fan connector directly to the radiator fan. So the blower fan will still be working just not as fast and it's only job will be cooling the vrms and coils. I also will probably attach some heat sinks under the shroud to the front plate with thermal adhesive for better cooling of the vrms and coils.
 
I got the totally new airboost 56 card and tested it out before taking it apart. I ran the same ultra firestrike stress test as I did when I had it running with the water cooler and this is what I found. out.

The hotspot temperature is around the same as it was when I was water cooling the other airboost card give or take a few degrees because of the stock paste. The gpu temp was of course much higher then when running on water. The vrm temps were very reasonable in the 60c ~70c range with the card doing close to 300 watts.

My modding plan is now as follows.

I Will use original blower fan and front plate. I will use the original shroud also by either cutting it in half of making a cutout for the cooling head of the h55.

I bought a Noctua 4pin PWM controller which I will use to lower the blower fans rpms. I made a fan splitter cable so I can control the rad fan from the card and the blower fan. I will use the rpm wire from the blower fan and connect it to the motherboard to monitor it's speed.

I will use better thermal pad all around and possibly sand off the paint in those areas on the front and back plate that will make contact with the thermal pads. I will use thermal adhesive and add heatsinks to the front plate under the shroud and also on the back plate in certain areas.
 
Sounds cool.

Interesting that about the hotspot. I found mine varies about 8 degrees between my lowest (approx 40% max RPM) and highest pump settings.

I think thermal tape is what you're looking for to mount some of this stuff. Maybe that's what you're already planning with the thermal adhesive. Just a different name. Then its a removable thing but fairly secure.
 
I'll have to post some pictures as I'm going along like the first time. I'm not gluing directly to the components this time, it's to the front and back plates so it will be easier and permanent. Right now I'm doing little bits here and there. This weekend I will be enlarging the front plate socket hole so the H55 head will fit and enlarging the heatsink bolt holes on it. I think from measurements that's all I have to do to it.
 
Question...the front plate seems to have a baked on enamel. Would it be worth the effort to sand it down to bare aluminum in the spots for the thermal pads and also on the other side where I will attach some heat sinks to with adhesive? If it would only make a small difference or none at all I won't bother. Any ideas about that? Thanks.
 
I had some time so I sanded where the pads will go even if it won't make a difference. The front plate has been modified to fit the H55. This is also the fan controller for the blower fan and the 4 pin pwm cable for the rad fan. The single wire connector is the rpm for the blower fan that will use a motherboard header to monitor its rpm's. The blower fan can't connect to the motherboard directly it's wattage of 28watts is too much.


P1000138.JPG
 
Well I finally finished it today. The blower fan controller didn't work off the card directly, not sure why though. I think it was confused with having two fans connected to the gpu fan header. I will just get an adapter for the controller so I can run it off the motherboard. They make an adapter that connects directly to the power supply, but the blower will be controlled and monitored by the motherboard. I also modified the front plate so if anything happens to the blower fan I can replace it without having to take off the front or back plate.

I used a little bit extra thickness on the thermal pads, but now I wish I didn't. The circuit board in certain spots is bending from the front and black plates, but it still seems to be working fine.

This card does a lot better on the gpu clocking then the other card. Running Ultra Firestrike I can run P7 at [email protected] which does around 1655Mhz steady. The HBM on this card is horrible I can only manage around 850 because of the hynix memory. The old card would do around 930. I tried a 64 bios with the extra hbm voltage and I didn't gain all that much so I flashed it back.

Temperatures are all around pretty good, this below is with a rushed ic diamond pasting.

Running Ultra Firestrike Stress.

Ambient: 24c
Fan Speed: 1700rpms
GPU: 57C Avg.
HBM: 62C Avg.
HS: 83C Avg.
Both VRM Banks: 52C Avg.
P1000142.JPG P1000144.JPG
 
Last edited:
Nice, glad you're getting better clocks to boot. Was this one an epoxied die, or another bare one? I'm guessing if you feed it more voltage it will clock much higher, but it looks like you're approaching thermal limitations right now.

I finally got to spend some serious time gaming and got some things dialed in. My HBM was crashing in games at 1150MHz, though it still seems stable for benching, and it was causing freeze/stutters above 1050MHz (like it was about to crash but didn't). Working on all around stable clocks as well. I used the % slider and went to +0.5% (this is with the liquid cooling bios) which set P7 @ 1757MHz and 1250mV and P6 @ 1677MHz and 1150mV. I think it's important to have both P6 and P7 adjusted, because the card actually seems to spend most of its time between the two, never actually reaching P7. Rather than winging it, I just used the % slider. When I tried 1% I noticed the texture artifact (where textures will take a long time to load and things randomly are blurry), so I backed it off. It was stable on these settings through a pretty solid Mass Effect Andromeda sesh today.
 
It was another bare die. What are your temps like running those voltages with Firestrike Ultra stress? I'm pretty sure it will go higher with more voltage but trying to keep everything cool especially the hot spot is a challenge. I'm also not sure if it's worth it for real world performance.

I re-pasted it tonight and lapped the copper on the H55. I think I managed to lower everything down a couple of degree's.
The IC Diamond can also take up to two hours before getting the best temps.

Give this demo a try.

http://tombraider-dox.com/

With both my cards it showed artifacts like glowing colored orbs right on the starting screen and also in the game when the HBM was clocked too high. I use that and random screen flashing when running Firestrike ultra to detect the memory is clocked too high.
 
Cool I'll check it out. I had no problems running FS Ultra with the HBM at 1150MHz, but after a more prolonged load I got crashes. It wasn't until I pulled the clocks all the way back to stock settings and still crashed that I decided to run it on "performance" instead of my own OC, low and behold crashes gone. Only difference was HBM clock and power slider. Will edit in results from the requested tests :).

edit: FS Ultra looped for 10 minutes, max temps: CPU 75.3C, GPU 48C, HBM 50C, HS 78C.
 
Last edited:
Those are some good temps. I really don't think there is much to do about the hot spot temp under heavy load. I got pretty much the same thing with both cards no matter what I tried.

Any idea about long term effects of running hynix memory at 1.35 instead of 1.25? I can get a little better overclock but only if I flash to a 64 bios which I can with the higher voltage. I'm thinking it shouldn't matter as long as it's kept cool. I'm also thinking that the only reason amd didn't use it on the 64 is because it wasn't reliable enough even with more voltage for the higher 945mhz speed on the 64.

Any thoughts about it?
 
Last edited:
Back