• Welcome to Overclockers Forums! Join us to reply in threads, receive reduced ads, and to customize your site experience!

Opinion on my radiator layout

Overclockers is supported by our readers. When you click a link to make a purchase, we may earn a commission. Learn More.

larryccf

Registered
Joined
Dec 18, 2018
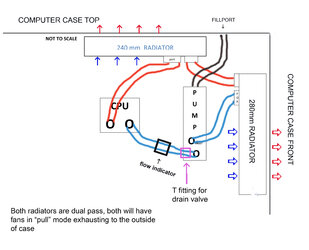
BELOW IS a cocktail napkin sketch of the radiator layout i'm getting ready to assemble

any suggestions, opinions etc i'd appreciate.

I would have preferred to go with one 360mm radiator in the roof of the case but that presented fitment issues with the rear exhaust fan and the front 5.25" external bay at the front top of the case, and that bay is needed

fans will be mounted on the radiator in "Pull" mode, exhausting to the outside of the case, and there will be 4 & 1/2 fans blowing in (i say 1/2 fan as it will be a 120 x 15mm fan turning low rpms - but point is the case will have good airflow with positive air pressure

What was the rear exhaust fan will be turned around to blowing inward, and i'm fabricating a shroud to direct it's airflow onto the motherboard

- - - Auto-Merged Double Post - - -

not sure why it posted the image twice, sorry about that
 

Attachments

  • 8cKpeuo.jpg
    8cKpeuo.jpg
    370.2 KB · Views: 224
  • tokGsxZ.jpg
    tokGsxZ.jpg
    86.6 KB · Views: 208
Larry,

I deleted your duplicate thread since this is the one you wish to use with the visible attachment. Welcome to OC Forums. :thup:
 
thanks - i'm not sure what happened, the first time i added the image it was way oversize for the screen, so i went back and replaced it with a smaller image and two images showed up
- i wasn't even aware of duplicate threads
 
thanks - i'm not sure what happened, the first time i added the image it was way oversize for the screen, so i went back and replaced it with a smaller image and two images showed up
- i wasn't even aware of duplicate threads

Our vBulletin software plug-in automatically reduces photos to fit our screens. It's not an issue.
 
welcome to OCF Larry! everything looks good. altho your pic has all of your fans blowing out ;)
 
maxfly - There will be 4 & 1/2 fans blowing in (i say 4 & 1/2 fan as one will be a 120 x 15mm fan turning low rpms) - but the case will have good airflow with positive air pressure. The 4 "full" fans are noctua's industrial 2000rpm pwm 140mm fans. Of the four blowing in, one will be what was the former exhaust fan location, in the top rear of the case, and i'm fabricating an acrylic shroud to direct it's airflow down onto the motherboard & VRM heatsinks.

caddi daddi - pump will be the EKWB's XRES 140 D5 PUMP W 200ML RESERVOIR

I didn't know if one flow route was preferred or recommended over the other, ie pushing cooler water to the cpu's waterblock vs pulling it thru the cpu's waterblock.

And, fyi, i have no intention or foreseeable need to liquid cool any other component, like the GPU, ram etc.
 
Last edited:
the shrouded rear fan should be a nice option for keeping your vrms/mosfets nice and cool. im looking forward to seeing some pics! ;)
 
when i'm done i'll post them, for sure - right now my problem is my back went out (helping neighbor move washing machine), and i've been worthless. Wearing a girdle/back brace what should have taken me a couple of hours at most took me three and still didn' finish. My mentor used to say getting old ain't for pansies and i'm appreciating that more and more every day
 
argh, i can appreciate your situation. if only we knew 20 years ago what we know now...
 
well, the wife's over at the daughter's house helping her out, i'm sitting here bored and figured i'd bore you guys - amazon delivered the "magnetic" filters to put on the cabinet over the fan openings i bored in the side cover - those magnetic filters are a joke, these were from THermaltake

neither one has the magnetic strength to hold themselves up, and the steel in the case, Fractal Define R6, is "magnetically responsive" . I've got some of those super earth magnets, figure i 'll use those to hold the filters clamped to the case, and make a thin wood frame with magnets embedded to clamp those filters over the fans

here's first shot, by the time i got the camera out, one had already slipped down


wdB41Hc.jpg


2nd shot without the filters, fan on the left is noctua "industrial" 2000rpm black 140mm fan, fan on the right is noctua's 120 x 15mm fan, aimed or located in front of that window that opens to the backside of the motherboard - i won't have it turning very fast, just moving some air into the case, but figured it would help keep air pressure inside case positve


xRbTW7F.jpg


and here's a shot from of the inside - the pump / reservoir is going half hidden by the HDD panel in front of the black 140 mm fan, but half will be visible so i can check fluid level in the reservoir at a glance, and positioned so the outlet is as close to halfway between the lowest point of the 280mm rad on the front of the case, and the highest point of the rad mounted in the roof of the case


u3g3NZW.jpg


going to start assembling everything tomorrow, and get the testing for leaks started - i'll post some shots of it assembled assuming i get it done tomorrow - have to make a bracket to hold the pump reservoir up

THere are two 140 mm Noctua industrial fans in the base or floor of the case and what was the rear exhaust fan will be reversed to blow inward with a shroud directing it's airflow onto the motherboard, so a total of four 140mm fans blowing in + the 120mm fan behind the motherboard, vs the four 140mm fans exhausting out from the radiators and the GPU exhausting out
 
Last edited:
the shrouded rear fan should be a nice option for keeping your vrms/mosfets nice and cool. im looking forward to seeing some pics! ;)

got it nearly finished -

for anyone else that's never worked with acrylic, for this item i fabbed a forming buck

zq1bkGi.jpg '

then covered it with a film that has a release agent, so the acrylic doesn't stick or imprint from the wood grain

AzwVezZ.jpg

i had already cut the acrylic front panel before making the buck - i knew the width of the buck, slightly under the width of a 140mm fan. I would have preferred to do the bending in an oven, but didn't have any metal tubing large enough, so i grabbed a pc of PVC pipe, and that pvc would not survive in an oven up thru the temp the acrylic takes (240-280F). For anyone trying to form acrylic in an oven, be sure to cut the piece you're going to bend or form oversize - subjected to heat, acrylic shrinks in both width and lenght, but will thicken. Another tip i mentioned in another post, when you cut acrylic, (i do it on a table saw, fine tooth blade, sandwiched between two pcs of wood, and used double sided tape, taping it to one of the boards, to keep it from sliding around under the wood. But once cut, i learned on a $480 airplane canopy, that the edges should be shaved smooth, ie to remove the cut or saw marks. Easiest way is to use a hacksaw blade, and using the back edge (non-tooth edge) like a draw knife. If you don't, if the pc flexes while you're handling it, working it etc, a crack will start in one of those saw cut marks.

anyway, after clamping the front panel to the top of the forming buck, and clamping a weight (centered on the bottom edge of the front panel) i used a heat gun on the center of the bend point - as it heats up, the weight i clamped (3/4" square steel rod) will pull it down and give me a reading on how soft the acrylic is where i'm heating it.
When it's close to where i want it, i put the heat gun down, and used another block of wood wiping the front panel down toward the bottom, kind of like a squeegee, and then clamped it while it cooled with that clamp you see with the handle pointing toward 9:00 O'clock

here is the bent front panel pc with the two side panels

u4gT7M0.jpg

and one side panel with the cement curing - i'll leave it clamped overnite, as i only used 1/16" thick acrylic sheet, so there's not much of a bonding area on the edge of the side panels, and the cement wants 24 hours for 80% strength cure. I swear this stuff smells like the glue we used to use to assemble model airplanes (yeah, i was building models back when Lincoln was still in shorts).

iQQMaRq.jpg

if you were looking at the computer case from the front to the rear, the open end of the shroud will be pointing toward the mother board, and the small closed end would be at 9:00. The case's exhaust fan will be turned around to blow inward and will be mounted on the outside of the computer case - i don't like those perforations so i'll be cutting a 5.5" hole so the fan isn't restricted by them

this shroud would have been much easier to make out of fiberglass, making a form out of styrofoam, but i plan to "pimp" the case out with at least a RGB fan at the rear of the case there.
 
Last edited:
Back