• Welcome to Overclockers Forums! Join us to reply in threads, receive reduced ads, and to customize your site experience!

PROBLEMS WITH RYZEN 5 INSTALLATION AND AMD MSI B450M MOTHERBOARD

Overclockers is supported by our readers. When you click a link to make a purchase, we may earn a commission. Learn More.

Averyius

New Member
Joined
Jun 27, 2013
Location
Vienna, Austria
I have a new Ryzen 5 processor with a screw - on heat sink which is sold together in a box. I have attached it to my new compatible AMD msi B450M motherboard. I also have a new 8 GB RAM card slotted in to the first position away from the processor / heat sink. As far as I can see all the cables are connected correctly yet only the lights on the motherboard lit up and the cooling fan of the heat sink started working. Nothing else! No BIOS message or page on the monitor screen. I handled the processor with care like an egg only holding it at the edges and with plastic gloves. I am certain I never damaged the golden pins beneath (if they are so sensitive then they should be protected so that it is impossible to touch them with fingers) What am I doing wrong? I tried several times. In the instructions and on the motherboard there is inadequate information for the correct positioning of the CPU. Only a small golden triangle on the processor but no corresponding golden triangle on the board. Just a white dot with wires leading away. I am a trained technical author and consider this a major blunder and omission of whoever wrote the instructions and designed the motherboard. Presumably the processor sits with the triangle at the corner where the white dot is on the board? Only 2 orientations seemed to be possible because there are two rectangular shapes both on the processor and the board which presumably must also align with each other. Each time I took off the heat sink to check the position of the CPU, it was stuck to the bottom of the heat sink. I suspect that the uneven screwing on of the heat sink at all 4 corners is the problem as it must move the processor around while it is being lowered down by the screws unevenly? Maybe a simple and more conventional heat sink which is just put on and clamped would have been better or maybe one of the components is faulty? I don´t know and it cost me a lot of money. What should I do?
 
What RAM do you have and is it on the QVL? Or even designed to work with AM4? This could be your issue
The CPU "sticking" to the bottom of the heatsink is not anything new, hopefully there's no damage or missing pins. If the CPU goes back in easily then you're likely fine. Next time you're removing the HS twist it back and forth a bit while pulling this should help keep the CPU in the socket
 
I also have a new 8 GB RAM card slotted in to the first position away from the processor / heat sink.
This may actually be the problem, try moving it to the second slot away from the CPU. Using two matched sticks (more goes into being "matched" than is intuitively obvious, however we can go over this later) will improve your performance however it should boot on one stick.

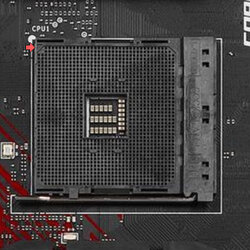
n the instructions and on the motherboard there is inadequate information for the correct positioning of the CPU. Only a small golden triangle on the processor but no corresponding golden triangle on the board. Just a white dot with wires leading away.
Yes I agree the manuals leave a lot to be desired, they assume this is not your first time. If you assembled your first system with only the manuals and not a separate PC build guide, than KUDOS to you, it must have been quite an experience.

Presumably the processor sits with the triangle at the corner where the white dot is on the board? Only 2 orientations seemed to be possible because there are two rectangular shapes both on the processor and the board which presumably must also align with each other.
The CPU will only go into the motherboard one way. There are three 45 degree "cut off" corners and one corner that is 90 degrees indented into the field of pins. If that doesn't make sense, just look for the one that is not like the others. This keys the CPU socket. Did you use the metal arm when installing the CPU? This should be raised, then the CPU should gently settle into the socket, the arm can then be lowered to secure the CPU into place. There should be no force required to insert the CPU into the socket. If you used any force to insert the CPU, or if the CPU was not fully seated when you mounted the cooler, then it is very likely that you have some bent pins.

Each time I took off the heat sink to check the position of the CPU, it was stuck to the bottom of the heat sink.
Yeah this happens sometimes. Not a big deal. You may need to re-apply the thermal interface material with so many mountings/removals.

I suspect that the uneven screwing on of the heat sink at all 4 corners is the problem as it must move the processor around while it is being lowered down by the screws unevenly?
I too found the stock cooler on my R5 to be a challenge to mount. I would ensure that you have the motherboard flat against a firm surface, outside of the case / enclosure when mounting, thus the backplate is fully supported. I found it odd that the backplate for for these systems is not secured to the motherboard when used in this configuration. That said, I will take ANY screw down solution over a clip down solution any day.

What should I do?
1. Try moving the ram
2. Post a full list of your system specs
3. Review this video and let us know if you followed this procedure exactly
 
If you forcibly extracted the CPU from the socket while the lock lever was still in place because the heat sink was stuck to the CPU it is possible you traumatically damaged one of the golden pins through extraction. Check the underside of the CPU for this kind of damage and also check the socket to see in there are any broken pins that remained in the socket matrix.

The suction created by the thermal paste will more often than not make it difficult to remove the heat sink. The wrong way to approach this issue is to just pull harder. This can result in the traumatic extraction of pins as I already described. The correct way to deal with this issue is to gently twist the heat sink clockwise and counter clockwise while sliding it to one side. This will break the vacuum seal.
 
Here is the triangle on the socket

MSIB450M-socket.jpg

I suspect that the uneven screwing on of the heat sink at all 4 corners is the problem as it must move the processor around while it is being lowered down by the screws unevenly?
The CPU should just fall in place once it is aligned, also when installing the HS, tighten the screws like you would the lug nuts on a tire on your car or truck, to put even pressure on the CPU.
 
Last edited:
Back