• Welcome to Overclockers Forums! Join us to reply in threads, receive reduced ads, and to customize your site experience!

PROJECT LOG Project Black and White

Overclockers is supported by our readers. When you click a link to make a purchase, we may earn a commission. Learn More.

Dakyris

Member
Joined
Jan 17, 2005
Location
Canada
Hey guys,

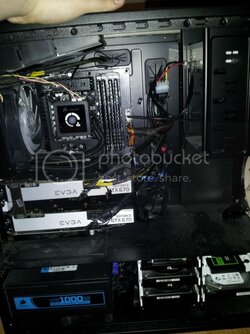
This is my build log for my new watercooling system. I'm actually retrofitting my "old" setup from last summer in the hope of reducing noise level and I'm trying to get a rather clean look if possible. The concept is rather simple, my current build is mostly black (picture below), I'm going to use white components for the watercooling system to achieve a high contrast.

I'm gonna reserve the first few posts and update those as I go.

I will not post all my pics here, only the most important ones. You can check out this link for more : http://s4.beta.photobucket.com/user/Kerdal/library/Dakyris 2013 build

DISCLAIMER : This is going to be a long post with multiple pictures on the front page!

(IN PROGRESS, check back soon!)

The hardware
Existing components :
Mobo : ASUS Z77 Sabertooth
CPU : Core i7 3770k
RAM : 4x4GB Corsair Vengeance 1600Mhz class 8
PSU : Corsair HX1000
Case : Fractal Design Define XL (R1)
ODD : LITE-On iHOS104-08 Blu-ray reader
HDD : 1x WD Velociraptor 10000RPM 600GB, 2x WD Black 2TB WD2002FAEX, 1x SG 3TB
SSD : 1x OCZ Vertex 3 240Gb MAX IOPS (boot drive), 1x Agility 3 360Gb, 1x Patriot Pyro 120Gb 1x OCZ Vertex 120Gb
Monitor : 2x DELL U3011 30" 2560x1600
Cooling system : Corsair H80 with Scythe Gentle Typhoon AP15, case fans are a mix of Noctua NF-P12 (2 in front, 1 at the bottom, 1 in the side door, have a few more spares) and NF-P14 (2 in front) and that weird angled fan at the top of the case

New acquisitions :
- Fractal Design Define XL R2
- Corsair HX1050
- EK GeForce 670 GTX VGA Liquid Cooling Block - Acetal/Nickel CSQ
- EK FC Bridge Dual Parallel 3-Slot CSQ - SLI Connection - Acetal
- EK Supremacy CPU Liquid Cooling Block - Acetal/Nickel
- XSPC RX240 Dual 120mm Radiator - Custom Painted White (for the front)
- XSPC EX240 Dual 120mm Low Profile Split Fin Radiator - Custom Painted White (for the top)
- Monsoon compression fitting 1/2" ID x 3/4" OD (3 packs of 6)
- Killcoil
- PrimoChill PrimoFlex Advanced LRT Tubing 1/2"ID x 3/4" OD
- Swiftech Maelstrom with MCP35X2
- 4x Swiftech HELIX-120-BW-PWM 120mm PWM Fan (to begin with, mostly for the visible spots, may order more later if necessary or use my spare fans)
- ARCTIC MX-4 Thermal Paste

Special thanks to those who helped me review my parts selection and offered constructive criticism, especially Conumdrum and GTXJackBauer

A few notes for those who followed my previous thread.
-I decided to stick with the monsoon, mostly for aesthetic and monetary reasons. The alternatives were plain chrome or black and costed up to 3x as much per fittings. These may be harder to work with (I'll see that later and post about my experience here)
-I will start with 2 120.2 rads and see how my temperatures are. If necessary I'll add a 3rd radiator but I'm hoping 2 will be sufficient if I keep the OC mild (or open the window when it's -20°C outside haha)

Initial setup
This is what my current build looks like :
initial.jpg

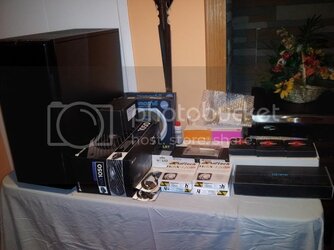
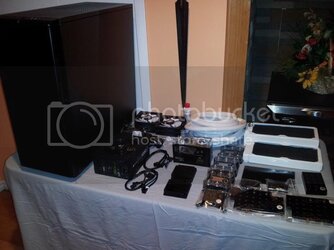
14/03/2013 - New components received
Here are a few pics of the new components
boxes.jpg

unboxed.jpg
 
Last edited:
Preparation

Now to fit with my "Black and White" theme, I'm gonna try to paint the various waterblocks. I'm told acetal is a pain to work with so I'll try on a small component that could be hidden, one of the fc-links (used to connect the gpu waterblock to the bridge.

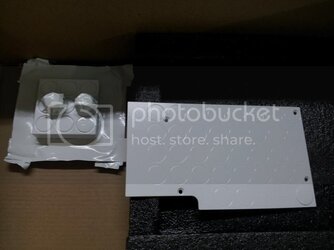
The initial plan was to test it on the single backplane I ordered but I got a little surprise, the backplane appears to be metallic. At the very least, it's not the same texture, color and feels rather cold compared to the waterblocks' acetal. So that won't work and I'll need to order a 2nd one. As I said, I wanted to test it on that first, if I failed I would've ordered a new pair and that was all. Unfortunately my canadian supplier is out of stock for the moment.

I'll probably try the paint tomorow night and will update this on Saturday with the updates.

15/03/2013
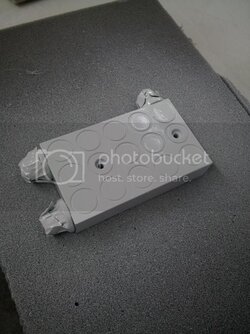
Results of the paint test.

I just came back from the paint tests.

I started with the small FC-link (basically a 2 channels 90° elbow made of acetal), I taped all the other surfaces to block the paint and only focused on a single, flat surface to begin with. This is a worst case if the paint doesn't hold. The small indentations in the blocks will be introduce other challenges but at this point I was only concerned on whether or not it could be painted or if it would simply flake off immediately and I was concerned about painting the black into white.

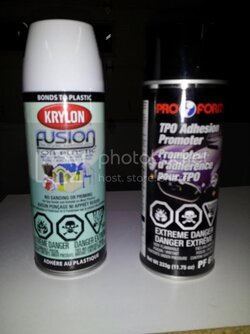
Picture of the products I used :
20130315_200349.jpg

16/03/2013 1:12
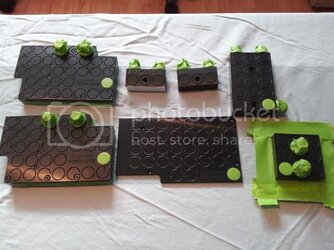
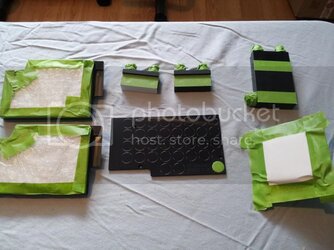
The blocks are prepped, starting the paint work. I blocked the threads with the first half of my fittings, should prevent anything from going in there. The nickel plated part of the vid card was a pain to protect. I used a single continuous piece of tape to protect the side and then folded the tape over a piece of paper + bubble wrap. See the pictures. Protecting the various EK badges required a LOT of precision work. Word of caution for anyone attempting similar, be prepared to spend a lot of time on the prep work if you want to do a clean job and have plenty of tape :p

These pictures are pre-sanding.

prepedparts2.jpg

prepedparts1.jpg

16/03/2013 7:00
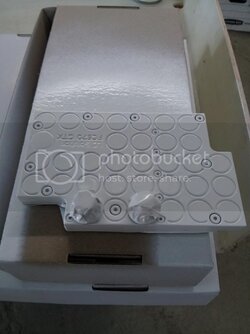
I finished painting. I will leave them to dry for at least 12 hours.

paintedbridge.jpg

paintedgpublock.jpg

paintedcpu.jpg

Flush and leak tests
21/03/2013

I started cleaning the various parts today. I setup my res/pumps in a large plastic sink I have in the basement, then I connected my first rad to it, the outlet of the rad is reduced to 1/4" to go through a gas filter (I wanted some kind of filter, I don't trust carbon filters, always had some residues leaking so I figured I'd try this, it's cheap as hell but adds a lot of restriction due to the 1/4" inlet and outlet).

I use my old tubing from my previous system which I cleaned up first. I couldn't find any distilled water, all they have is deionized/demineralized water and it's $4 for 4L (about a gallon). It's good enough for flushing but I'm gonna keep looking for distilled for the real loop but I don't have high hopes. Been pretty much everywhere already.

I let it run continuously for about 30 minutes and then I move on to the next part, initially I thought about removing the rad and replacing it by something else but I would've wasted a lot of water in the process so instead I decided to test my pumps at the same time. After 30 minutes, I'm gonna cut the tube near the filter and add the new component in series, the previous parts should be clean enough already so I won't have to worry about contaminating the newer components.

Quick notes :
- I really like the monsoon fittings, didn't have any problems installing them, no leaks either after 2 hours.
- The pumps are a bit loud and hot because I only supply the 12V to them so they probably run at 100%, I'm glad I bought PWM splitters, will definitely try slowing them down a bit.
- I'm happy with the paint job. It's not perfect, it never is. But it certainly looks good so far.
 
Last edited:
Building
22/03/13
I started disassembling my current build and integrating the new watercooling setup.

The main components are now sitting on the table for the moment. I'm waiting for the parts I flushed to dry out a bit before attempting assembly.

I installed the cpu block on the motherboard, no problems there. I disassembled the vid cards in preparation for the water block but I had a bit of a setback. The paint is much more fragile than I expected. I had to touch up one of the blocks. Installed the other one. I modified the wrong backplate I received, the result is pretty decent, it won't be as clean but at least it will cover the card and have the proper contact point.

Tomorrow I should be able to install the 2nd gpu block and assemble everything in the new case. I noticed I may have some contamination because the water in the res after the flushing wasn't perfectly clean and since the parts were all in series, they were all affected. I'll install everything, fill the loop and let it run for a while. After that, I'll drain the system and fill with clean water. That should get rid of the remaining contaminant.

Still no luck finding distilled water.

23/03/13
I finished cleaning the parts, I discovered I had to repair the paint on 1 part and I modified the backplate I received (the direct cu one) to fit the vid card. I assembled the vid cards.

25/03/13
I spent the last 3 days building the computer. There were quite a few setbacks.
1) The paint is REALLY fragile. I have to be very careful while handling the painted parts or it simply flakes off.
2) The R2 case has a few issues I didn't expect.
2a) The space between my power supply and the reconfigured hdd bay is only about 1", I'm having a really hard time fitting all the cables there.
2b) The front rad is behind a trap door for fans but the original fans are 140mm, there are mounting holes for 120mm fans but they don't align with the rad. I'll try it like that anyway but the front rad will be less effective. For other people considering this case, go with 2x140mm rads (the top fan slots are hybrid 140/120mm but might as well go 140mm all the way)
2c) Very minor, but the screws to hold the mobo on the stand offs are slightly different than the ones in the XL (R1) case, the old ones simply wouldn't fit so I had to use the new ones.
2d) cable management is a real nightmare because of 2a, I didn't have the time to REALLY work on it even though I've spent close to an hour trying to simply close the damn case. Will have to work on that later.
2e) Some cables are short, the front panel audio cable is the worst, barely reaching the port.
2f) Fitting the dual bay res was much harder than I expected, for some reason the screws don't align well with the slots in the case, I have 2 screws at a 45° angle, the other 2 are fine.
3) I was hoping the basic fans could be reused but they are 140mm so I'm short a few fans, will have to order more later.
 
Last edited:
Tests
28/03/13
I've had a few days to try the new cooling system now. I must admit I'm a bit disappointed. Like I said in the build section, the fans on the front rad aren't aligned so it doesn't work that well.

At this point I start my computer with a water temperature of about 21°C (around room temperature). Doing some very low powered stuff like checking emails, etc. the temperature very slowly creeps up. For example, it's been about 3 hours now and I'm at 25.5°C.

During gaming, the temperature rises up to 35°C (that was after about 2-3 hours of gaming, I will have to do more intensive tests later). CPU and GPU temperatures are pretty decent though. right now my CPU is at 28°C (OC'ed to 4.0Ghz) and my gpus idle at 28°C. I didn't monitor the cpu temp during gaming but my GPUs seem to hover around 40-45°C after 3 hours so that's alright, it used to be closer to 70°C.

Unfortunately, I can't OC the vid cards. I tried everything and I get the same results than when I was using the stock coolers. I guess I got defective cards. As soon as I change SOMETHING in PrecisionX, whether it's GPU clock offset or mem clock offset, the cards become unstable. They can work for hours (sometimes less than 2 minutes) but all of a sudden, the game (happened with 10 different games so far, different engines) minimizes and I can only kill the process. I tried various drivers, it's always the same deal. I tried various benchmarks, same deal. I tried increasing the power target, it stabilizes it a bit longer but it still eventually happens. If I try to change the voltage it crashes almost instantaneously.

I was hoping the WC would help, because I was always near the max temps and power but it wasn't a temp issue after all :(.

Noise wise, it's not bad. Could be better but I don't hear it over my games anymore, a huge improvement compared to the GTX670 cooler fans.

Note that I'm still working with my fan curves and my front fans don't seem to change speed like they should. Adding a 2nd set of fans in pull on the front rad should also get the temps down a bit.
 
Last edited:
RESERVED (Final results and lessons learned)

I will use this section to reflect on the end results of my little project. I will also compile a list of interesting things I learned throughout the experience, they may help others with their own projects.

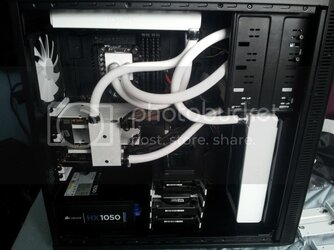
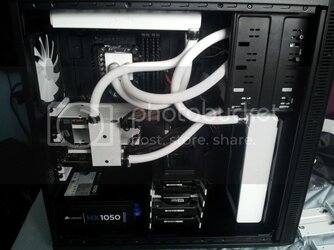
The final result!

The picture most of you were waiting for is here!

finallook.jpg


What I learned
- Acetal CAN be painted! This is something that wasn't entirely clear and I couldn't find examples of people attempting it on this scale. I've heard of people making a small logo or something like that but turning all the blocks into another color seems to be a first. I didn't do an exhaustive research so I may very well be wrong. Though you have to keep in mind that the paint is VERY fragile and will likely flake off if you manipulate the components too much or if there's an impact of some sort. I can't say it enough, it's VERY FRAGILE.
-The heatsinks on the MCP35X are definitely for a single pump. They are too big and overlap when you try to use them on the MCP35X2. They have a different heatsink for MCP35X2. I will attempt to modify mine. (Note that I wanted 2 single heatsinks in case I wanted to split the pumps later.) The modification of the heatsinks was a bit harder than I expected, I had to slice off 2 pieces from each (on the side so they can fit side by side and in the front because it would poke through the 5.25" bay.
-The R2 case is great, looks great but kept the 1 major flaw the R1 had, the space for the psu isn't sufficient for my corsair PSUs. That means that a lot of other PSUs will have the same issue.

Would I attempt something similar again? Probably but I wouldn't paint acetal again, not on this scale.
 
Last edited:
15/03/2013 update
Acetal can be painted! See post 2 for details and pictures.

Comments and suggestions are always welcome!
 
I only unboxed them so far so... yeah... can't really say much at this point. They look good though and fit with the theme. I initially wanted to paint Noctua NF-12P for case fans and Scythe Gentle Typhoon AP15 for Rad fans but that seems like a pain in the... and there's the potential issue of unbalancing them, wasting $20 fans in the process.

Expect more comments on the fans later.

As for updates, I'll keep this updated as soon as I progress. Expect to see pics of the painted blocks tomorow but nothing much until next weekend. I work 12-16 hours a day (not my normal schedule, crazy project) so I won't fill the loops and leak test until I'm able to actively monitor the system. That means waiting on the weekend. I would've painted the stuff and filled the loop this weekend but I only got the components yesterday.
 
Ah, ok...I only work 9hs and barely have time for playing games and overclocking stuff.
I got two small modding projects, and I estimate they will take two months each easily with my current schedule, so don't lose sleep over my comments :p
I intended to cheer you up more than anything else xD
 
Eh, don't worry about it. I'm thrilled about the whole project and I can't wait to see the final result. I simply wish I could take a few days off to complete it. As I said, I'll keep this updated as soon as there's progress.
 
update I'm done painting the parts. Photos in post #2. I will wait until next weekend to start building because I wouldn't be able to monitor the system for leaks until then.
 
Quick update, I ordered the missing backplate from a Canadian supplier (DazMode). I received it today.

Unfortunately, I'm almost always off-site so I shipped it to my father. He received the package, opened it to confirm the content by checking the part numbers I sent him. Everything checked out. He decided to give me a hand by painting the plate right away so I could use it in my build Friday.

When I got home, I checked the plate and discovered that there was a significant error. The bubblewrap's label and the documentation package both indicated EK-FC670 GTX Backplate, Black with the same bar code than the first one I received. But I had a bit of a shock when I saw the backplate, it's about 3" longer than the first backplate I received. It's not for the reference design but the ASUS DirectCU line of graphic cards.

It just won't fit, way too long, only 2 holes instead of 4, the contact pads inside don't match. I just wasted $60.

I contacted the supplier, he won't do anything about it at all. I'm certainly not buying from him again. I didn't expect a full refund or anything but SOME kind of help would've been appreciated. Instead I got a generic line about no return for opened products.
 
Update - I started cleaning the various parts of my system, details at the end of post 2.
Oh and for Conumdrum, I really like the monsoon. No installation issues, no leak.
 
UPDATE with photos of the final look! I also updated the various sections.

finallook.jpg

Comments are welcome.
 
Back