- Joined
- Sep 27, 2004
- Location
- Wonderland
-
-
-
-
-
-
So I'd like to say up front, other than some possible painting down the road, water cooling this system will be the last mod I do to this system. I'm getting deployed in October, and I plan on building an entirely new rig upon my return.
That being said, allow me to elaborate on the parts being used in watercooling this build.

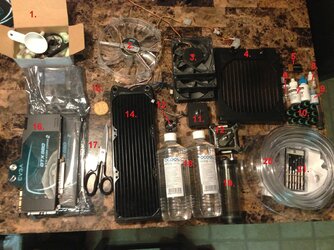
PARTS LIST
1. Box of misc. Parts.
2. Coolermaster 200mm blue LED Fan.
3. 3x Ultra Kaze 32x120mm Fans.
4. Phyoba 200mm Radiator.
5. Random *** battery.
6. Kill Coil Silver.
7. Arcticlean (arctic silver surface cleaner)
8. mayhem clear Blue UV Dye
9. PT Nuke Biocide
10. a **** load of Bitspower 3/8ID 5/8OD Compression fittings
11. MCP355/XSPC Top
12. Apogee XT
13. World's smallest fan?
14. MCR320
15. Delicious Girl scout cookie.
16. 2x 580 GTX Hydrocopper 2's, 3gb
17. The world's coolest pair of scissors
18. OCOOL filtered distilled water
19. Z-Multi rez
20. Primochill Clear tubing
21. Random assortment of tools and other fittings. etc etc.
I might be missing a few things, but I've got the girl scout cookies, so I think we're good.
So the system in sig will be my base. Stats:
CPU = Intel Core I7 2600K @ 4.5Ghz - 100x45 1.29vcore
MB = ASUS Z77 Sabertooth
RAM = Corsair Vengeance v1.43 16GB (4 x 4GB) DDR3 2133
VGA = SLI 2x EVGA Superclocked GeForce GTX 580 (Fermi) @900/2100
HD = Crucial 256GB
PSU = CORSAIR CMPSU-750TX 750W
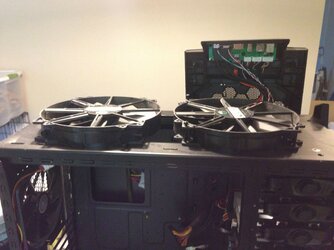
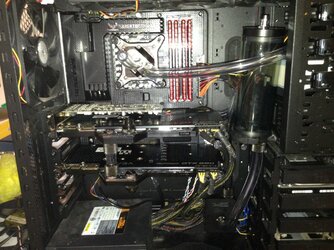
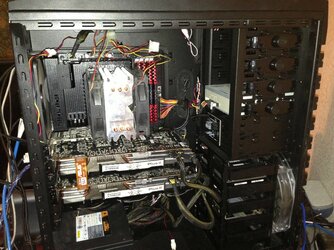
Pictured here. With my old video cards (coming out today)

Man that's ugly.
GOALS WITH THIS BUILD
1. 5.0GHZ Stable.
2. Maintain my 900/2100 on the VGA's (I might push them further)
3. Clean up everything, massive cable management + cable sleeving (hasn't arrived yet)
4. Find a way to mount that 200m rad to the side panel
5. Possibly paint the ram blue
5.2. Most importantly, get fat on girl scout cookies.
I'm always open to suggestions, as well as comments, good or bad. I'll be posting pictures over the next couple of days as building commences. I work the next 3 days, but I'll be working during my free time.


Here I go.
-
-
-
-
-
So I'd like to say up front, other than some possible painting down the road, water cooling this system will be the last mod I do to this system. I'm getting deployed in October, and I plan on building an entirely new rig upon my return.
That being said, allow me to elaborate on the parts being used in watercooling this build.
PARTS LIST
1. Box of misc. Parts.
2. Coolermaster 200mm blue LED Fan.
3. 3x Ultra Kaze 32x120mm Fans.
4. Phyoba 200mm Radiator.
5. Random *** battery.
6. Kill Coil Silver.
7. Arcticlean (arctic silver surface cleaner)
8. mayhem clear Blue UV Dye
9. PT Nuke Biocide
10. a **** load of Bitspower 3/8ID 5/8OD Compression fittings
11. MCP355/XSPC Top
12. Apogee XT
13. World's smallest fan?
14. MCR320
15. Delicious Girl scout cookie.
16. 2x 580 GTX Hydrocopper 2's, 3gb
17. The world's coolest pair of scissors
18. OCOOL filtered distilled water
19. Z-Multi rez
20. Primochill Clear tubing
21. Random assortment of tools and other fittings. etc etc.
I might be missing a few things, but I've got the girl scout cookies, so I think we're good.
So the system in sig will be my base. Stats:
CPU = Intel Core I7 2600K @ 4.5Ghz - 100x45 1.29vcore
MB = ASUS Z77 Sabertooth
RAM = Corsair Vengeance v1.43 16GB (4 x 4GB) DDR3 2133
VGA = SLI 2x EVGA Superclocked GeForce GTX 580 (Fermi) @900/2100
HD = Crucial 256GB
PSU = CORSAIR CMPSU-750TX 750W
Pictured here. With my old video cards (coming out today)
Man that's ugly.
GOALS WITH THIS BUILD
1. 5.0GHZ Stable.
2. Maintain my 900/2100 on the VGA's (I might push them further)
3. Clean up everything, massive cable management + cable sleeving (hasn't arrived yet)
4. Find a way to mount that 200m rad to the side panel
5. Possibly paint the ram blue
5.2. Most importantly, get fat on girl scout cookies.
I'm always open to suggestions, as well as comments, good or bad. I'll be posting pictures over the next couple of days as building commences. I work the next 3 days, but I'll be working during my free time.


Here I go.

