• Welcome to Overclockers Forums! Join us to reply in threads, receive reduced ads, and to customize your site experience!

radiator mishap

Overclockers is supported by our readers. When you click a link to make a purchase, we may earn a commission. Learn More.
Someone please correct me if this is wrong, but over time the distilled water will pick up ions from the loop and become conductive, correct?

yup.

while it will take a while and if there was a leak the water wouldn't have enough time to pick up enough ions why chance it.

just my .2 cents.
 
Yeah, I've spilled distilled water on a running system's motherboard, and before I thought to turn it off I just ran to get some paper towels. After it was wiped off, I was surprised that windows didn't lock up or anything, not that its a good idea to be spilling water on a computer though :D

Also, just an idea from me that if those tubes are painted, its probably best to strip the paint off the metal the JB weld will be applied to. Maybe it doesn't matter though.
 
An easy way to use the pump without turning on your computer is this:

http://www.newegg.com/Product/Product.aspx?Item=N82E16812232002&Tpk=vantec ide/sata to usb

Honestly the best thing I ever bought. I use it all the time. Easy way to use pump on and off and to try out fans and anything really with a molex connector. Highly recommend it.

think you mean this.


a shorrt piece of wire or paper clip to bridge the pins off the psu`s $21.18 cheaper for how often you would need it :)

http://forums.extremeoverclocking.com/showthread.php?t=118964

easy to do that yup, but those 24 pin jumpers are so cheap its almost worth it. i made a test power supply so i never use my computers psu when leak testing.
 
I have a 1994 oldsmobile delta 88 royale lss. I mix the green coolant and the orange dex cool coolant in the radiator. Is this a big problem or can i use it like this for awhile.
 
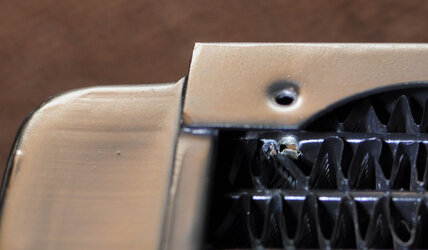
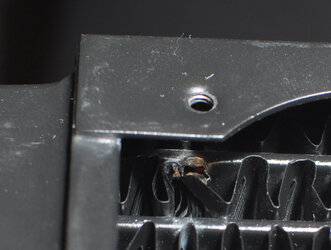
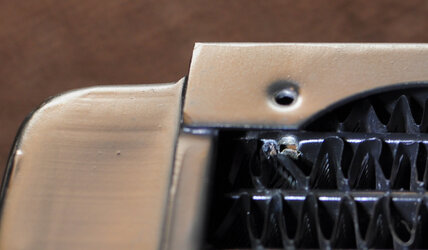
deadrad_large.jpg
TFC XChanger 480
(apologies for the pic, I can't bring myself to remove the metal shroud just yet)


I did the same thing when I set up my first loop a little over a year ago. It was so frustrating to put on all the blocks, run the tubing, etc., have it leak test successfully, then puncture a hole in the rad. It was only then that I looked through the packing box and noticed that Feser had included two lengths of screws ;(

Thanks for the mention of the JB-Weld! I've been hanging on to it until I could find a good welder, but I might give that a go instead.
 
I did the same exact thing with my XSPC 360 rad. You have to use washers when just securing fans to them. Without the added material of a case to go threw the screws they provided are to long. Mine only weeped a tiny bit and JB weld fixed it right up.
 
dont feel to bad i got a 4870x2 right when it came out a month later i spilt some water on it didnt cleen it well enough it got in there disolved the thermal paster from one of the spots where the block contacts a ram module cooked the ram module and ruined an 800$ card i just swore loudly a couple times then borrowed a 4850 froma friend till i could afford the 2 4890 watter cooled cards i have now
 
deadrad_large.jpg
TFC XChanger 480
(apologies for the pic, I can't bring myself to remove the metal shroud just yet)


I did the same thing when I set up my first loop a little over a year ago. It was so frustrating to put on all the blocks, run the tubing, etc., have it leak test successfully, then puncture a hole in the rad. It was only then that I looked through the packing box and noticed that Feser had included two lengths of screws ;(

Thanks for the mention of the JB-Weld! I've been hanging on to it until I could find a good welder, but I might give that a go instead.

Id like to keep this pic as a precaution for future members. If this is stickied for future reference in out forums would you have problem with it? It's such a perfect picture and such. Thanks for sharing, it can possibly help future mistakes.

Raher ask you the originator befor showing this fine boo-boo in a sticky.
 
+1 that needs a sticky thread on "how to install rad" so no one else can ruin a $50 rad and flood the computer if they skipped leak test.
 
Id like to keep this pic as a precaution for future members. If this is stickied for future reference in out forums would you have problem with it? It's such a perfect picture and such. Thanks for sharing, it can possibly help future mistakes.

Go right ahead, I'm more than happy to share (misery loves company and all that.)

Hell, I could even throw in some pics of what happens when you don't remember to put biocide in a loop for around a year... I redid my loop just barely and had to replace all the hose - it'd gotten pretty funky.

(EDIT: Am I the only one for whom that picture shows up large, like at full size, on the first view of the page? After reloading the smaller image shows up.)
 
4GHZ, yep, it's more of just life experiance. Depends of your job and knowing what to look for. Some build logs mention being very very careful, but if you don't read them, well, it's up you what you do for a living lots of times.

I'm hoping for a seperate sticky stating, "How not to ruin a radiator in the first 15 minutes". 15 words and a pic is all you need.

It happens to so many peeps. Rather none of them be OCF members.
 
Go right ahead, I'm more than happy to share (misery loves company and all that.)

Hell, I could even throw in some pics of what happens when you don't remember to put biocide in a loop for around a year... I redid my loop just barely and had to replace all the hose - it'd gotten pretty funky.

(EDIT: Am I the only one for whom that picture shows up large, like at full size, on the first view of the page? After reloading the smaller image shows up.)

It's a perfec size for me. Maybe a bit larger even 640x480 would be fine. Let you know once we got Mod blessing for a sticky.

EDIT: LOL it did it just now for me, was huge but shrunk. No worries, page loading I guess.
 
It was a thread similar to this that convinced me to check my screw lengths when I got my new radiators. !!! They were too long so I just added spacers. If I had not thought back to that thread I wouldve been in the same boat. Good job on the fix too!
 
Back