- Joined
- Oct 16, 2006
Project Objective
Tear down a 5 year old water cooling system, clean, evaluate and rebuild the machine in a NEW CoolerMaster HAF Box. The build is to be a High Flow, High Pressure machine with a clear emphasis on making future modifications easier. The End Product should be a very careful (if not anal) cable management setup with a high visual appeal. Reduction of Dust.
History
2006 I bought a pre-made Coolermaster Stacker with a submerged pump, a triple res and a high pressure low flow focus (8mm). This machine came from Germany and was going to be auctioned on Ebay as it was "Too Expensive" for Frozen CPU since it came from Germany. Back then, most Europe based machines and products focused on High Pressure over High Flow. Soon I found Myself on Toms Hardware Forums where I found a very unfriendly and unhelpfull crowd. I ended up coming to OCForums and never looked back.
Eventually the Pump got replaced with a MCP655, the Block was a STORM Rev 2, and an Aluminum External mounted XSPC Passive 250mm Reservoir took the place of the old pump and block I also had a Tyee and T-Type Temp Probe. In this learning phase I played with flow meters, hose sizes, lights, and other gadgets.
I soon found the Stacker to be an uncomfortable machine to work with and even the top USB ports broke within weeks, if not days of the original ownership. I changed this machine allot, new motherboards, Optical/HD drives, Memory, etc. The machine was so packed that it seemed that every time I changed something, something else would break. Years later I was dreaming of the day when I could replace the Case! That Day has come!
Day 1 (6/8)
Trip to JNCS
CoolerMaster HAF-X
Trip to FrozenCPU 1
5 feet 1/2" ID 5/8" ID Tygon Clear Tube.
We pulled the old machine apart, and took most of the components (except Drives) out of the Highly modded Cooler master Stacker 2. LOTS OF DUST!
Cleaning
Washed the CPU and PC Block with Denatured Alcohol. Will be cleaning again with Arctic Silver Cleaning Kit, but I wanted to get the Artic Silver off ASAP, as this is toxic, gooey and makes a mess!
*Pic Coming*
Took the water block apart.
*Pic Coming*
Hoses are in Horrible Conditions!
*Pic Coming*
Washed with soap and tooth brush. Rinsed with water. Removed all copper peaces. Filled up the sink of water, added a small splash of bleach, quickly mixed water drained and rinsed. Mounted the Radiator to the top of the NEW Cooler Master HAF Advance! What a case, needed to re size and re-tap holes on the top of the radiator.
Vacuumed then blew off EVERYTHING making sure to hold any fans in place to keep the airflow from spinning and killing the fans. So much Dust!
Whipped off most surfaces with water or Windex.
XSPC Passive Reservoir
My XSPC Passive 250mm Reservoir internals was restrictive with a internal 8mm return tube. The Reservoir was also Aluminum in a otherwise completely Copper system. The fact that I had NO corrosion was amazing. In fact the inside of My Parts looked better then the external.
Day 2-4 (6/9-6/11)
Trip to FrozenCPU 2
Local Cooling Shop, Not a huge fan (no pun intended)...
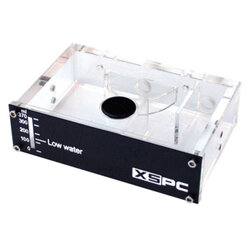
Bought a XSPC 5.25" Single Bay Res (Pic Bellow).
3 Black Mesh 120mm Fan Covers
4 short 1/2" ID short Barbs (1/4" thread)
Custom Cold Side Temp Sensor
Modified the XSPC Res by Drilling and tapped another hole in the back for a temp sensor (Cold Side).
*Pic Coming*
Custom Hot Side Temp Sensor
Took a plumbing based Copper T and re-taped it, polished, washed. We then put a copper drain and plug on one end, with a drain on one end, and two 1/2" short barbs on the others. We also drilled a small hole for another temp sensor (Hot Side). This was to Drain the NB/CPU Blocks.
Everything went back together, the water block replaced, wiring was being worked on. We had to have enough hose to pull out the Res enough to fill and clean. We created a custom hook that looped one line near the back. We had enough hose that the loop that was placed in front of the HAF back 140mm fan, without providing an obstruction. It was a simple hook, that took some time to tune to get to be in just the right place, with enough of a hook to hold the hose, but not enough to be an obstacle.
I was unhappy with the Single Drive XSPC Res. The unit is great, but the Res prevented me from placing My 3rd Optical Drive in. In addition as mentioned above the additional 2 hoses presented a problem and made working on this machine difficult (See Project Objectives). As days passed (and the story continues), I will grow more and more unhappy with this setup as it fails to meet MY goals for this build.
Day 5 (6/13)
Trip to FrozenCPU 3
140mm Fan Cover
200mm Fan Cover
6 3/4" OD White Reusable Quick Clamps
6 5/8" OD White Reusable Quick Clamps
Tear down a 5 year old water cooling system, clean, evaluate and rebuild the machine in a NEW CoolerMaster HAF Box. The build is to be a High Flow, High Pressure machine with a clear emphasis on making future modifications easier. The End Product should be a very careful (if not anal) cable management setup with a high visual appeal. Reduction of Dust.
History
2006 I bought a pre-made Coolermaster Stacker with a submerged pump, a triple res and a high pressure low flow focus (8mm). This machine came from Germany and was going to be auctioned on Ebay as it was "Too Expensive" for Frozen CPU since it came from Germany. Back then, most Europe based machines and products focused on High Pressure over High Flow. Soon I found Myself on Toms Hardware Forums where I found a very unfriendly and unhelpfull crowd. I ended up coming to OCForums and never looked back.
Eventually the Pump got replaced with a MCP655, the Block was a STORM Rev 2, and an Aluminum External mounted XSPC Passive 250mm Reservoir took the place of the old pump and block I also had a Tyee and T-Type Temp Probe. In this learning phase I played with flow meters, hose sizes, lights, and other gadgets.
I soon found the Stacker to be an uncomfortable machine to work with and even the top USB ports broke within weeks, if not days of the original ownership. I changed this machine allot, new motherboards, Optical/HD drives, Memory, etc. The machine was so packed that it seemed that every time I changed something, something else would break. Years later I was dreaming of the day when I could replace the Case! That Day has come!
Day 1 (6/8)
Trip to JNCS
CoolerMaster HAF-X
Trip to FrozenCPU 1
5 feet 1/2" ID 5/8" ID Tygon Clear Tube.
We pulled the old machine apart, and took most of the components (except Drives) out of the Highly modded Cooler master Stacker 2. LOTS OF DUST!
Cleaning
Washed the CPU and PC Block with Denatured Alcohol. Will be cleaning again with Arctic Silver Cleaning Kit, but I wanted to get the Artic Silver off ASAP, as this is toxic, gooey and makes a mess!
*Pic Coming*
Took the water block apart.
*Pic Coming*
Hoses are in Horrible Conditions!
*Pic Coming*
Washed with soap and tooth brush. Rinsed with water. Removed all copper peaces. Filled up the sink of water, added a small splash of bleach, quickly mixed water drained and rinsed. Mounted the Radiator to the top of the NEW Cooler Master HAF Advance! What a case, needed to re size and re-tap holes on the top of the radiator.
Vacuumed then blew off EVERYTHING making sure to hold any fans in place to keep the airflow from spinning and killing the fans. So much Dust!
Whipped off most surfaces with water or Windex.
XSPC Passive Reservoir
My XSPC Passive 250mm Reservoir internals was restrictive with a internal 8mm return tube. The Reservoir was also Aluminum in a otherwise completely Copper system. The fact that I had NO corrosion was amazing. In fact the inside of My Parts looked better then the external.
Day 2-4 (6/9-6/11)
Trip to FrozenCPU 2
Local Cooling Shop, Not a huge fan (no pun intended)...
Bought a XSPC 5.25" Single Bay Res (Pic Bellow).
3 Black Mesh 120mm Fan Covers
4 short 1/2" ID short Barbs (1/4" thread)
Custom Cold Side Temp Sensor
Modified the XSPC Res by Drilling and tapped another hole in the back for a temp sensor (Cold Side).
*Pic Coming*
Custom Hot Side Temp Sensor
Took a plumbing based Copper T and re-taped it, polished, washed. We then put a copper drain and plug on one end, with a drain on one end, and two 1/2" short barbs on the others. We also drilled a small hole for another temp sensor (Hot Side). This was to Drain the NB/CPU Blocks.
Everything went back together, the water block replaced, wiring was being worked on. We had to have enough hose to pull out the Res enough to fill and clean. We created a custom hook that looped one line near the back. We had enough hose that the loop that was placed in front of the HAF back 140mm fan, without providing an obstruction. It was a simple hook, that took some time to tune to get to be in just the right place, with enough of a hook to hold the hose, but not enough to be an obstacle.
I was unhappy with the Single Drive XSPC Res. The unit is great, but the Res prevented me from placing My 3rd Optical Drive in. In addition as mentioned above the additional 2 hoses presented a problem and made working on this machine difficult (See Project Objectives). As days passed (and the story continues), I will grow more and more unhappy with this setup as it fails to meet MY goals for this build.
Day 5 (6/13)
Trip to FrozenCPU 3
140mm Fan Cover
200mm Fan Cover
6 3/4" OD White Reusable Quick Clamps
6 5/8" OD White Reusable Quick Clamps
Attachments
Last edited: