Hello everybody! I wish to replace the factory thermal paste on my laptop's CPU which is really old but I don't really know what is the best way to apply it. By the way my CPU is a athlon 2650e (Yes it is a laptop with a desktop CPU) Arctic Silver's website tells I should tint the heatsink with the paste to get rid of the micro gaps and then, apply a blob of thermal paste that is as big as a grain of rice and reapply the heatsink. Is it really the best way?
-
Welcome to Overclockers Forums! Join us to reply in threads, receive reduced ads, and to customize your site experience!
You are using an out of date browser. It may not display this or other websites correctly.
You should upgrade or use an alternative browser.
You should upgrade or use an alternative browser.
SOLVED Best way to apply thermal paste
- Thread starter MAL22
- Start date
- Joined
- Jan 21, 2011
- Location
- Seattle,WA

I would put a small dot in the center. It will spread out when you put the heatsink back on.
- Joined
- Nov 11, 2001
if your heatsink has the heatpipes with direct touch there will be some voids in the surface that can keep a small dot of paste from reaching out to the edge of the chip, if its smooth the dot method works fine. if it does have the voids you will need to get a good even thin coat of paste on the chip. You can do that by putting the same dot and smoothing it out with your finger covered by a piece of seran wrap, just make sure you dont get your finger on the chip or in the paste as the oils from your finger can contaminate it
- Joined
- Nov 12, 2002
- Location
- Rootstown, OH
To make sure I get the right coverage, I do 2 applications. The first I put on about how much I think should cover it well, then I mount the heatsink applying full pressure... Then I pull it off and see if it looks like it spread well enough. It will spread better with continued pressure and some heat cycles, so I take that into consideration.
The first application tells you if you are in the right ballpark. Cleaning it off, then doing it again will get you something you are confident in, and it should be the right amount based on experience.
I like doing it that way, because even if I haven't used the paste before, I can see how it spreads and how much is the right amount. I always use the dot method, however I haven't used direct heatpipe coolers like dejo mentioned and I'd do it that way for those.
- Joined
- Sep 15, 2007
- Location
- Small town Emlenton, PA
That's what I actually did but my tube was almost empty... Left it that way and will reapply paste sometime lol.
LOL. LOL. Nice excuse fo not having your pegs in the right holes.
I'll say LOL. That makes it all okay. All better now.
"LOL, not enough oil for your oil change sir so your engine will be fine." LOL.

Actually besides your LOL you seem to understand the paste application methods.
And temp are good? If so get more paste for next time so it's not OMG funny.

i have tested many mounts over a variety of methods.
at the end of the day there are a lot of variables, but the following I find to be true:
1, too little thermal paste can impair performance, a bit more, won't.
2, tighter mount wins, almost every time.
as such, I choose to use the thin-film method, use a old credit card to make sure a thin film is applied with no air bubbles. then tighten the mount completely finger tight, and use a tool to go another 1/2 round.
should ensure a pretty tight mount with good thermal spread.
- Joined
- Aug 19, 2012
ARCTIC PASTE???
It's a good question: how to apply the paste,yet such important detail as well, otherwise the temp's could be really bad. The method i use here is a dot on the center of the cooler and a small thin line in the same direction as the catch on the plate,which retains the CPU chip in place. I can now see all the people on the web site here saying WHY, WHY, Because A, (it works) and B, If you are using after market coolers, some people say, they are not flat and don't fully engage with the CPU CHIP, so you end up with air pockets.
P.S. Hence you apply paste to both sides, "GUY'S JUST THINK ABOUT IT".
It's a good question: how to apply the paste,yet such important detail as well, otherwise the temp's could be really bad. The method i use here is a dot on the center of the cooler and a small thin line in the same direction as the catch on the plate,which retains the CPU chip in place. I can now see all the people on the web site here saying WHY, WHY, Because A, (it works) and B, If you are using after market coolers, some people say, they are not flat and don't fully engage with the CPU CHIP, so you end up with air pockets.

P.S. Hence you apply paste to both sides, "GUY'S JUST THINK ABOUT IT".
- Joined
- Jan 20, 2002
I use the dot method with a side twist. i get a plastic fork and break off a tine and do a "pre"spread with it not to cover everything 100% but to start out the spread. my theory is that in the dot method when you apply the HS it spread out in a circular patten to the edges. all im doing is offering it a head start.
I've tried all kinds of fancy ways of applying paste, but in the end what works best for me is a dot about 2-3 rice grains I guess, then just plop the cooler down, give it a titty twister and clamp it down. Temps depend a lot on how your ihs was installed, amongst others.. I've had some crazy hot i7s, but now I'm running a Xeon and its such a cool runner it's almost rediculous. At 1.2-1.4ghz oc is when temps start getting out of hand for me, depending on the particular stress test.
- Joined
- Apr 11, 2010
- Location
- London, UK
X method works for me, always get an even cover.
- Joined
- Dec 27, 2008
Someone must have done a PhD on this somewhere in the world...
No doubt!
lets think critically here.
what is the use of TIM?
1, to transfer heat through surfaces.
2, to fill gaps between to surface.
as such, you want the material with the highest heat transferance, covering as much of the surface area as possible. however since even the highest heat transferral is still less than metal itself, ideally we want to have 'just enough' TIM without having any reducing returns.
on the CPU heatsink, heat is localized in the center yes, but due to thermal conductivity, the whole surface will be transferring heat. As such you don't want to limit yourself of results by forgetting to fill the gaps on the edge, which btw, has the most gaps. (as most heatsinks are very slightly, convex.
you can also prevent 'over supply' of TIM by having a very tight mount, excess will be squeezed out. (of course, not telling you to silly butter the CPU.)
as such, the thin film method should scientifically give the best results, given your mount is tight enough. both blob and cross methods runs the risk of having heat sink surface not fully covered, (and you won't know, unless you unhinged it, which will introduce too many air bubbles and not recommended.) As such, the thin-film method also proves to be the savest bet, and I expect it to give the most consistence of performance on a tight mount.. and that was what I found to be true.
food for thought.
- Joined
- Apr 11, 2010
- Location
- London, UK
Sorry to offer advice to contrary but i used to do the thin film method too, but after watching this vid it seemed like that it causes more air bubbles than other mounting methods. This difference in the end will be negligible but i assume that if the first points of contact are relatively small, and it spread out from there ( roughly the centre the likelihood of air bubbles will be smaller surely? If you have a large area of contact but the surface is uneven ( the majority of IHS and blocks are not 100% flat) the air bubbles will appear within the gaps of contact and wont be able to escape as the pressure isnt coming from one central point but rather several. I'm not 100% on this but it seems to make most sense to me.lets think critically here.
what is the use of TIM?
1, to transfer heat through surfaces.
2, to fill gaps between to surface.
as such, you want the material with the highest heat transferance, covering as much of the surface area as possible. however since even the highest heat transferral is still less than metal itself, ideally we want to have 'just enough' TIM without having any reducing returns.
on the CPU heatsink, heat is localized in the center yes, but due to thermal conductivity, the whole surface will be transferring heat. As such you don't want to limit yourself of results by forgetting to fill the gaps on the edge, which btw, has the most gaps. (as most heatsinks are very slightly, convex.
you can also prevent 'over supply' of TIM by having a very tight mount, excess will be squeezed out. (of course, not telling you to silly butter the CPU.)
as such, the thin film method should scientifically give the best results, given your mount is tight enough. both blob and cross methods runs the risk of having heat sink surface not fully covered, (and you won't know, unless you unhinged it, which will introduce too many air bubbles and not recommended.) As such, the thin-film method also proves to be the savest bet, and I expect it to give the most consistence of performance on a tight mount.. and that was what I found to be true.
food for thought.
skip to 1:53. This could be due to the uneven/lack of pressure he is applying to the plastic, but it does give a nice incite as to how paste acts under different methods. I found the x method seemed to spread the best ( 2:16) In the end though it will make very little difference in terms of temps. And simply each to their own. But Blue is spot on about too little paste being detrimental and also having a very tight mount .

Nb look at the MX2 method vid he does
I know these are pretty shoddy but this is my thought process
With the X method for example, as the pressure is coming from a high contact point, which has the space to push the air to the edges, eliminating the potential for air bubbles.
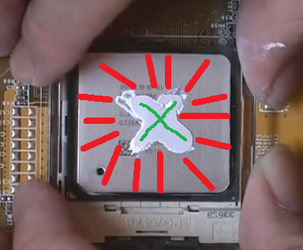
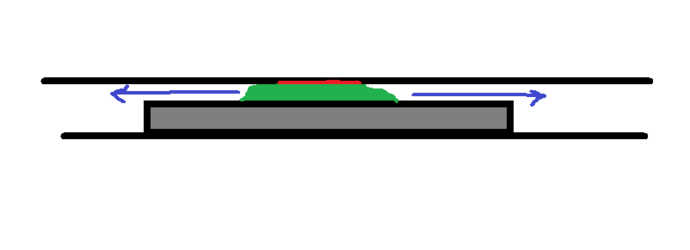
As the pressure is applied the area of contact spreads from that original X outwards and pushing all the air bubbles to the side in the process like so
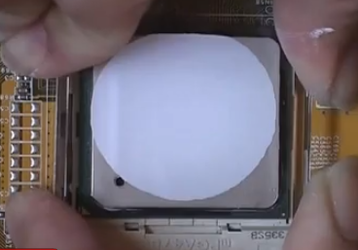
With the credit card process you are making multiple areas of contact that are not linked.

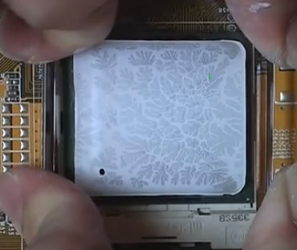
As you can see the blue areas ( air bubbles ) get trapped in between the multiple contact areas ( red) as they have no route to escape.
This might be stupid and flawed, but this is kind of how my brain is seeing it at the moment ( sorry about the shoddy paint job im at work and its the best i could do!) lol
Last edited:
http://www.overclockers.com/forums/showthread.php?t=709078
that's my general experiment in mounts and methods.. testing 60-ish mounts...
yeah, what you post makes good sense to me too,
so it becomes a battle of:
some air bubbles vs some un-covered space.
and from my experience in general, it is better to have no uncovered space.
and tight mount will help, a fair bit.
*your experiences may differ.
- Joined
- Apr 11, 2010
- Location
- London, UK
http://www.overclockers.com/forums/showthread.php?t=709078
that's my general experiment in mounts and methods.. testing 60-ish mounts...
yeah, what you post makes good sense to me too,
so it becomes a battle of:
some air bubbles vs some un-covered space.
and from my experience in general, it is better to have no uncovered space.
and tight mount will help, a fair bit.
*your experiences may differ.
ah but i have found with a decent amount of paste ( as you said not crazy butter, but just enough) i get it to cover the entirety of the IHS and the rest just gets squeezed out around the edges ( providing you have a tight mount and there is no more paste than needed.) But as i said the difference is negligible in terms of temps, maybe 1-2c at max which can be accounted for by just different mounts.

I think your table proves this with a mere 1c difference between the methods when using a tight mount. As long as you have a tight mount any method is fine with enough thermal paste.
I'll take a pic of my mount when i redo it at some point to show how i managed to get the whole IHS covered with the X method and a nice tight mount. ( almost sounds like im talking about something dirty, phowrrrrrr i love a tight "mount"

Last edited:
Similar threads
- Replies
- 41
- Views
- 1K
- Replies
- 28
- Views
- 5K
- Replies
- 0
- Views
- 917