• Welcome to Overclockers Forums! Join us to reply in threads, receive reduced ads, and to customize your site experience!

"custom" AIO build? no res, no t-line.

Overclockers is supported by our readers. When you click a link to make a purchase, we may earn a commission. Learn More.

gsrcrxsi

Member
Joined
Feb 21, 2008
Location
Baltimore, MD
So i was thinking about this recently. I'm planning to rebuild my HTPC (board, cpu, ram). and wanted to over clock it a good bit. so i was initially debating between an AIO cooler, or just making a custom loop.

Antec Fusion Remote
i7-7700k 4.2GHz (shooting for 5GHz, but i wont be crushed if i'm short)
ASUS STRIX Z270G GAMING


my major hangup is available space.the case is totally partitioned around the mATX board with no extra space. I'm using, and quite like my Antec Fusion Remote case so I'm not planning to change cases. I've already modded it a bit to fit my long graphics card, so i'm not scared to cut it some more. Also, i quickly realized that a custom build would be much more expensive. I'll preface this that for my initial purposes, I decided to just go with the EVGA CLC-240 AIO unit https://www.evga.com/articles/01081/evga-clc-liquid-cpu-cooler/ . i need to cut the case a bit, but it should still be pretty clean looking. and the EVGA unit is very aesthetic compared to other offerings (sans the NZXT, but its more $$).

But I'm still interested in this concept. I've been reading some discussions as obviously I'm not the first to have this idea. I mean all (most) AIO units are like this, so why can't i make my own? I might do this in the future just for the hell of it and proof of concept.

Basically for a CPU only loop, i think it would be quite simple.

$145 - Apogee Drive II
$50+ -whatever radiator you want (i was looking into 240mm size)
$20+ -fittings (could go up if you get fancy)
$10+ -tubing (not much needed for an "AOI" CPU-only setup)

so maybe 2-3x the price of a standard AIO kit, granted with better expandability and more quality components.

so it seems the biggest issue people come up with for why you shouldnt do this is filling and bleeding the system, and the worry that trapped air would degrade lifespan of the pump (i think this is highly exaggerated). the best case would be to make it totally free from air in the loop, then somehow seal it without introducing more air.

I was thinking to do it like this:

get large enough container to totally submerge the radiator, laid flat, fittings up.
fill container with your fluid (distilled + biocide is sufficient, IMO) above the height of the radiator
connect tubing between drive and rad, but leave one tube disconnected from the rad and instead submerged in the pool of fluid
run pump until there are no more bubbles. the rad in this position isnt likely to trap many bubbles.
move things around a bit to jostle whatever bubbles might exist in the pump/block or rad.
leave setup to run for a few hours
connect/seal the open tube/rad line while keeping both submerged so no air gets introduced.
remove whole setup from "pool" and let dry.

yeah you'll waste a bunch of water doing this, but distilled water is cheap so who cares?.

now you should have basically a whole AIO setup, with quality components and no need for extra space for a res or pump.

thoughts?
 
Lots of radiators have various port locations for filling/draining. You could probably find one that allows you to have an up-facing port and if you make that the highest point in the system you could fill the whole system via that port. Once sealed up, move the case around to remove air bubbles and top off. You should be able to get most of the air out, and if the pump is at the lowest point then you will always have fluid at the pump. You could easily eliminate the reservoir if you wanted.

- - - Updated - - -

Take THIS ONE for example.
End tank has ports on both sides, so if it was mounted horizontally then you could you one side for the tubing going out and one side for a fill. If you used it vertically, it also has a port opposite of the end tank so either side would have a port at the highest point. As long as the radiator was the highest part of the build, you would fill the radiator like you would the reservoir.
 
in my specific case, it would be mounted horizontally on its side where the side fans are

35746_l.jpg


fans mounted inside, rad attached outside (stock grille cut out between them).

thats a decent solution. i dont think i want a rad that thick just for aesthetics, but maybe there are some others like that that are thinner.

- - - Updated - - -

the biggest thing I'd want to achieve is essentially a 2 component loop. only pump/block and rad, and tubes between them.
 
If you find a thinner 2x120 radiator with ports on both sides of the end tank similar to the one I linked, just fill it up while it's on its side so the port faces up. Then once all the air is out, lay it back down. Should be pretty doable.
 
Cool idea. I use a Apogee Drive II. It's a great pump/block combo. I really like the idea of mounting your radiator on the outside of the case. I opted for a bench case myself but have been toying with the idea of a mini-ITX build. If the Vega comes out in a a nano version I'm there. I think a reservoir is important though. You may want to consider a Swiftech mini reservoir that can be mounted directly to a radiator port with hard tube or a straight fitting (multi GPU fitting?). Here's a couple pic of how I mounted my reservoir directly to my Apogee. Maybe they will help your creative juices flow.
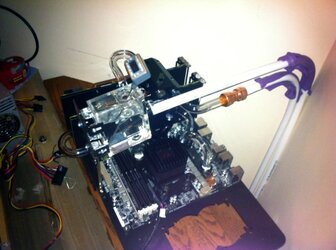
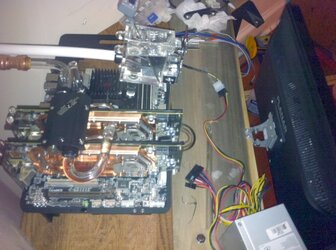
IMG_0399.JPG IMG_0400.JPG
 
Last edited:
Alphacool Eisbaer + Eiswolf and replace tubes to whatever you want. Made one ITX PC like that with Ryzen 1700X+GTX1070. I don't know if you can install Eisbaer in the mentioned case. It's just one quite cheap option which is also performing well and runs quiet. Can also use Eiswolf GPU block which has pump inside and use standard CPU block but then you have to also add small res or solve it in some other way.
 
Alphacool Eisbaer + Eiswolf and replace tubes to whatever you want. Made one ITX PC like that with Ryzen 1700X+GTX1070. I don't know if you can install Eisbaer in the mentioned case. It's just one quite cheap option which is also performing well and runs quiet. Can also use Eiswolf GPU block which has pump inside and use standard CPU block but then you have to also add small res or solve it in some other way.

I've seen that alpha cool stuff before. pump/block/res combo is neat, but i don't think will work too well if you don't have the MB laying flat (in most cases it would be vertical. while it would work for me, just something to note.

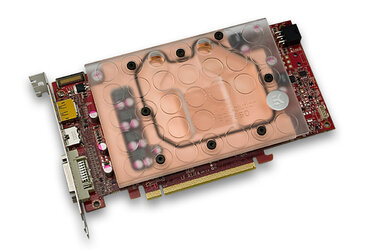
I dont know how well the mem/VRM components can cool with just a huge heatsink either I'd prefer a FC block, but that's a whole other can of worms for my setup because of my case. Id also really love if WB mfgrs would start having full-cover GPU WB options that aren't taller than the PCB.

like this:
EK-HD-7850.jpg

I could fit something like that, but i cant fit the types that run the tubes over the PCB because theres not enough clearance to the top of the case to put the cover on.

but thanks for the suggestions!
 
only thing i can think of is if you were to put it all together, take it all off fill it by submerging it all under water and assembling it already under water and after flipping everything around and shaking it making sure theres no air bubbles, problem is, eventually there WILL be air bubbles, the water does evaporate through the tubing. i have to add a couple oz to mine every year or so.
 
only thing i can think of is if you were to put it all together, take it all off fill it by submerging it all under water and assembling it already under water and after flipping everything around and shaking it making sure theres no air bubbles, problem is, eventually there WILL be air bubbles, the water does evaporate through the tubing. i have to add a couple oz to mine every year or so.

I once ran a custom loop consisting of cpu block, gpu block, 360mm radiator, and pump/res combo using all barb fittings and Primochill soft tubing with distilled water for three years straight without draining or cleaning or taking anything apart. It didn't loose any water from anything, the reservoir was at the same level at the end of the three years as it was in the beginning. It was an overclocked 965be with overclocked HD 6950 that ran probably 12-18 hours a day 5 days a week. Surprisingly, everything was very clean when I eventually took it all apart.

Either way, I stand by buying a radiator with a drain/fill port if you want to eliminate a reservoir. You can tip the computer on its side so the radiator is the highest point when filling. It would be no different than filling a reservoir. You would still need to get air bubbles out, and even occasionally topping it off, but you can still do that by again tipping it on its side. Nothing else in the PC will care what orientation it is while you're filling it.
 
yeah, if its well sealed, i don't think it's going to lose anything. water doesn't just permeate through the tubing itself. if you lose water, you have a tiny leak you're not aware of (ive seen people have tiny leaks that basically evaporate before pooling), or you had/have air bubbles trapped that are slowly working their way out.
 
I once ran a custom loop consisting of cpu block, gpu block, 360mm radiator, and pump/res combo using all barb fittings and Primochill soft tubing with distilled water for three years straight without draining or cleaning or taking anything apart. It didn't loose any water from anything, the reservoir was at the same level at the end of the three years as it was in the beginning. It was an overclocked 965be with overclocked HD 6950 that ran probably 12-18 hours a day 5 days a week. Surprisingly, everything was very clean when I eventually took it all apart.

Either way, I stand by buying a radiator with a drain/fill port if you want to eliminate a reservoir. You can tip the computer on its side so the radiator is the highest point when filling. It would be no different than filling a reservoir. You would still need to get air bubbles out, and even occasionally topping it off, but you can still do that by again tipping it on its side. Nothing else in the PC will care what orientation it is while you're filling it.

i ran mine for 4 years and i had to top off my res twice. i never drained it once in that time period.
 
Last edited:
yeah, if its well sealed, i don't think it's going to lose anything. water doesn't just permeate through the tubing itself.

Actually, yes, water can permeate through plastic. Very slowly over a lot of time, but it can.

I have been watercooled for 15 years, trust me, you do lose a little water over time, especially if you have a reservoir, but also a little even in a sealed loop. I'm a geologist, not a chemist, but I'll try to explain. Water particles sometimes has enough energy to go from liquid to gas even at room temperature. Everyone knows about evaporation. In a sealed environment, a water particle can still turn to a gaseous state, but since it's sealed, it usually crashes back into a liquid state which releases a tiny bit of energy which in turn causes another bit of water to turn to gas. Occassionally, one of these sneaks their way through the plastic structure. Given time, enough water vapor might leave to make a noticeable difference in the water level.

A loop with a reservoir in it will definitely drop the level a little over time. I think almost everyone that has watercooled for any length of time will agree. I top off my reservoir with a tiny bit of coolant a couple times a year.

A sealed loop can experience that too, but at a far lesser amount. Has anyone here had a sealed loop and after a year or two noticed the hoses looked slightly collapsed and/or saw air bubbles that needed burped? I had a sealed system for a couple of years and it was a big hassle, not to mention hard to fill and purge air.

There will be people that will refuse to believe that water can escape through plastic and already I saw a post where someone declared they ran a loop for 3 years and never lost a drop. Yes you did, you just didn't notice it, but I'm not going to argue. I had a bottle of water given to me during an environmental conference that had a cool label that had been printed just for the event. I put it on a shelf in my office for decoration. It sat there for over 12 years and over time the water level slowly dropped until it was about 1/4 was gone when I retired. Yes, it was sealed, I checked. I turned the bottle upside down and squeezed, there was no leak.

If you want to go with a sealed unit, fine. But, it still requires just as much if not more maintenance as a loop with a reservoir (or T-line if you really don't have room).
 
Last edited:
I saw a post where someone declared they ran a loop for 3 years and never lost a drop. Yes you did, you just didn't notice it, but I'm not going to argue.

I said that, and I guess I should clarify that I over three years I didn't notice a water level drop in my reservoir. It was 95% full when I started and if it was at 94% full when I tore it apart I wouldn't have noticed that. What I was getting at was that I didn't have to top off my water in the three years. If the OP built a reservoir-less system, I still think he'd be fine by making the pump at the bottom and getting a top-mounted radiator with fill port. If the system was say 95% full in the beginning, and had no leaks and permeated enough water over the years to drop it to 80%, the pump still wouldn't die as it's at the bottom and he can just pop the fill port off the radiator and top it off. The downside, if you're using colored tubing, is that you might not notice the water level being down if you can't see the water.

- - - Updated - - -

I had a bottle of water given to me during an environmental conference that had a cool label that had been printed just for the event. I put it on a shelf in my office for decoration. It sat there for over 12 years and over time the water level slowly dropped until it was about 1/4 was gone when I retired. Yes, it was sealed, I checked. I turned the bottle upside down and squeezed, there was no leak.

I'm definitely trying this. Not because I don't believe you, but because it would be a neat experiment. I'm young enough that I can leave it sit for a looooong time and see how far it will go down.
 
With that water bottle, it was also collapsing as it lost water. If there was a tiny leak, the bottle would not have collapsed. If there was a leak, outside air would rush in to reach equilibrium (remember the saying, nature abhors a vacuum?). That might be a key thing to remember with a sealed unit. If the hoses look collapsed, it just lost a little water vapor through the hoses. If it's not collapsed and you keep getting air bubbles, it might mean a tiny leak somewhere.

Back to the a computer water loop. I'm sure what rate you lose over time (with or without reservoir) probably has a lot of factors that can affect the rate of loss. For example, logic says that a thin-wall flex hose might have more loss than thick-walled tubing. My guess is humidity has a role too. Certainly temperature is a factor, I noticed the level in my reservoir drops slightly faster if I'm doing a lot of overclocking at high speeds and a lot of voltage (which means higher temps). Not only temps of the water in the loop itself, but my guess is ambient temps matter too. Perhaps atmospheric pressure too, and other factors that I haven't thought about. The type of plastic used in the hose probably has something to do with rate of permeation.

At this point I was getting over my head, so I did a bit of research. I found that the plastic industry is aware that water vapor... not liquid water... can pass through different types of plastics and different thicknesses of plastic. They can even measure the MVTR (moisture vapor transport rate). Wow, I learn something new everyday.
 
Last edited:
Back