• Welcome to Overclockers Forums! Join us to reply in threads, receive reduced ads, and to customize your site experience!

Help with AMD Build upgrade.

Overclockers is supported by our readers. When you click a link to make a purchase, we may earn a commission. Learn More.
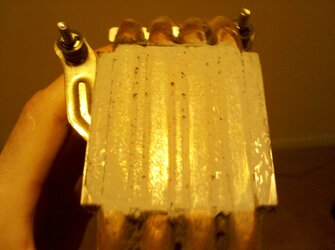
I find that sometimes with the coolers having the exposed heat pipe bottoms that the "blob" method of applying paste doesn't work well because the ridges and valleys on the surface prevent the paste from spreading when the clamping pressure is applied. I don't think this is the case with the Hyper 212 Evo as the bottom is machined nicely but if you take it off and find the paste didn't cover the area very good try placing two very thin lines of paste across the pipes instead. That way, the spread from the clamp pressure will cause the paste to spread along the ridges and valleys instead of having to jump them.
 

Attachments

  • TwoLine.PNG
    TwoLine.PNG
    161.5 KB · Views: 71
I find that sometimes with the coolers having the exposed heat pipe bottoms that the "blob" method of applying paste doesn't work well because the ridges and valleys on the surface prevent the paste from spreading when the clamping pressure is applied. I don't think this is the case with the Hyper 212 Evo as the bottom is machined nicely but if you take it off and find the paste didn't cover the area very good try placing two very thin lines of paste across the pipes instead. That way, the spread from the clamp pressure will cause the paste to spread along the ridges and valleys instead of having to jump them.

Good point trents. The two lines across the bottom work well. Here is a pic of a recently removed hyper 212 on a socket AM3 cpu. The cooler has a machined finish, but there are still grooves/valleys where the heat pipes meet the base. Here I used a little bb sized dot in the middle, and then a very small bead in each groove to fill the spaces, making sure not to go overboard (too much paste is a bad thing).
 

Attachments

  • testrun.jpg
    testrun.jpg
    929.6 KB · Views: 79
Hey Guys.
Just a quick update to say that I have installed the Intake fan at the bottom of the case next to the PSU and I received my new CM Fan for the Push-Pull config on the Heatsink.

However, came across an issue when installing the new fan on the EVO 212 -here is a copy of the email I sent Cooler Master EU:-

*****************************************************************

Hi,


I just put in an order for a "XtraFlo 120 Slim" fan to use in a push-pull config on my new Cooler Master Evo 212 Aftermarket CPU Cooler.


The new fan just arrived and I installed today (Saturday 22/06/2013). I used the spare holding brackets that come with the EVO 212 (as instructed) and applied to my EVO 212 in case.

The push-pull configuration was complete.


However, prior to attaching to the Heatsink - I noticed that when the blades spun, they were catching the bracket RIM and causing a horrendous noise. I thought this would be gone once I attached to the HEATSINK as the brackets would stretch slightly. It did not.


Please listen to attached recording for noise. I have removed the brackets and rotated them and changed positions to no avail. The recording is from the Fan actually attached to the Heatsink in the PC.


I am very unhappy with this situation as I assumed that buying another CM Fan would be the best possible solution for my CM EVO 212 but looks as though I was seriously mistaken.


Please respond with necessary solution.

I look forward to hearing from you shortly,

******************************************************************

I haven't attached any pics here as they don't show much details.

Just waiting on CM to get back to me. They tweeted me to say it would be Monday before they can look into it.

That's all I have done thusfar.

PS - When I had the 2nd fan installed on the Heatsink, I did see a marked improvement on the CPU temp.
 
I added 1mm rubber shims to the 4 corners and it moved the fan away from the contact zone (the heat sink) which solved the issue. Probably wont work if the fan is contacting the bracket though.
 
Hi Storm-Chaser,
Thanks for the tip mate. I think the problem I have is this - the fan obviously has 2 sides and the side I need to put against the heatsink to blow the air away is unshielded.
The other side is shielded and the blades wouldn't touch the brackets for heatsink.

The only solution I can see is to remove orginal fan from the heatsink, remove its brackets, change sides and apply as pull fan.
Then use the shielded side of new fan as Push into Heatsink.

If that is the only solution, will just have to buy a new fan as I can't be bothered to do that ;-)
 
Evening all,

Apologies for my prolonged absence but only received the "4 rubber spacers" from Cooler Master today.

The solution they provided was to send 4 rubber corner spacers with holes in them that I was required to add to the 4 corners of the fan. They provide a buffer (space) between the bracket and the fan and thus stopped the catching and noise.
Only issue is that the 4 rubber strips that come with the Evo 212 to go over the screws before applying brackets to the Heatsink had to be left off. They were preventing the hooks from getting a grip on the Heatsink.

I apologise as I know I have gone off topic here.
Just wanted to give a quick update.

So, I have added the new fan for Push-pull config and I have disabled the 2 exhust fans on the side panels as requested. And I added an intake fan at the bottom of the case next to the PSU.

I will post idle temps tomorrow as I am off to work.
Many Thanks.
 
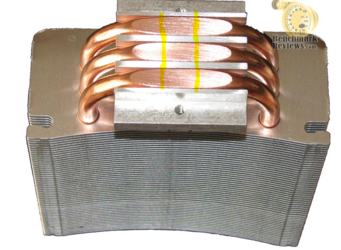
I have installed the Hyper 212 plus and Evo several times.Did you ever notice when you look for videos concerning installation, they never show the whole process in real time.Its always before and after shots.Go figure.Don't get discouraged mounting this cooler.The directions are incomplete imo.This is my method how to properly install the Evo.Your running a 8350, so you need your cooler to work at it's full potential.My Phenom II 965, 125 watt @ 3.8g idled at 28C using this method.This is assuming good air flow through the case, and using push and pull.

* The 212 Plus is a little different.The gaps on the heatsink should be filled in before applying paste.Not true with the Evo.The Evo has a smoother surface area vs the 212.Other than that, the same steps apply.

Here are my tips.

1.Use a green pea size drop right in the middle of the cpu.Actually, the size if a Nestles chocolate chip.Just a wee smaller than a pea. How do you know if you used the correct amount? When paste is not leaking out the sides when you have it fully tightened down.That is very important.

2.I'm sure you noticed the the push pins on the bracket.There adjustable for different lengths.Make sure all 4 pins are on the middle setting.

3.VERY important.This is where people make mistakes.Never put the cooler on the cpu first, and then try to adjust the bracket, after the fact.Your cooler will slip and slide before you get it clamped down.

4.Put the bracket on the cooler, just like you would if it was fully assembled sitting on your board.With no paste on the cpu, do some dry runs.Dont touch the cpu, just go through the motions.This will help you adjust the bracket very close to the holes when it counts.

5.Put on the paste, and drop the cooler on the cpu evenly.Your bracket should already be lined up to your 4 mounting holes.Make sure your using a longer phillips head screwdriver, as this helps.Notice the groove on the sides of the cooler.A longer phillips helps.Tighten each opposite corner a few turns, then the other opposite corners a few turns.Repeat until is is fully secure.After it feels tight.Give it an extra 1/4 turn.

6.The cooler can mount with fans facing front to back or top to bottom.Just incase you didn't know.

Hope that helps.Good luck.

You'll have a sweet rig when your done..Thats why I'm getting the ASUS Sabretooth 990FX R2.0.The same people helping you, took alot of time to test the best motherboards for FX cpu's.Much respect Rgone.
 
Last edited:
@ Wipeout - Thanks a million for that informative post. I will get around to reapplying the CM 212 EVO shortly but I am going to wait until I get my new case and PSU before doing it. The temperatures seem ok at the moment so happy not to disturb anything.

@Johan - I have followed your instructions in relation to the Fans and wanted to ask you another quick question. The RAM you advised is unavailable to me at the moment so was looking at getting the following instead:-

http://www.amazon.co.uk/Corsair-CML...UTF8&qid=1372889238&sr=1-1&keywords=DDR3+1866

I assume that is ok as its 8Gb (2 *4Gb) of 1866 RAM similar to the G. Skills you listed ?

Also, as my build is effectively done, should I now close this thread and start an OC AMD FX-8350 thread specific to Overclocking my system ?

I have been following Oldie_65 thread.

Many thanks guys,
Z_M
 
Back