Hello all!  This is a guide that will hopefully help you remove/replace your hard drive, reset your bios or replace your RAM, should you ever need to.

Two notes before we begin: I AM NOT RESPONSIBLE for any damage you might do to your laptop while following my ultra/uber/mega/super safe instructions.Follow them at your own risk.
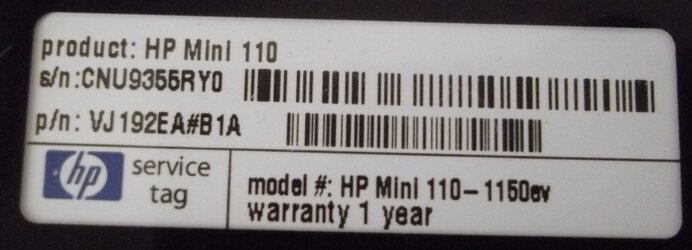
And two: The instructions are mostly based on a HP Mini netbook.
Other parts are based on a Sony VAIO laptop,but whatever the case, they should work for most netbooks/laptops.
If you need any help, just reply to this thread and I'll do my best to help you out.
You will need:
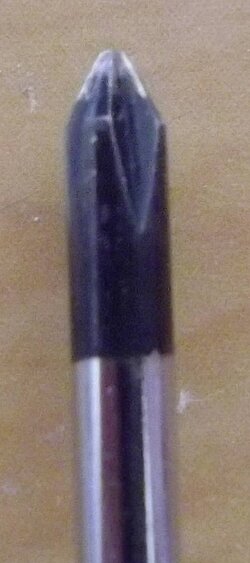
1) The smallest cross headed screwdriver you can get. This is critical! No screwdriver = game over.
2) You need to discharge yourself (touch something that is grounded) before you touch anything with a circuit board on it, because of static electricity, which can damage your components.
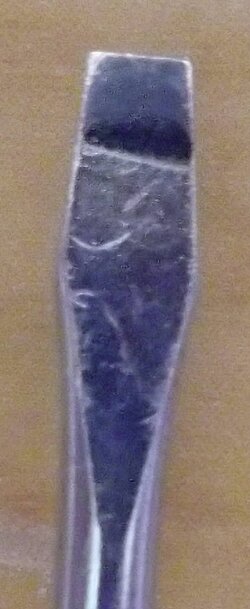
I used a cross-headed screwdriver for the screws and a flat-headed screwdriver as a lever to make plastic parts on the laptop snap out easily.If you don't have a flat-headed screwdriver, your nails or a knife should work fine.


Part 1: Getting Access to your hard drive tray and bios battery.
A word of warning : DON’T BE HARD ON THE SCREWS. If you can’t unscrew it, don’t force it because you will break it and then you won’t be able to unscrew it at all.
First of all, remove the power cable and the battery.

Then turn the laptop with its rear (where the battery plugs in) facing you.
You will see 3 small screws. Those are the toughest to unscrew, that’s why I recommended a small screw driver, because if it weren’t for these, a standard cross head screw driver would’ve been fine. Unscrew them. Now you can remove the keyboard.
(The screws on the photograph have already been removed; You can however still see the holes. Don’t forget to unscrew the one on the right corner of the photograph.)

Now you have to remove the keyboard.
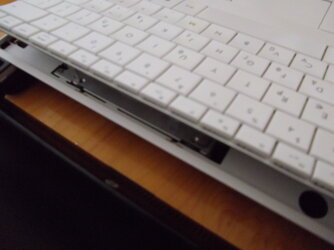
Removing the keyboard: Grab the edge that’s near the screen and try to make it snap with your nails or a screwdriver, can’t remember exactly how I did but it should be this way.
Now carefully flip the keyboard and put it somewhere where it does not cover what is underneath it, while being careful not to make the keyboard connector snap out.

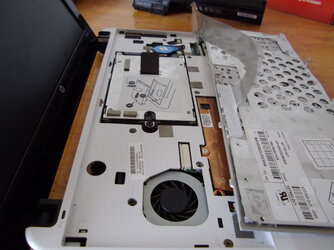
Once the keyboard has snapped out, your laptop should look like this:

Now you have access to your hard drive tray and bios battery!
PART 2 : Replacing/Removing the hard drive.
The hard drive tray is what holds the hard drive itself.Its like a special shelf for it,that only fits a specific laptop model.
To replace your hard drive,you must remove the hard drive from the hard drive tray, but first you must remove the tray from the laptop.
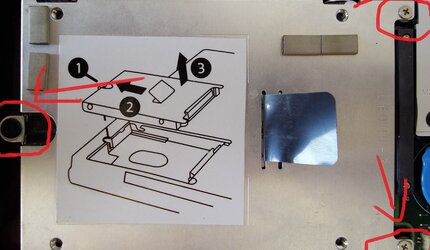
The hard drive tray is held in place by 3 small screws. Remove them (you will need them later).

After removing the screws, use the plastic tape as a handle to slide the hard drive tray out, first pulling left then up.
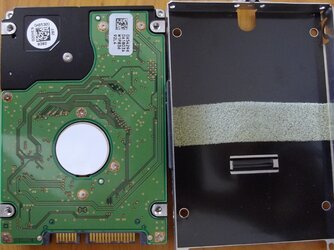
Now you must remove the hard drive from its tray,to replace it with your new hard drive.
The hard drive is held in the tray by 4 screws,2 on each side of the tray.

Unscrew them,remove your hard drive from the tray,put your new hard drive on it,put the 4 screws back in,put the tray back in your laptop,screw it in and you're done!

PART 3 : Removing your bios battery.
This part is probably the most simple part of this guide and it is about removing your bios battery.
You're probably gonna ask yourself “Why would I wanna do that” . Well because you might wan’t to reset your BIOS settings, that’s why!
In every motherboard there is a chip that holds your BIOS settings. This chip is powered by a battery. Removing the battery should wipe out the bios settings in ~20 minutes, if you have your computer plugged off of course!
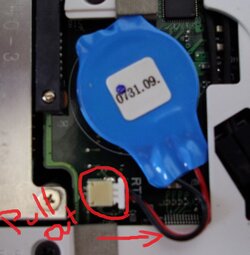
In this case, the battery looks like this. The image should be descriptive enough:

That's right all you gotta do is plug that little thing out and you've disconnected your laptop's BIOS battery.
After plugging the battery off , wait 20 minutes and check if the settings are still there. If they are, then you should’ve waited longer/I was wrong about the amount of minutes.
If they aren’t, turn off your laptop and plug the bios battery back in.
(I’m not sure if you have to plug the battery plugged in before booting, but you could do it, just in case )
So this it! You’re done! Now let’s move on to the last part of this guide :
PART 4: Removing/Replacing your RAM.
Note : This time I used a Sony VAIO laptop to illustrate the procedure. It is the same exact way with the HP mini laptop, but there is only one slot for RAM, instead of two.
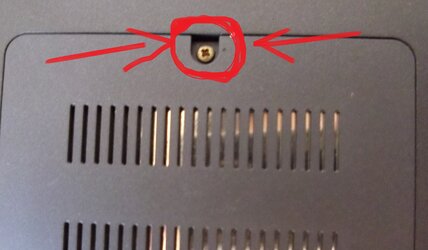
This is also extremely easy. Just turn the laptop upside down with its bottom facing you, and remove the ram cover by unscrewing the one and only screw it has in most cases :

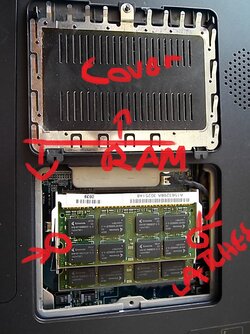
Now remove the cover to expose the RAM:

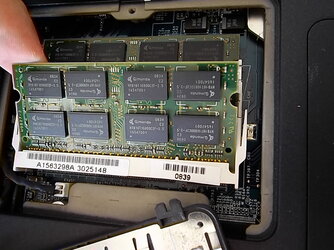
Now pull the right latch right and the left latch left to remove the ram by gently pulling it upwards then away from its socket.

Remember to do it gently.Once you've taken it out, follow the same instructions to install your new ram stick ,then screw the cover back in and that's it, you're done!
So this is the end of this guide,let me know what you think. I will try updating this with more simple laptop related How-To's like how to remove your motherboards cover to reach the heat sink and replace your CPU's thermal paste or how to replace your laptops fan(s) and maybe other simple stuff, all laptop hardware related.
Like I said above, if you need any help,just ask for it.I'll do my best to help you out as soon as possible.


P.S. Does anyone know if there is any way to resize those screwdriver pics I posted?I know they may seem redundant, but there is no way anybody makes a mistake when choosing a screwdriver with these pics .
.
Two notes before we begin: I AM NOT RESPONSIBLE for any damage you might do to your laptop while following my ultra/uber/mega/super safe instructions.Follow them at your own risk.

And two: The instructions are mostly based on a HP Mini netbook.
Other parts are based on a Sony VAIO laptop,but whatever the case, they should work for most netbooks/laptops.
If you need any help, just reply to this thread and I'll do my best to help you out.
You will need:
1) The smallest cross headed screwdriver you can get. This is critical! No screwdriver = game over.
2) You need to discharge yourself (touch something that is grounded) before you touch anything with a circuit board on it, because of static electricity, which can damage your components.
I used a cross-headed screwdriver for the screws and a flat-headed screwdriver as a lever to make plastic parts on the laptop snap out easily.If you don't have a flat-headed screwdriver, your nails or a knife should work fine.
Part 1: Getting Access to your hard drive tray and bios battery.
A word of warning : DON’T BE HARD ON THE SCREWS. If you can’t unscrew it, don’t force it because you will break it and then you won’t be able to unscrew it at all.
First of all, remove the power cable and the battery.
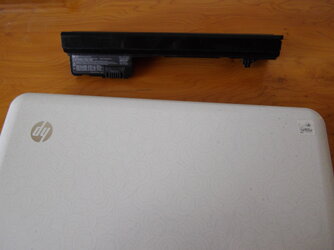
Then turn the laptop with its rear (where the battery plugs in) facing you.
You will see 3 small screws. Those are the toughest to unscrew, that’s why I recommended a small screw driver, because if it weren’t for these, a standard cross head screw driver would’ve been fine. Unscrew them. Now you can remove the keyboard.
(The screws on the photograph have already been removed; You can however still see the holes. Don’t forget to unscrew the one on the right corner of the photograph.)

Now you have to remove the keyboard.
Removing the keyboard: Grab the edge that’s near the screen and try to make it snap with your nails or a screwdriver, can’t remember exactly how I did but it should be this way.
Now carefully flip the keyboard and put it somewhere where it does not cover what is underneath it, while being careful not to make the keyboard connector snap out.
Once the keyboard has snapped out, your laptop should look like this:
Now you have access to your hard drive tray and bios battery!
PART 2 : Replacing/Removing the hard drive.
The hard drive tray is what holds the hard drive itself.Its like a special shelf for it,that only fits a specific laptop model.
To replace your hard drive,you must remove the hard drive from the hard drive tray, but first you must remove the tray from the laptop.
The hard drive tray is held in place by 3 small screws. Remove them (you will need them later).
After removing the screws, use the plastic tape as a handle to slide the hard drive tray out, first pulling left then up.
Now you must remove the hard drive from its tray,to replace it with your new hard drive.
The hard drive is held in the tray by 4 screws,2 on each side of the tray.

Unscrew them,remove your hard drive from the tray,put your new hard drive on it,put the 4 screws back in,put the tray back in your laptop,screw it in and you're done!
PART 3 : Removing your bios battery.
This part is probably the most simple part of this guide and it is about removing your bios battery.
You're probably gonna ask yourself “Why would I wanna do that”
In every motherboard there is a chip that holds your BIOS settings. This chip is powered by a battery. Removing the battery should wipe out the bios settings in ~20 minutes, if you have your computer plugged off of course!
In this case, the battery looks like this. The image should be descriptive enough:
That's right all you gotta do is plug that little thing out and you've disconnected your laptop's BIOS battery.
After plugging the battery off , wait 20 minutes and check if the settings are still there. If they are, then you should’ve waited longer/I was wrong about the amount of minutes.
If they aren’t, turn off your laptop and plug the bios battery back in.
(I’m not sure if you have to plug the battery plugged in before booting, but you could do it, just in case )
So this it! You’re done!
 Now let’s move on to the last part of this guide :
PART 4: Removing/Replacing your RAM.
Note : This time I used a Sony VAIO laptop to illustrate the procedure. It is the same exact way with the HP mini laptop, but there is only one slot for RAM, instead of two.
This is also extremely easy. Just turn the laptop upside down with its bottom facing you, and remove the ram cover by unscrewing the one and only screw it has in most cases :
Now remove the cover to expose the RAM:
Now pull the right latch right and the left latch left to remove the ram by gently pulling it upwards then away from its socket.
Remember to do it gently.Once you've taken it out, follow the same instructions to install your new ram stick ,then screw the cover back in and that's it, you're done!
So this is the end of this guide,let me know what you think. I will try updating this with more simple laptop related How-To's like how to remove your motherboards cover to reach the heat sink and replace your CPU's thermal paste or how to replace your laptops fan(s) and maybe other simple stuff, all laptop hardware related.
Like I said above, if you need any help,just ask for it.I'll do my best to help you out as soon as possible.


P.S. Does anyone know if there is any way to resize those screwdriver pics I posted?I know they may seem redundant, but there is no way anybody makes a mistake when choosing a screwdriver with these pics
Last edited: