• Welcome to Overclockers Forums! Join us to reply in threads, receive reduced ads, and to customize your site experience!

Is this supposed to look like this? Thermalright AXP90-X45 (AM4)

Overclockers is supported by our readers. When you click a link to make a purchase, we may earn a commission. Learn More.

QuantumCookie

Registered
Joined
Jan 5, 2023
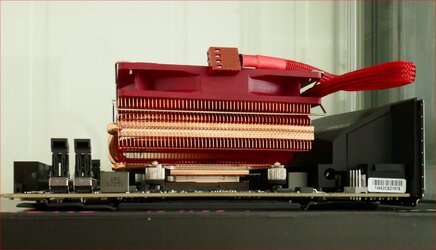
Heh, look at this (the image file in the attachment). I think this look way too wonky, but other people online have apparently complained that there is a risk of bending the motherboard, now I know why.

Noctua would never make something like this I think.

I guess I will have to be careful.

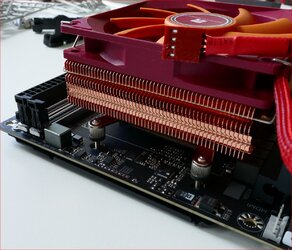
Notice how the screws just go straight through the mobo holes.
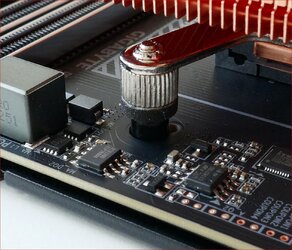
The whole thing is wiggly as the mobo holes are larger than the screws, perhaps Thermalright figured that, in order to have any hope of loosening an old heatsink with thermal paste ofc already added, some wiggle room was required.

The heatsink comes with a separate AM4/intel backplate, which is not seen in the photo. This separate heatsink is required, obviously, because if I tried to use the old backplate that came with the motherboard, the Thermalright hex nuts, would hardly make contact with the back of the motherboard. Edit: I could probably add four washers on the backside, safely if I wanted to keep using the old backplate, to make the hex nut lie flat against the original backplate.

Hm, I could maybe add some washers, but I don't have perfectly sized washers (they are not equally thick).
The board came with plastic stand-off parts on the top side, but they obviously won't fit, otherwise the cooler wouldn't even get to touch the cpu's heatspreader surface.

Here is a youtube guide that shows how the installation looks (also showing the removal of the big plastic stand-off parts on top of the mobo):
 

Attachments

  • fitw.JPG
    fitw.JPG
    176.7 KB · Views: 7
Last edited:
Update: So, trying on the original backplate, behind the motherboard it is obvious that this original backplate better locks the position of the cooler, because the original backplate fills in the mobo holes and doesn't allow the cooler bolts to wiggle around like they would be with Thermalright's separate backplate.
 
It looks like there shouldn't be any wiggle when using thermright's amd backplate when it's screwed down.

the Thermalright hex nuts, would hardly make contact with the back of the motherboard.
I think the video says there are two different lengths of screws...watch from around 2:20+. They also use the am4 backplate with the longer screws as a secondary option. Also, the shorter ones look to barely thread in the video too, but you should still be able to secure the heatsink well....

but either way, you CAN use the stick backplate so it looks like you're set...right?
 
Last edited:
I think this is the first time putting together my computers, that I've ever fiddled as much as this, but I will make it work.

Using the Thermalright backplate, you can see in my photo, there is like 1,5-2 mm space around the four heatsink screws on either side.
Although the heatsink when fitted and with paste applied, I guess it won't slide much, but testing fitting this, the heatsink is clearly sliding around inside the four mounting holes on the mobo and will offset the placement by max 2mm.

Btw, I just re-checked the topside of the cpu and it is super flat, so I will do a little bit of lapping on the heatsink base.
I've checked the contact action between the cpu and the heatsink base and it isn't a good flat fit, it sort of looks like the base if pivoting off the cpu surface and lying down on either side.

I will use the old motherboard backplate, as the hex nuts will go on ok, even if the hex nuts aren't 100% in contact with the backplate.

Hopefully I'll get to attach the heatsink later today if I can find some 600+ grit sanding paper around. I have a few.

Image below shows a new photo, using the original backplate, which has some plastic that mostly fill the inside of the four mobo mounting holes, making the heatsink not moving around inside the holes anymore. There is a fluffy foam part seen in this photo, just beneath the shiny metal screw here, obscuring the remaining gap between the mobo and the heatsink.
 

Attachments

  • better.JPG
    better.JPG
    216.7 KB · Views: 6
Last edited:
Using the Thermalright backplate, you can see in my photo, there is like 1,5-2 mm space around the four heatsink screws on either side.
I see that there's room. That looks like a poor design. Maybe tighten down the nuts a bit more when using that backplate?

You say the AMD backplate works right? So just use it.

Btw, I just re-checked the topside of the cpu and it is super flat, so I will do a little bit of lapping on the heatsink base.
I've checked the contact action between the cpu and the heatsink base and it isn't a good flat fit, it sort of looks like the base if pivoting off the cpu surface and lying down on either side.
Like we said in another thread, this is normal. The mounting pressure should push the heatsink IHS (metal cover) down a bit when tightening to make a secure fit. In other words, don't do that!!!
 
Yes, I'll use the old backplate.
I have to make sure I don't overtighten it all, regardless, as other people have reported that the mobo will eventually start bending.

Isn't the IHS soldered fixed to the cpu core? I can't imagine the IHS would flex at all.

Do you mean that you think the outer area of the IHS will flex a little around the core, and then match the shape of the base of the heatsink base?
 
Yes. I have to make sure I don't overtighten it all, regardless, as other people have reported that the mobo will eventually start bending.
It's an ITX board, I don't imagine much, if any bending going on there. Secure it down tightly (hand tight + 1/4 turn is how I roll) and enjoy your PC. :)
 
I guess I will just try the heastink on as is, and then have a look once it is properly fitted with paste and tightened on properly (without damaging the mobo).
 
Isn't the IHS soldered fixed to the cpu core? I can't imagine the IHS would flex at all.

Do you mean that you think the outer area of the IHS will flex a little around the core, and then match the shape of the base of the heatsink base?
The IHS will flex a bit under the pressure of the convex heatsink, correct. I apply a small BB size drop in the middle then four small drops in the corners. This has worked out well for me over the years.
 
I wish I bought some of the softer Noctua paste (they sell two variants, one harder, one softer, NT-H1 and NT-H2 iirc ), the Thermalright paste (TF7, came with the cooler) is a bit hard to work with. I do have some very old paste that would have been easier to apply.

Ah, too late, now, I've applied the paste and I have attached the cooler.

I forgot to take note of the mobo edge prior to working with the board, I do suspect the edge is flexing a little bit, perhaps because of the inward pressure around the cpu socket, but hard to tell for sure and I did not use a screwdriver here, just manually rotating the hex nuts with this tool that fit around the hex nuts.

The photo below show the cooler used with the original mobo backplate. I have also added a single washer on top on each of the four points around, but they are hidden inside the foamy bits in the photo. I added them to make sure I didn't get to bend the mobo too much.
 

Attachments

  • fl.JPG
    fl.JPG
    160.6 KB · Views: 7
Last edited:
Heh, can't do. Still waiting for my ram sticks. Should be here any day now. Maybe even later today.

Also, heh, will be installing linux. At least I should be able to power it on and enter uefi menus regardless.

I hope I didn't damage the mobo around the components when I tightened the two screws around the mostfets/vrms. I heard a faint crunch noise, might have been just the pcb board or the nearby materials around the hole. After applying the new thermal pads around the mosfets, I struggled a little putting it all back together, because I did not take notes of which screws goes where. I did mange to put it back together though.
 
To be honest, I see the slop and don't see a concern for it. They make up for it in the back plate. Using the original back plate looks to be impossible to me. Since you can't get to the screws from the top (this is an issue for me), you have to have a back plate with through holes and use nuts. Using pre-threaded back-plate does not look to be an option from what I see.

Now, I don't like the idea of haveing the place the MB onto the HSF (heat sink fan). Even large ones that I've installed over the years are made to install the HSF onto the MB. The other way around seems weird to me.

The slop in the holes does have a finish that seems cheap but once you have the back plate installed and fastened down (I agree, not too tight) friction should hold it firmly in place.

Seeing how this unit installs, I would tend to shy away going forward but I wouldn't have even known if you hadn't shown it to me.
 
Using the original back plate looks to be impossible to me.

Using pre-threaded back-plate does not look to be an option from what I see.
That's what's happening in the last picture, no? Either the screws don't thread and poke through, or it's the same thread.

Either way, I agree using the Tright mounting unit and not the stock AM4... but if it's working.......... lol
 
It's all ok.
Just looks half assed, because the product apparently wasn't designed that well imo, so it fits on the mobo, but I can't imagine this kind of fitting is an ideal fitting. :)

If I get normal temps on this now, I don't plan on tightening the four hex nuts at the back behind the motherboard any further.

The cpu heatsink official specs clearly states that it is AM4 compatible, though Thermalright also sell an (another) AM4 variant of the same cooler. I just wasn't able to order any, couldn't find it. Presumably, I bought the latest version. *shrugs*
 
Back