- Joined
- Jan 30, 2008
Yeah the, SG07 is about twice as much as the SG05, but does come with a 600w PSU, so it would only come to ~$25 more because with the SG05 I'd have to buy the $75 Silverstone PSU.
Couple other questions though. To get the SG05 down to pretty much the frame only, do rivets need to be popped out, or are all the panels screwed on?
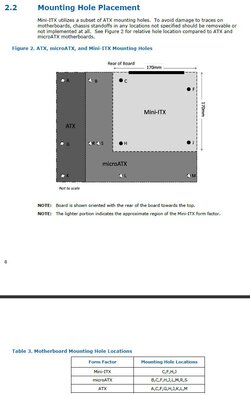
And second, as silly as it would look, can that GB mini ITX motherboard be put into a regular ATX case? Or would the screw holes not line up? For me to tackle the project, I'd need to buy the mobo, use it with my normal case, then buy the case and PSU with the funds from selling my MIIIF.
I don't mean to hijack your thread MIAH, but this build links the source of my inspiration, and there seems to be a pretty good mini ITX discussion already going on here")
Couple other questions though. To get the SG05 down to pretty much the frame only, do rivets need to be popped out, or are all the panels screwed on?
And second, as silly as it would look, can that GB mini ITX motherboard be put into a regular ATX case? Or would the screw holes not line up? For me to tackle the project, I'd need to buy the mobo, use it with my normal case, then buy the case and PSU with the funds from selling my MIIIF.
I don't mean to hijack your thread MIAH, but this build links the source of my inspiration, and there seems to be a pretty good mini ITX discussion already going on here