• Welcome to Overclockers Forums! Join us to reply in threads, receive reduced ads, and to customize your site experience!

Phenom II x4 3.4ghz 965BE + ASRock 960GM OC

Overclockers is supported by our readers. When you click a link to make a purchase, we may earn a commission. Learn More.

chronei

New Member
Joined
Aug 23, 2012
Newbie here. I've read countless "in theory" situations and understand that everyone's different. I know that upping the fsb increases EVERYTHING and multiplies everything even more. I also understand that a BE is supposed to be easier to overclock with. But all in all, all BIOS "wording" is different, and I am royally screwing up somewhere and can't even where to find fsb. Is that "CPU frequency [200]"?? I keep seeing it default at 200 in guides.. /shrug

It is told that my CPU, even by stock fan, can OC easily from 3.4 to 3.7 no problem. I tried even doing 3.6 and got blue screen or a freeze ! Unbelievable! But again, I am a complete OC newb minus what I've read in the guides.

Anyway, I tried to do it on my own using wprime (not even sure what the difference is between 32m test and 1024m test (I do 32m for 30 mins and do 1024m overnight from what I can see?).

SO, here we go:

CPU: Phenom II x4 965BE 3.4ghz
http://www.newegg.com/Product/Product.aspx?Item=N82E16819103727

Mobo: ASRock 960GM/U3S3
http://www.newegg.com/Product/Product.aspx?Item=N82E16813157323

RAM: 8GB Corsair Vengeance
http://www.newegg.com/Product/Product.aspx?Item=N82E16820233170

Aftermarket HSF: Cooler Master Hyper N520
http://www.amazon.com/dp/B001NJ0D0Y/ref=pe_175190_21431760_M2T1_ST1_dp_1

Case *NEW*: Apevia X-QPACK2 Aluminum MicroATX Case (replaced stock PSU with 850w)
http://www.newegg.com/Product/Product.aspx?Item=N82E16811144144

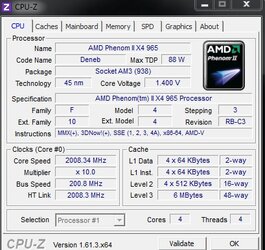
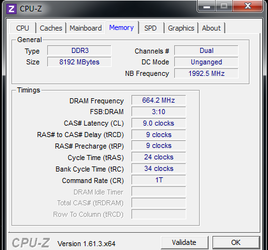
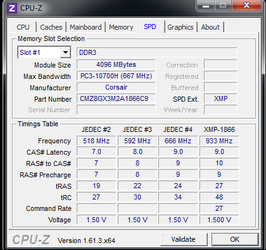
What's hard is that I can't even tell sometimes what is supposed to be default! After you take the options off AUTO, it doesn't default to what auto starts at which is frustrating. So I decided to turn everything on manual and take pictures of my current settings (which is more than likely messed up):
104m7t0.jpg
35b9r15.jpg
29b22h1.jpg

Where is a good place to start where you guys are pretty confident I can handle at the beginning? If I can get a good starting place, I'm sure I can test more and more.

Also, I can't find exactly which one is for FSB ... I think it's worded differently.

ANYWAY, OC suggestions would be greatly appreciated ;D
 
Last edited:
First of all, disable Advanced Clock Calibration. That is only useful if you have cores to unlock and with the CPU you have there are no cores to unlock. Leaving it enabled will prevent you from being able to read the CPU "core" temps which is important in overclocking.

Second, disable Cool N Quiet and C1E in bios. Then go into Windows Control Panel Power Options and configure it to High Performance. This should turn off all the green, power saving and down-throttling technologies that can mess with an overclock.

Third, and most importantly, you need to increase your CPU voltage in bios to break through the current instability you are experiencing. You can't keep asking the CPU to cycle data faster and faster without giving it more juice to do so anymore than you can ask an automobile engine to propel a car faster and faster without giving it more gas. Right now your CPU voltage is set to 1.3875. Give it another .025 volts, what we call "vcore" for short.

And for now, lower your NB Frequency Multiplier back to 10x which is the stock amount.

And yes, the CPU frequency is the FSB. AMD doesn't use the term "FSB" anymore. It's a dated term but veteran overclockers still use it. The technical term is "HT Reference" but most bioses call it "CPU Frequency" these days. You do not need to be concerned with it since you have a black edition CPU and you can overclock it with the "CPU Frequency Multiplier" which you seem to already have figured out.

The next thing we need you to do is to attach pics of CPU-z (a free program for download) tabs: "CPU", "Memory" and "SPD". To attach pics, use the built-in forum tool. First crop and save the individual images with Snipping Tool in Windows Accessories. Then click on the Go Advanced button at the bottom of any new post window. When the Advanced window appears click on the little paperclip icon at the top. This will load the file browser/uploader tool and the rest will be obvious.

It would also be helpful to know something about your case make and model (to get an idea about ventilation), your PSU make and model and your video card make and model. Please go back and add this information to post #1. Soon we will have you create a "Sig" so all that parts info travels with every post you make but you don't have access to that feature yet.

We will soon be also asking you to do a Prime95 stress test to check for temps and stability under load but first give us those CPU-z pics so we can check your bios settings and get some details about your CPU and ram.
 
Ok (sorry about taking so long):

Completed:
* Disabled advanced clock calib
* Ensured cool n quiet is disabled / high perf. power settings in Windows
* Upped vcore to 1.4125
* Edited main post with inclusion of my case. As for cooling, it should already be there (the aftermarket HSF is attached. The hsf exit fan also is blowing directly towards a case fan that sucks the heat out of the case.

CPU-Z:
* Attached CPU Page
* Attached Memory page
* Attached SPD page
 

Attachments

  • cpuz-cpu.jpg
    cpuz-cpu.jpg
    57 KB · Views: 923
  • cpuz-memory.png
    cpuz-memory.png
    37.6 KB · Views: 871
  • cpuz-spd.png
    cpuz-spd.png
    40.7 KB · Views: 907
If you have disabled CnQ then you may need to go and manually adjust you're CPU multiplier as it looks like it has defaulted to x10 making you run at 2000mhz (2ghz) instead if you're stock x17 (3.4ghz), as tents said all you need to adjust for now is vcore and CPU multiplier, but when you start adding vcore it will make you're CPU heat up which you can monitor using a free prog called HWmonitor, you don't want you're temps to go over 55c when stressed
 
ok fixed it ~ I got it up to 3.6ghz right now and it's fine, but when I tried 3.8 my pc wouldn't POST. Reset bios and it worked again. Think this is because it's not getting enough juice? Raise vcore?

How do i know when I need to raise vcore other than the pc not posting?

Edit: I REALLY don't get this ..... I only went from 3.4 to 3.6 with this beastly aftermarket ASF and this CPU that's known to go to 3.8 easily just by stock fan, and when I stress with 3.6, the temperature hits max of 58 !! 50 when idle. What the heck is going on?! :( why is it overheating so easily?
 
Your high temps could be caused by one or more of the following problems:
1. poor case ventilation. You have a 120mm fan in the back of the case but only one 80mm fan in the front, according to the product info on NewEgg. That's not much. Especially with a compact case like that one.
2. heat sink being not mounted well
3. the TIM (thermal interface material, or the heat sink paste, in other words) not being applied correctly.

Both 2. and 3. would cause poor contact between the heat sink and the CPU and thus poor heat transfer. High idle temps are often a tip off to this issue.


The first thing I'd try would do would be to take the cover off the case and check temps again while stress testing. The kind of case you have is not overclocking friendly. It's intended for HTPC kind of applications rather than enthusiast/overclocker use. If the temps drop significantly then you have found the problem.

If removing the case cover doesn't help, then I would redo the TIM. I have that very same cooler and it is the most difficult one to mount I have ever used. Not a bad cooler but not the greatest either as far as efficiency but it's easy to mess up the TIM application while screwing around with the difficult mounting process. Of course you know that it can only be mounted while the motherboard is out of the case. If you decided to redo the mount and the TIM, get someone to help you. It's really a two person job:

First, clean the heat sink bottom and the CPU face thoroughly with paper coffee filters. They work great because they have a hard sheen and don't leave behind lint.

Then, turn the cooler upside down on a counter top and apply a pea-sized blob of TIM to the bottom in the center. Don't try to spread it with anything. Let the clamping pressure spread it. That way you will avoid interjecting air bubbles into the paste or skin oil from your finger, both of which can insulate.

Then turn the motherboard upside down and carefully lower it so that the mounting holes slip down over the cooler bracket screws. (Make sure the board is oriented the right way so that the cooler fans will be blowing the correct way.) Hold the board as flat and steady as you can while your partner adds the back plate and the nuts.

Have your partner tighten the nuts in a back and forth "X" pattern, tightening each one a little at time to evenly distribute pressure.
 
Last edited:
Honestly I'm pretty sure you are correct. Aughh.. I think I'm just in denial lol. I'll probably procrastinate this a weekend or two, so i'll revive this thread a bit later when I do and post the results.
 
Back