• Welcome to Overclockers Forums! Join us to reply in threads, receive reduced ads, and to customize your site experience!

RX56 Vega Liquid Metal

Overclockers is supported by our readers. When you click a link to make a purchase, we may earn a commission. Learn More.

Sentential

Contributing Member
Joined
Sep 16, 2003
Location
Knoxville, TN
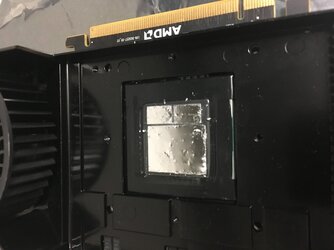
I was planning on doing a whole write up until I had an accident during reassembly that I assume had killed the card, fortunately it is very much alive! The most important thing is to use electrical tape around the die. If you don't have that you will kill the card. Why? Well the way the whole unit is designed it is broken up into 3 parts. You've got the shround up top, the flat sled which cools the VRMs and then finally the actual GPU heatsink itself. At least on mine the whole thing is sealed with epoxy so you don't have to worry about the interposer however the heatsink itself sits below the spine of the card that the sled uses to support it and it wants to shift around once you start to rotate the card right-side up. Unfortunately you cannot get to the heatsink without removing absolutely everything. The thermal pad is so large and is made of that chewing gum style stuff so it takes a fair amount of effort to dislodge.

So once everything is removed off the card including the rear I/O plate go ahead and clean and put down the electrical tape. Make sure it is sealed in front of the VRMs since you are likely going to slosh or spill something when you rotate the card like I did.

Once you've got the sled back on tight, die cleaned and LM applied this is where I screwed up. When you go to rotate the card make sure you have direct finger pressure on the heatsink block and the rear of the card. Once it is upside down make sure you place the center of the heatsink on top of a raised object like a coke can or a power supply or something raised enough to clear the spine of the sled. I did not do this and so when I lifted off to tighten the rear of the card since the bracket is so stiff the heatsink skittered off and I assumed the worst. FORTUNATELY! :bday: since I had Super33 tape down I could carefully clean the LM away and scoop it back onto the die for removal using a Q-tip. To scoop back onto the die I used a flathead screwdriver covered in a piece of electrical tape and that worked better than trying to scrub the excess off.

Once I fixed my screw up I placed the heatsink on top of a coffee mug I had lying around for added support to do the rear plate and everything else went just fine. I just want to spare someone a heart attack.

Before:
-20% Power / 960mhz memory
65C* @ 2384RPM

After:
-20% Power / 960mhz memory
65C* @ 1978RPM

Seems to have helped quite a bit, temps now take a long while to reach peak as opposed to it being more or less instant. I can't say I recommend this for everyone until non-reference HSF designs arrive but for those with water blocks you can use liquid metal without issue on Vega. Lastly all the stock thermal pads appear to be .5mm for those interested. Photo below you can see the LM spray caused by the shifting heatsink. Also highest observed clocks so far were 1572 / 960 and that was with a targeted temp of 65C* at 3500RPM with 50% power offset.


IMG_0114.JPG
 
Last edited:
Tim isn't always about dropping temps, its about how quickly can the heat migrate between two surfaces.
 
Cool! But it would be nice to see the actual temp drops in addition to to fan rpm drop. :)

Linked from image below and this is as close to an apples to apples I can do ambient temperature excluded.

Their peak (Balanced): 1590mhz / 800mhz @ 2419RPM 72C*
My peak (Balanced-Custom): 1644mhz / 800mhz @ 2382RPM 65C*

So there you have it, a drop of about 7C*+- or so and that's as good as I can do as you can't directly force clockspeed. I took my readings running Eth Claymore, I'm not sure what they used but I doubt its heavier use than that so mine should be closer to absolute max than theirs is. I think this is pretty accurate given that the stock HSF has a large vapor chamber and there is a **** ton of pressure on the core itself to where it takes a significant amount of force to clamp the HSF back down. Also be careful when screwing it back on do not over torque as I have sheared off a screw already. Fortunately the bolts that hold down the fan shroud are exactly the same as the ones on the HSF so if you break one you have 6 others as replacements and the thread size is a standard laptop screw (already bought replacements).

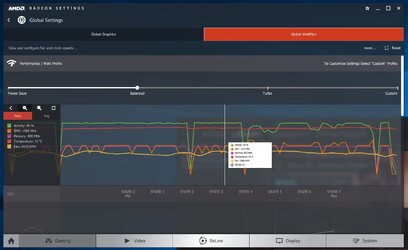
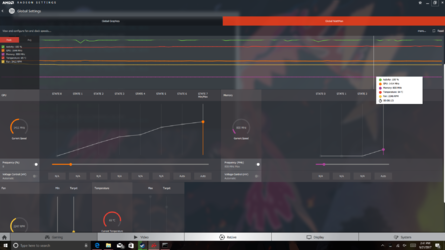
The way wattman works it's difficult to really pin that down but I've tried my best using this as a template from here:
https://www.pcworld.idg.com.au/arti...6-vega-64-liquid-cooled-vega-64-tested/?pp=11
Theirs:
56-deus-ex-dip-100731673-orig.jpg

Mine:
Screenshot (5).png

EDIT2: OK That's as good as I can do, note that mine isn't throttling at all and is dead flat vs theirs. Once Prey finishes downloading I'll try and upload more typical usage.
 
Last edited:
Not sure what 'they' (whoever that is) has to do with it. I was asking for a comparison of YOUR before and after with temps, not fan speeds. Other results arent relevant. Did i miss something?? :)
 
Not sure what 'they' (whoever that is) has to do with it. I was asking for a comparison of YOUR before and after with temps, not fan speeds. Other results arent relevant. Did i miss something?? :)

No you haven't missed anything :) *unfortunately* I don't have any so I tried to replicate another website's testing to get as close as possible to a before/after. Even if I had mine it still wouldn't be completely accurate as Vega adjusts clockspeeds, straps, timings and voltages based on temperature. As of right now there is no way to get a perfect 1:1 comparison for temps which is why I didn't bother and used fan RPM instead. Here is Futuremark Timespy up to the first CPU test. Again sorry folks I know it's not great but it's the best I can do. Until wattman is updated in such a way to control all the hidden options in Vega there isn't a way to 100% show temperature improvement other than to use a targeted temp and compare the clockspeed and fan speed.

View attachment 193585
 
Why isn't there a way? What would change if you tested one way, applied new TIM and tested again? I am not terribly familiar with how these work.

I appreciate the effort (and patience with me) for sure. :)
 
Why isn't there a way? What would change if you tested one way, applied new TIM and tested again? I am not terribly familiar with how these work.

I appreciate the effort (and patience with me) for sure. :)

Sure thing! So basically there are a couple issues here. First the screws that are used on Vega are super *SUPER* soft and I am terrified that I am going to need to replace all the screws on it as most of them are starting to strip heavily after just trying to re-paste it once. Second pulling Vega apart is a gigantic pain in the ***.

The first step is to remove the shroud screws (6 soft)
Then the backplate (8 also soft)
Then you've got about 12 or so hard screws to separate the cooling VRM from the PCB.
Next you've got 4 screws for the primary heatsink and it likes to pop because of how much tension is on the main core. (also very soft and prone to shearing)
After that you've got 4 screws above the I/O inputs to remove (soft)
Then 2 that act as the spine for the aluminum VRM plate that help stabilize the IO plate to the PCB. Right out of the box the OEM had stripped the threading (not the head) of one of these before I even started.
Once you've got the I/O plate removed you have to use a plastic pry-tool to separate the whole HSF as everything is sticky and it doesn't want to let go.
Now that you've finally separated the HSF you have to pry the shroud off which is vaccum/friction locked onto the VRM plate (again pry tool)

After you've finally got everything off you've got to put it back together and naturally the primary HSF sits below the spine of the VRM plate housing which means you have to fumble around and place something to stabilize the core of the heatsink like a coke can or coffee mug since it wont sit flush. This is why I said make sure you use lots of electrical tape because getting the main heatsink back down is very tricky since it isn't level with the rest of the shroud.

Combined this with the fact I've already sheared one screw and stripped another and the fact my GPU die is covered in liquid metal there is NO way in HELL I'm pulling it apart again lmao :D. Plus each time you consider re-pasting a Vega you roll the dice between one of 3 die slug packages. The best is sealed with an epoxy which prevents any damage or chipping to the HBM or core (like mine) and is completely covering the interposer. Another isn't level and has the interposer completely open which prevents any kind of conductive TIM from being used and a second which just has epoxy to protect the interposer gap between the core and the HBM. Here's a detailed article about it here:

http://www.tomshardware.com/news/amd-vega-package-problem,35281.html

Again, giant cluster****. Plus wattman is completely broken. There is no way to set clock speeds, no way to directly set voltages and up till the most recent Radeon driver you couldn't even see what the true clockspeed actually was!
 
To be clear, i didnt want it redone, though i appreciate hearing the story. :)

I was simply questioning why you cant test the same way twice... but i see you essentially said already as it changes clocks, voltage, etc (though why the major things cant be changed in wattman to match i dont know.... and is the crux of my questions).

No I completely understood what you meant no worries :D. The key issue with doing a direct comparison to Vega more than anything are the HBM straps more than the core speeds. Essentially the HBM controller has various tiers based on what temp it reads.

Once Vega hits 65C it drops throughput by atleast a good 25% which is enormous. This is why you see weird behavior showing Vega on par with the 1080Ti and other times it’s beneath the 1070. Once it hits 65C it aggressively throttles the memory subsystem.

So the best way to overclock Vega is to throw as much power to it until it hits 65C and keep it under 65C at all costs, even if that means backing power off 20% because the moment you go over 65C you’re going to lose at least that much.

...it’s very odd

I’ll give an example since mining is the only thing I can show it happen. I’ll go from 37mh/s down to 31mh/s the moment I cross 65C*. Like I said....odd

So when I bench I use max HBM which is 960 before hardlock, 50% pwr, max fan, no overclock boost % and as many fans I can find to keep it in the 30s-40s and I get 1600+ core speed.

This thing will be savage on LN2!
 
Last edited:
This thing will be savage on LN2!
Beware! Liquid Metal doesn't work well under LN2!!!
It hardens and then will crack from thermal expansion at those temps, pretty much negating it's purpose as a TIM!

If I'm wrong on this, someone please correct me - but I've always understood that's pretty much the one limitation of liquid metal. It doesn't work right if you go extreme sub-ambient - I don't think it likes DICE either, but I can't find any info on that. I do distinctly remember that LN2, especially on big dies it's performance is unpredictable, usually bad.
 
If anybody is interested in the thermal properties of Gallim based TIMs (a.ka. liquid metal), here are a few references I found in a few minutes.

[1] Gallium-Based Liquid Metal Amalgams: Transitional-State Metallic Mixtures (TransM2ixes) with Enhanced and Tunable Electrical, Thermal, and Mechanical Properties, Jianbo Tang, Xi Zhao, Jing Li, Rui Guo, Yuan Zhou, and Jing Liu ACS Applied Materials & Interfaces 2017 9 (41), 35977-35987
DOI: 10.1021/acsami.7b10256

[2] Thermal conductivity of liquid metals and metallic alloys
https://doi.org/10.1016/S0022-3093(99)00268-9

[3]https://www.researchgate.net/public...d_Metal_Alloy_Dispersed_With_Copper_Particles
 
Back