• Welcome to Overclockers Forums! Join us to reply in threads, receive reduced ads, and to customize your site experience!

Unlocking phenom x2 550 help

Overclockers is supported by our readers. When you click a link to make a purchase, we may earn a commission. Learn More.

Fcool1

Registered
Joined
Aug 4, 2009
Hello there.

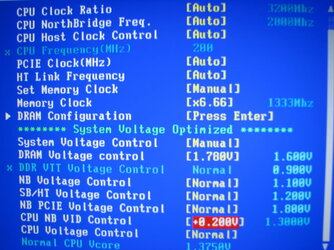
My problem is that i unlocked succesfully with setting the settings to hybird and acc to auto but it freezes at windows is starting animation. Ive tried increasing the vcore and the nb lowering my ram mhz and lowering the cpu clock but nothing works. I did disable acc and it booted up but im guessing it requires to be on for the 4 cores to work? because it didnt show up as four so i was wondering if there was other options to work with.

what i also want to know is that ive heard just making it 3 cores instead of 4 worked for others but i cannot find the option in my bios to disable cores. Anyone know of any other way?

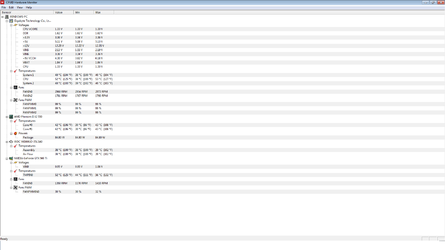
Heres a screenshot of my cpuz
http://img844.imageshack.us/img844/5679/processorinfo.png
 
If you choose the "Go Advanced" option at the bottom of any new post window and then when the advanced post window pops up click on the little paperclip icon at the top you would be able to directly attach images to your posts instead of linking them. We prefer this.

Some motherboard bioses have an individual core control feature and some don't. It should appear when you enable ACC and would be in that same section most likely.

If you would take a digital camera pic of that section of the bios with ACC enabled and then attach it with your next post we might be able to help you find the relevant line item if it's there.
 
unfortunately i know for a fact now theres no disable core feature. But is there anything else i can do to help with the unlocked cores?
 
You've already tried bumping up the vcore which is the one thing that occasionally helps. I think you nonviable locked cores is the deal.
 
Instead of making a new thread i was hoping youd help me get my overclock higher.

Heres my current set up:

cpu at 3.7 ghz with multiplier
cpu nb at 1.8 ghz
cpu fsb at 200
ht link at 1.8
memory at 1333
cpu nb vid at + 0.100v
cpu vcore at 1.40v
cpu nb at 1.220v

Al this at 50c max load. If i try to put it at 3.8 its not stable. What can i do to get it stable at 3.8-4.0 ghz?
 
This is almost never anything to make an overclock more stable but more voltage or 'cooler'. You could try and go to 205 FSB/HTT/CPU Frequency from 200 but not much more as a test since raising that to 205 overclocks ram and CPU NB and everything else really. About all can suggest with next to n0 information about your system specs for board and actual ram model.
 
sorry heres my system specs.

Mainboard : Gigabyte GA-MA770T-UD3P bios version f2
cpu cooler : Rosewill RCX-Z1 1700-3000 rpm

Chipset : AMD RD770
memory : g skill 2x2 gb model no. F3-10666CL9D-4GBNQ
psu : 500w
hhd : 1 sata
sound device : onboard
usb : mouse joypad
win 7 64bit
case : not sure which model or brand. got 2 120mm fans blowing air in and out.
graphics : gtx 560 ti
 
Last edited:
Thanks for the system info. Please take that info and put in a "Sig" so that it travels at the bottom of every post you make. To create a Sig click on Quick links at the top of this page and then click on Edit Signature. This is a common forum etiquette which really helps those who may join in the discussion later after the thread has gotten longer and the system info you give early on gets buried. Also, please add something about your CPU cooler make and model or is it just stock? Please state so one way or the other.

Also, please do not link to pics like you did in post #1. Not a big deal but there is a built it forum tool which allows you to attach pics directly with your posts and this is handier for those helping you. To do so, first crop, capture and save the pic to disc. Snipping Tool in Windows Accessories works great for this. Then click on the Go Advanced button at the bottom of any new post window. When the advanced screen pops up then click on the little paperclip tool at the top which will load the file browser/upload tool and the rest will be obvious.

The next thing is (if you have not already done so) download and install Prime95 and HWMonitor. Then put all your bios voltage and frequency settings on stock or Auto. Launch HWMonitor and leave it open on the desktop while you run the Prime95 blend test for 20 minutes. Then post back with an attached pic of the HWMonitor interface so we can see what your CPU vcore is and what your core and CPU socket temps are like. This will give us an idea if you are likely to run into temp-related instability early on in the overclock process.

Thanks for your cooperation and we will enjoy helping you in your overclock. Please forgive the list of instructions. We love to help people here but we have developed standard and systematic ways of doing that which serve well.
 
Last edited:
Heres the hwmonitor temps.
 

Attachments

  • hwmonitor.png
    hwmonitor.png
    40.9 KB · Views: 40
The core and CPU (socket) temps are good and it looks like you have 10-15c of headroom. When overclocking you will be increasing processor frequency and voltage which drives up temps. Rule of thumb is that you want to keep max core temps from exceeding 55-58c and max CPU socket temps from exceeding 65c. Above that we usually see temp-related instability. And those are also safe operating temps.

So the next thing to do is to go into bios and disable Cool N Quiet and C1E. Then go into Windows Control Panel Power Options configure it to High Performance. This turns off the "green" power saving, down-clocking technologies that interfere with overclocking.

My next request would be to have you take digital camera pics of the overclocking section(s) of your bios and then attache the pics with your next post. This is the easiest way to help you spot the main overclocking controls in your particular bios as opposed to having us use terminology that may or may not match what you see. What we will need you to be able find in bios would be the following:

1. The master system bus frequency control (maybe called something like "CPU Frequency" or "HT Reference". We often simply refer to it as FSB ("front side bus") around here. FSB is kind of a dated term but all the experienced overclockers are familiar with it.
2. The CPU voltage control (maybe called something like "CPU VID" or "CPU Core Voltage")
3. The CPUNB Frequency control (maybe referred to simply a "NB" in your bios)
4. The CPUNB Voltage control (maybe something like "NB VID" or "CPUNB VID")
5. The HT Link Frequency control (not to be confused with the HT Link Width)
6. The Memory Frequency control (may be referred to as DRAM Frequency)
7. The Memory Voltage Control (may be referred to as DRAM VID or something similar)
 
The other thing I should point out is that some of the overclocking controls will probably be hidden and/or inaccessible when main section headings are on "Auto". They may need to be taken off of Auto and put on Manual for all the choices to be viewable and accessible.
 
Instead of doing the camera thing i found a pic of it in google thats exactly like mine.
 

Attachments

  • bios.jpg
    bios.jpg
    84.5 KB · Views: 34
Okay, looks like your bios uses common terminology to label the overclocking tools. By the way, don't confuse "NB Voltage Control" with CPU NB Voltage Control" The "NB" is a chip on the motherboard that controls the PCI-e function and we won't be concerned with that. Some bioses make it confusing by using "NB" to refer both to the chipset NB and the CPUNB. That isn't going to be a problem in your case.

Now, take the CPU Northbridge Frequency off of Auto and set it to either 9x or 1800, however it is expressed. The CPUNB is the memory controller and resides on the processor die. Stock is 2000 mhz and it's the product of the the CPU Frequency and the multiplier selected. So at stock it is 200x10 or 2000 mhz. What we want to start with is 200x9 or 1800 mhz to make some headroom for overclocking.

Next, do the same with the HT Link Frequency except we want it to be 8x or 1600 mhz. to start. The HT Link is the bridge between the CPU cores and some systems on the motherboard like the NIC and the SATA lanes.

Then, Take the CPU Host Clock Control off of Auto and Put it to Manual. This is what I referred to earlier as the master system bus or the CPU Frequency or the FSB. All the other system buses are "tuned" to this one and when you increase it the other ones (CPUNB, HT Link and memory) rise with it. That's why we are lowering these other ones to make some headroom for overclocking. Unlike the CPU frequency, these others don't like to be overclocked or at least no much and will cause instability if they are.

Next, change the Set Memory Clock to Manual and change the Memory Clock to 5.33.

For now, put the CPU NB VID control to Auto or Normal.

Now, hit F10 and save the settings. Reboot and take a pic of this same section in bios so I can check the changes.

Oh, and please create a Sig as I requested and described how to do in post #8.
 
Back