• Welcome to Overclockers Forums! Join us to reply in threads, receive reduced ads, and to customize your site experience!

Using EKWB Performance 360 Water Cooling Kit

Overclockers is supported by our readers. When you click a link to make a purchase, we may earn a commission. Learn More.

BobCochran

Registered
Joined
Jun 9, 2017
It has been a while since my last post on a computer I built for a friend which is water cooled with a Corsair H115i All-in-One. As I built it, everything worked just great. However the friend is trying to work with gigantic Excel workbooks, and does quite a lot of video editing, and too many times it felt slow to her. I would get complaints when Excel froze up. (I did strongly suggest that Excel has its own issues once you do too much formatting and too many pivot tables, but that is a different subject for some other forum, smile.)

All this time I've been itching and itching to use an EKWB water cooling kit, and an EKWB water block for the graphics card. I decided to replace the processor with a more powerful Xeon processor. This was my excuse to also try the EKWB kit and graphics card water block.

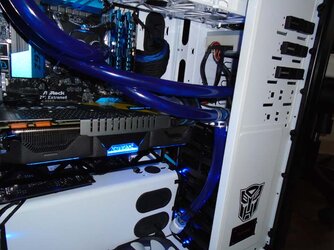
After much work, I've installed the kit. It is not too bad. A photo of the system being leak tested is shown below. I'm still leak testing as I write this. I could not find any place inside the chassis to put the reservoir and pump so I put it on top of the case. It seems to be working -- at least, there is no leaking water to this point.

I admit it is probably very amateurish, but it is a great experience for me.

Earlier this week, I had wondered if the 2 meters of EKWB-brand tubing would be enough for my system. On Tuesday night, I decided to order some Mayhems brand tubing from ModMyMods.com. They posted it to me the next day. Meanwhile, I took Friday off work to do this modification of my friend's system. It took many hours for me...and I made first-time, new technician type mistakes when connecting the EKWB tubing. I kept cutting it too short or too long and I'd get kinked tubing. Well, Friday afternoon the package with the Mayhems tubing arrived. It saved me! I'm using the Mayhems tubing for the last part of the cooling loop. Had I not ordered it as a backup, I'd be out of tubing (due to my own mistakes) and have a disappointed friend.

The hardest part of the entire build for me was figuring out where to put the pump and reservoir. The second hardest part was installing the water block on the graphics card.

liquid_cooling_system_leak_test_small.jpg

Thanks a ton

Bob
 
You should be able to install the EK 120mm bracket for the pump/res housing above the drive cages vertically. What you have right now is in a horizontal style configuration. You'll have to drain, reroute the loop to get this done. I would also add a drain port if you change things up.

If its the same bracket for both configurations as shown below, just flip the sides and that should give you the vertical config.

What you are using now.
900x900px-LL-2ff8f7d5_IMG_3852_zps98yfuqip.jpeg

What you need to change to, above the drive cages to the front 120mm, internally.
900x900px-LL-60e11209_IMG_7703_zpst9t3ode0.jpeg

Before anything, I would verify with EK that you can do this.
 
Hi GTXJackBauer, thanks for getting back to me. I tried to fit my reservoir inside the chassis to the right, where the fans would mount, as you suggest. It did fit, sort of. There was only a few millimeters of clearance between the top fill port and the bottom of the optical cage. My reservoir seems taller than the ones you show in the photos, I am sure those would fit. I also thought of installing the reservoir on the left side of the chassis, on the outside and above the I/O ports on the motherboard, but that would have made routing the tubing even more awkward. It also doesn't seem as if I can rotate the IN/OUT ports on the pump to the orientation that I want. It would be nice to turn those ports around like 45 0r 90 degrees to make connecting the tubing a lot easier.

You mention adding a drain port. I've read mentions of this in other posts but I don't quite get what adding a drain port means. If you could show me a photo that would be great.

Thanks a ton

Bob
 
Hi Console, thank you. I will see if I can get my courage up to drill screw holes in that area or find some way to make a customized bracket to size. I'm a bit new to machining stuff.

Do you think the existing configuration will be okay for a while as is? I'll have to order additional tubing, but that's not the real problem. My friend will freak if I say I have to redo the cooling loop. I will see if the modified system actually boots up, it should, but if it does not then I may re-route the loop per the advice given.

Thanks a ton

Bob
 
Yes it should work just fine as it is .
I dont think you will need new tubbing as the run will be shorter you will just have to cut some off the existing tubes .

A drain is just a easy was to "drain" you loop , I dont use one and never have I just pull the cpu block off and take the tube off and drain that way .
 
I got an idea. You could install one of the empty drive cages just above the bottom one and plant the reservoir to its side as there are 120mm holes for it as it's an extra feature if you were to add a fan to the cages for more air flow.

Here's an example of one using both drives. Heck, you could move all your bottom cages to the front and have the rad res/pump hang to its side, leaving you with more rad room in the bottom.

853619FE-5086-4FC3-9AAC-3F035072EB46-2861-000000AEE3235C0B_zpse868341c.jpg


As for a drain port, it's to make it easier and less risky while draining the loop. Here's an example.

af-ball-valve---nickel_example_use_1200.jpg

To your port closest to the window, add a T-line with a drain valve to it. Once you're ready to drain, you add a fitting with tubing to the valves end, unscrew the fill port and release in a bowl big enough to capture all that fluid.
 
Thank you very much, GTXJackBauer, for the idea -- it is gold! -- and posting the pictures to show what you mean. I hadn't thought of checking the sides of the drive cages. This helps a lot.

I completed the 24 hour leak test and the system boots up and runs Windows 10 just fine. I noticed that the Mayhems brand tubing was starting to kink at the reservoir IN port, close to the barb. Certainly it is my fault. That is a very long run of tubing, and the tubing must have about 100 ml of coolant in it at least, and it is quite soft compared to the EKWB tubing. I thought that if I could provide strain relief to the tubing, and support it at the inlet end of the reservoir, I can do a good temporary fix for it. So I zip tied the tubing to the case temporarily. That helps but I think the zip tie compresses the tubing a little. I'll look into this more in the morning. I think I'll go ahead and buy more EKWB tubing and plan on moving the reservoir/pump so I can shorten the tubing runs.

But -- with this temporary fix -- the system is happy and working. The pump is connected to the CPU fan header and the molex power connector from the pump is plugged into a power supply molex connector, and it doesn't seem to be running much. Hmm!

Thanks a ton

Bob
 
I found this pair of LEDs in the kit that EKWB sent me. I can't remember if it was included with the Performance 360 kit or with the graphics card water block. My question is, where do I use it? None of the documentation from EKWB seems to reference it.

Thanks a ton

Bob

wc_led_small.jpg
 
Could be for the CPU block or the GPU block. By the look of it, it might be more for the CPU block. If you're not going to use it, I'm always happy to have extras ;)
 
Thank you, Batboy, for the idea. I'm certainly learning a lot. I think I can slice open some old ethernet cable and take some of the copper wires inside the cable, like one or two twisted pairs of wire, and wind them around the tubing for a few inches to stiffen it and so stop a kink from forming.

Maybe it is best for me to move that pump inside the chassis. I made a blunder putting the pump on the very top of the case like that. Any suggestions for draining the system such that I don't damage the motherboard and drives?

Thanks a ton

Bob
 
See if you can thread the pump/res through the top of the case down through the 5.25 bay and down to the bottom. Empty the res, tilt the case forward and the rad will empty out as gravity will take place. If not, empty the res where it is, place a large plastic bowl under the GPU and unscrew the bottom fitting while keeping the bowl under that. Be sure to have lots of rags/paper towels handy.
 
See if you can thread the pump/res through the top of the case down through the 5.25 bay and down to the bottom. Empty the res, tilt the case forward and the rad will empty out as gravity will take place. If not, empty the res where it is, place a large plastic bowl under the GPU and unscrew the bottom fitting while keeping the bowl under that. Be sure to have lots of rags/paper towels handy.


Differnt take on this take the CPU block off ( much easier than the GPU and less chance of damage because of the IHS ) then tip on its side and take the tube off the cpu block and let drain .
 
Differnt take on this take the CPU block off ( much easier than the GPU and less chance of damage because of the IHS ) then tip on its side and take the tube off the cpu block and let drain .

That will still leave the GPU block or anything under the CPU filled with fluid plus, you'll need extra hands if you're gonna take the CPU block off and have the case tilted while loosening the fittings and taking precautions with towels. They'll just fall off. Best bet is to drain from the GPU block with lots of towels everywhere as Neb said, even partially covering the bottom of the GPU from splashes. Cover the PSU as you don't have to worry if fluid spills in the bottom chamber as there shouldn't be any electronics to worry about.
 
Yeah see it took me a long time (years) to actually putting a drain line/plug in my current loop. Makes things alot easier to drain without resorting to taking the block off, making sure I have a bowl and paper towels/rags all over the inside of the case to prevent spillage. This is when I added it to my Z97 setup. It's exactly the same with my current setup. I tilt the case backwards (where the fittings on the rad are) and everything just flows right out with ease. Simple yet very effective.
 

Attachments

  • DSC00031.JPG
    DSC00031.JPG
    85.3 KB · Views: 298
Back