OP
- Joined
- Aug 17, 2011
- Location
- Kailua-Kona, HI
- Thread Starter
- #21
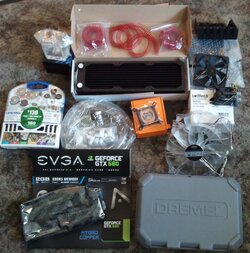
time to PPPPPPAAAAARRRRRTTTTYYYYY!!!!
I have soooooo much to do; first waiting on the last few part I'm getting later today... then probably break the HAF-X down and check fitting of radiator/fans... if all is well, i'll assemble tomorrow with min mods, if not then its dremel time.
thoughts on air flow through top mounted radiator?? either 200mm pushing down into rad and 120mm pulling air through rad into system; or 120mm pushing air up through radiator and 200mm helping pull it through and out?
Attachments
Last edited:
 Love seeing new hardware especially when its a GTX 680 Hydrocopper
  I would go with a push n pull exhaust going out than if you we're to use the 200mm as a intake because you're just going to drop in much warmer air back into the case than if you would pull air out of the case originally.
 Very nice build and you look like you did your homework and took your time to leak test it which is always a must (assuming you cleaned your gear before you put it together too). Dam EVGA had to make the logo red? Can it change or is that the standard color?