-
Welcome to Overclockers Forums! Join us to reply in threads, receive reduced ads, and to customize your site experience!
You are using an out of date browser. It may not display this or other websites correctly.
You should upgrade or use an alternative browser.
You should upgrade or use an alternative browser.
7970 Reference Vmod Log
- Thread starter Bobnova
- Start date
- Joined
- Jan 19, 2006
- Location
- Florida
Now this is a SLIIY PUTTY job!!

Will be cranching it up tonight hope for the best!! I will stream it but not for the masses just post here as I dont think I want to be typing to much just trying to get all the 3D I can as high as I can!!
Will let you know a bit later when but say around maybe 8PM EST.
Will be cranching it up tonight hope for the best!! I will stream it but not for the masses just post here as I dont think I want to be typing to much just trying to get all the 3D I can as high as I can!!
Will let you know a bit later when but say around maybe 8PM EST.
- Joined
- May 10, 2009
- Thread Starter
- #44
Pre-mod testing. 1.253vGPU. Stock mem, stock PLL. Stock values are unknown at this time.
Parts to mod it (the new improved rev2 way) should arrive tomorrow, along with a second (or third, depending on how you want to look at it. Second 7970OC anyway) card.
http://hwbot.org/submission/2290040_

(The background is the 3.3v rail from a recent, unpublished, PSU review. Scope is on 50mV/500ns)
Parts to mod it (the new improved rev2 way) should arrive tomorrow, along with a second (or third, depending on how you want to look at it. Second 7970OC anyway) card.
http://hwbot.org/submission/2290040_
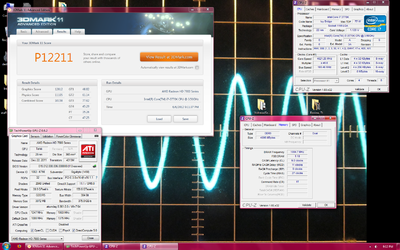
(The background is the 3.3v rail from a recent, unpublished, PSU review. Scope is on 50mV/500ns)
- Joined
- Jan 19, 2006
- Location
- Florida
that looks really good, amazing memory speed.
How/what did you use to get above 1790 on the memory? T&B says that his version was stuck there.
Have to use 2 programs Sapphire Trixxx and AB-X
ST set memory up to 2K
AB GPU and volts-fan speed
Got text later last nt from Ed on it still I rather run 1 program!
Stock card will do 1950 mem.
- Joined
- May 10, 2009
- Thread Starter
- #48
Discovered that reference 7970s, be they MSI strictly reference or GBT 7970OC reference+6th core phase populated (it's empty on strictly reference), hard cap core voltage at 1.38-1.39v. Even with AB-X NDA edition+unlocked.
Core voltmod time.
Soldered up the read points on card2. I don't like where shammy has them, too much risk of the cooler causing issues. Plus the rear is easier to get to.
PLL has to go on the front as far as I can tell, or right under the core which is no good.

As a sidenote, this card dose the above 1200/1950 with 1.25v core and stock 1.625vMem. Veeeeerry nice.
Core voltmod time.
Soldered up the read points on card2. I don't like where shammy has them, too much risk of the cooler causing issues. Plus the rear is easier to get to.
PLL has to go on the front as far as I can tell, or right under the core which is no good.
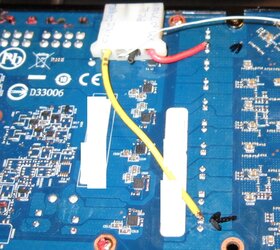
As a sidenote, this card dose the above 1200/1950 with 1.25v core and stock 1.625vMem. Veeeeerry nice.
- Joined
- May 10, 2009
- Thread Starter
- #49
- Joined
- Mar 27, 2011
- Location
- Soviet Mexico
sick Nasty, and awesome
- Joined
- May 10, 2009
- Thread Starter
- #53
Tempted to add OCP for the memory phase too, probably won't though as it's very happy right now.
It'll head back east for some thrashing on LN2 shortly here.
I won't be running the core any higher as I don't want to dent it.
Here we go, full on 7970OC vmod guide. Or 7970 reference vmod guide. (Take that, google bots)
Disclaimer: Follow this and you stand a really solid chance of simply killing your card. Either during soldering or with the mod afterwards.
Pics and brief descriptions:
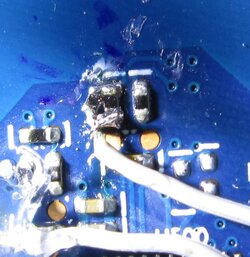
First up, PLL read point and chip.


Replace the (0ohm...) resistor that has been replaced (if you can't find it, you have no business doing the mod) with a 270 ohm resistor, 5k trimmer to ground.
Rear of the card as a whole and zoomed a bit:


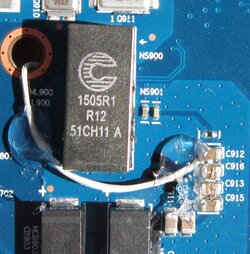
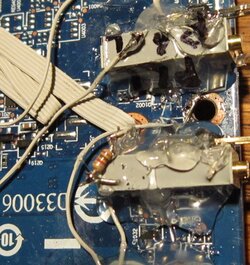
The main IC, on one side is vMem, the the opposite side is vGPU. The strip along the side is OCP. The strictly reference cards (GBT 7970OC is reference with the sixth core phase populated) you can leave off the OCP wire furthest from my sharpie scribbles.
vGPU replace the replaced resistor (closest to sharpie scribbles) with a 270 ohm, 1k trimmer to GND. A 5k will work, but voltage control is very touchy at the high end. NOTE: For extreme use you may need to remove that resistor entirely and use a 5k trimmer!
Further data on this point as knowledge is acquired.
vMem replace the replaced resistor with a ~130-150 ohm resistor (furthest from sharpie scribbles), 5kish trimpot to GND. I was unhappy with 270ohms and 5k, the mod gave +0.1v regardless that way and if enabled it gave another 0.1vMem. Too much.
More on this after the pics.


I put a second 270 ohm resistor on (don't have any 150ohm 0402 bits), tolerances and such give me 130ohms across the pair, that's fine with me. The 5k trimmer got a 1k resistor in series with it.
This gives ~0.03 volts across the board, with the mod enabled it gives an additional 0.04v. Perfect.
Without the additional 1k resistor on the trimmer results are similar, feel free to simply use a 5k trimpot.


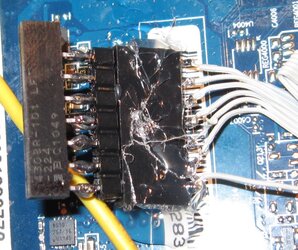
Lastly, the socket on the rear is for a bus resistor to set how much of the current sense signal is siphoned off to GND. ~110k to 330k is likely to be ideal for most DIce and LN2 use.
The GND pin of the bus resistor (single wire, not a strip) goes to the 1MOhm (1,000,000 ohm) trimmer for fine tuning the OCP level. Doing it on the GND pin allows some crosstalk between phases, which is not ideal. The only way around it is a major pain, both to solder and to use.
Early results from the field show that ~500kOhms is too high for LN2 use (OCP still triggers, at around 1.5v and 1400MHz), further results will be added as they arrive.
The socket doesn't fit the bus resistor well, the bus resistors really need IC SIP sockets rather than pin headers. I soldered a pin header on the bus resistor.
You really don't want to put the thing in backwards.

Have fun. Don't kill anything without getting a record first.
It'll head back east for some thrashing on LN2 shortly here.
I won't be running the core any higher as I don't want to dent it.
Here we go, full on 7970OC vmod guide. Or 7970 reference vmod guide. (Take that, google bots)
Disclaimer: Follow this and you stand a really solid chance of simply killing your card. Either during soldering or with the mod afterwards.
Pics and brief descriptions:
First up, PLL read point and chip.
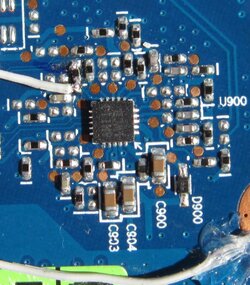
Replace the (0ohm...) resistor that has been replaced (if you can't find it, you have no business doing the mod) with a 270 ohm resistor, 5k trimmer to ground.
Rear of the card as a whole and zoomed a bit:
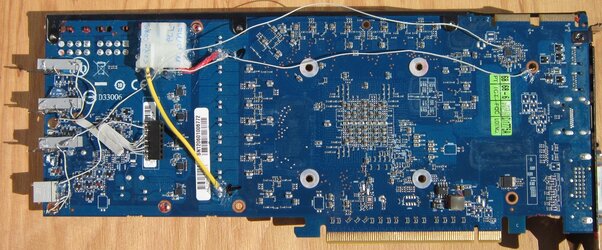
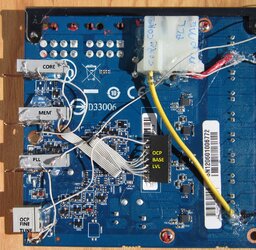
The main IC, on one side is vMem, the the opposite side is vGPU. The strip along the side is OCP. The strictly reference cards (GBT 7970OC is reference with the sixth core phase populated) you can leave off the OCP wire furthest from my sharpie scribbles.
vGPU replace the replaced resistor (closest to sharpie scribbles) with a 270 ohm, 1k trimmer to GND. A 5k will work, but voltage control is very touchy at the high end. NOTE: For extreme use you may need to remove that resistor entirely and use a 5k trimmer!
Further data on this point as knowledge is acquired.
vMem replace the replaced resistor with a ~130-150 ohm resistor (furthest from sharpie scribbles), 5kish trimpot to GND. I was unhappy with 270ohms and 5k, the mod gave +0.1v regardless that way and if enabled it gave another 0.1vMem. Too much.
More on this after the pics.
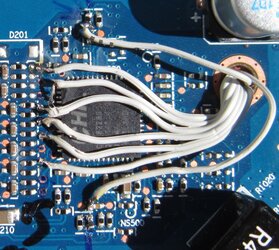
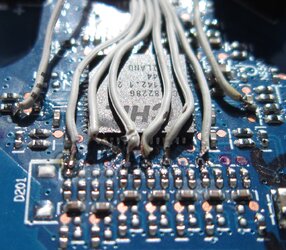
I put a second 270 ohm resistor on (don't have any 150ohm 0402 bits), tolerances and such give me 130ohms across the pair, that's fine with me. The 5k trimmer got a 1k resistor in series with it.
This gives ~0.03 volts across the board, with the mod enabled it gives an additional 0.04v. Perfect.
Without the additional 1k resistor on the trimmer results are similar, feel free to simply use a 5k trimpot.
Lastly, the socket on the rear is for a bus resistor to set how much of the current sense signal is siphoned off to GND. ~110k to 330k is likely to be ideal for most DIce and LN2 use.
The GND pin of the bus resistor (single wire, not a strip) goes to the 1MOhm (1,000,000 ohm) trimmer for fine tuning the OCP level. Doing it on the GND pin allows some crosstalk between phases, which is not ideal. The only way around it is a major pain, both to solder and to use.
Early results from the field show that ~500kOhms is too high for LN2 use (OCP still triggers, at around 1.5v and 1400MHz), further results will be added as they arrive.
The socket doesn't fit the bus resistor well, the bus resistors really need IC SIP sockets rather than pin headers. I soldered a pin header on the bus resistor.
You really don't want to put the thing in backwards.
Have fun. Don't kill anything without getting a record first.
Last edited:
Similar threads
- Replies
- 7
- Views
- 1K
