-
Welcome to Overclockers Forums! Join us to reply in threads, receive reduced ads, and to customize your site experience!
You are using an out of date browser. It may not display this or other websites correctly.
You should upgrade or use an alternative browser.
You should upgrade or use an alternative browser.
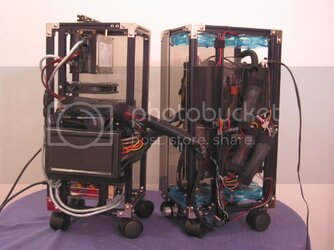
A tour of my Lubic based system
- Thread starter Navig
- Start date
- Joined
- Jul 5, 2004
- Location
- Folding in the Pacific Northwest.
looks great. Although i would clean up the rats nest in teh back. Thats the only thing not working for me.
- Joined
- Apr 22, 2005
- Location
- A Labyrinth
Lego Bricks(tm) for overclockers.
That's awesome and love all the volt and filter modds.
That's awesome and love all the volt and filter modds.
- Joined
- Feb 26, 2005
- Location
- Claremore Oklahoma
yes, Very nice man!
- Joined
- Dec 7, 2003
- Thread Starter
- #27
Alrighty, I'm back!
Took some time to do some cable management on the backside, and here are the results. Sorry, it took a while, been working, plus its hard to work very long in this damn Boston heat:

Basically, I sleeved or covered the 4 channels blocks of fanbus--you can make them out pretty easily.
Next I "fabricated" a lid to cover the OCZ unused cable block. By fabricate, I mean I took and cut up a takeout tupperware. It once housed some pretty mean quesadillas (Bella Luna, JP).
I did a little more rearranging. I could definitely clean things up more by making some more custom cables, but I think I'm done with this project.
Enjoy,
navig
Took some time to do some cable management on the backside, and here are the results. Sorry, it took a while, been working, plus its hard to work very long in this damn Boston heat:

Basically, I sleeved or covered the 4 channels blocks of fanbus--you can make them out pretty easily.
Next I "fabricated" a lid to cover the OCZ unused cable block. By fabricate, I mean I took and cut up a takeout tupperware. It once housed some pretty mean quesadillas (Bella Luna, JP).
I did a little more rearranging. I could definitely clean things up more by making some more custom cables, but I think I'm done with this project.
Enjoy,
navig
Last edited:
- Joined
- Feb 3, 2004
FoxBat said:Hmmm. No pics here in Mozilla. What's up with that.
OK, here is a bit of weirdness! I am now looking at this thread in Mozilla Firefox running under Linux, and the pics are just fine. I think my Windows is broken again. Bloody Windows!
Anyway...
Wow, what a sweet piece of work. I like the "keep it stock" philosophy. Esthetics is a nice thing to think about but cable clutter is not a cooling issue with your rig. The final adjustments you made look fine.
Keep up the good work.
- Joined
- Jul 30, 2005
- Location
- Greenville, South Carolina
ok how did you get the wireless rf key switch to work i was trying this with a friend
- Joined
- Dec 7, 2003
- Thread Starter
- #30
Was there a specific issue that you couldn't get to work?
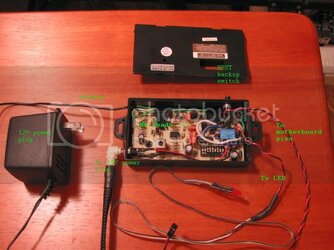
If it helps, I've labeled up my pic from above:

The wireless unit had a bunch of wires for different purposes:
Ground and red for a 12V voltage source: I bought 115VAC to 12V power plug ($8) with sufficient amperage (I've forgotten exactly, something like 500mA). I bought a power plug that mounts into the wall of the unit by a simple screw-on washer, after drilling an appropriate sized hole. The leads for the unit get wired to the jack. The plug power source gets spliced into a fitting plug. The 2 go together and voila its got power. All items are available from radioshack (but pricier than other online retailers).
The unit provides 2 types of circuit--normal open (NO) (blue and white leads) or normal closed (green and white leads). We want normal open so that the usual state of the unit is non-jumped, ie computer off. Which is why the green NC wire is tucked off to the side. The blue and white leads are wired into motherboard pin connectors.
I wanted to provided a safety switch, so that is wired into the NO leads/motherboard pins, setup to jump the pins independently of the wireless unit. It's a simple SPST switch mounted into the case wall the same way.
Finally I swapped out the LED for a 3mm, fortunately the voltages are the same.
Hope it helps, any questions?
navig
If it helps, I've labeled up my pic from above:

The wireless unit had a bunch of wires for different purposes:
Ground and red for a 12V voltage source: I bought 115VAC to 12V power plug ($8) with sufficient amperage (I've forgotten exactly, something like 500mA). I bought a power plug that mounts into the wall of the unit by a simple screw-on washer, after drilling an appropriate sized hole. The leads for the unit get wired to the jack. The plug power source gets spliced into a fitting plug. The 2 go together and voila its got power. All items are available from radioshack (but pricier than other online retailers).
The unit provides 2 types of circuit--normal open (NO) (blue and white leads) or normal closed (green and white leads). We want normal open so that the usual state of the unit is non-jumped, ie computer off. Which is why the green NC wire is tucked off to the side. The blue and white leads are wired into motherboard pin connectors.
I wanted to provided a safety switch, so that is wired into the NO leads/motherboard pins, setup to jump the pins independently of the wireless unit. It's a simple SPST switch mounted into the case wall the same way.
Finally I swapped out the LED for a 3mm, fortunately the voltages are the same.
Hope it helps, any questions?
navig
- Joined
- Jul 30, 2005
- Location
- Greenville, South Carolina
navig could you tell me where you got this wireless rf key switch at
* oh sorry for bringing this thread up again i am just loving the wireless rf key switch idea and need more info since electronis were never my thing
* oh sorry for bringing this thread up again i am just loving the wireless rf key switch idea and need more info since electronis were never my thing
- Joined
- May 28, 2002
AlabamaCajun said:LEGO Bricks(tm) for overclockers.
That's awesome and love all the volt and filter modds.
Hear Hear!!
Doc, I still say that is some AWESOME work!
You must be some kind of surgeon, to do work that immaculate!
(Oh Alabama Cajun, LEGO is supposed to be capitalised, when it is used. {at least, LEGO Group wants it.})
steve
Similar threads
- Replies
- 2
- Views
- 210