• Welcome to Overclockers Forums! Join us to reply in threads, receive reduced ads, and to customize your site experience!

FEATURED Case based Evaporation cooling (aka bing's bong cooling)

Overclockers is supported by our readers. When you click a link to make a purchase, we may earn a commission. Learn More.
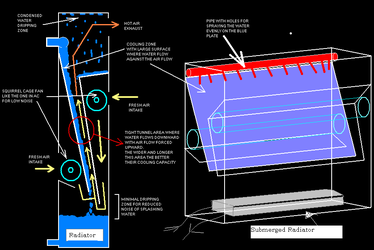
Sounds like a two stage system dave.

http://en.wikipedia.org/wiki/Cooling_tower

The heat transfer section there covers the cooling methods involved well, and how they work on a basic level.

A 2 stage would keep your water loop clean and help prevent the water block from clogging. But a wet cooling tower can produce better temps, potentially cooling the water to subambient levels if the design is very good.
 
Last edited:
Hence why that type of cooling I am using the old term swamp cooler. The old evaporator coolers used to stink like a swamp if you was not on top of keeping it clean. When I was a kid, my dad turned on our swamp cooler and somehow frogs got into it and were sprayed out on the dinner table. I take it, the cooler was perfect for tiny frogs to live in.

Like I mentioned, it is a simple concept and easy to catch on to. The hard part is Shelnutt2 designing a unit that is effective and works well for the conditions. Plus looks like, being cheap.

In the vein of swamp cooling... Them units use a fibrous material for maximizing surface area. Would applying this materiel to this application... Does anyone think this would help with surface area? I know it is cheap for a huge mat of it and is pretty sturdy. It goes by: Evaporative Cooler Mesh.
 
Seems to me that in a perfect world you'd have a setup more like this ramp wise:
box-bong-cooler.jpg

More surface area, more places the water splashes.

In wet/dry aquarium filters it's packed full of those plastic scrubby things, they have more surface area per dollar than pretty much anything. The goal there is the same too, get as much water in as much contact with as much air as possible. The difference is that the air isn't moving in one of those.

EDIT:
Also it greatly entertains me to use gimp to draw things crude even by mspaint standards.
 
Hey, I like how it sounds ! :bday:

Really appreciate that you pull this design to the surface, this brings back the memories of the exciting era in the old days in OC-ing.

Shelnutt2, thank you Sir ! :salute: :clap:

Subscribed for sure.
 
I will buy you a blower, under the requirement that you just finish the project and take pictures as you build. :)

How do you want to power the fan? 12 volt DC or AC? Unfortunately the blower I had been saving to donate to a bong project died in a flood, but it had what you would want, was DC (could run off your power supply), and was simple to control with a potentiometer.

If you have a unit in mind, let me know and I will PayPal the money so I don't have to ship you the unit. Otherwise if you don't have a unit in mind, I can look at making some suggestions.
<snip>

Is it necessary to use metal? Couldn't you do a trial design using tinfoil or plastic wrap? The metal isn't going to be a big help, except for its durability. The evaporation is where the heat transfer takes place.

I've already bought most of the parts I need. The only thing I am missing is the barbs, my auto fill parts (which I plan to deal with last), the fan, a p-trap and tubing/cpu block (but those arn't part of the cooler itself). I plan to take some pictures of the parts to go along with the supply list I already have up.

As far as a fan goes. I really don't know. I have a lot of older PSU's which have heaver 3-5 v rails. I suppose a DC unit would allow me to change the voltage. Now I was reading the review of the blower fan that was saved for this. In that was there any reason to use a potentiometer vs putting in on the 5.5v rail? Just curious.


Seems to me that in a perfect world you'd have a setup more like this ramp wise:
View attachment 96818

More surface area, more places the water splashes.
<snip>

Jesus, actually I think the concept in the first post focuses more on the slope than the misters also. So you weren't really off track. I could be wrong about what is more important. I really don't have a lot of confidence in a single slope working well tho as in the design. If its water running across a plane like that, I would think you may want panels at a very slight downward slope of a couple degrees, going back and forth down the containment vessel. Water runs down the maze, air flows up it.

Misters, sprinklers and shower heads have been used in designs I remember seeing most often because tons of tiny water droplets have a lot more surface area than a flat panel of water.

Regardless tho, I think it will work. And its cool and gets me interested. :D

I actually think this design idea is quite doable. @IMOG were you thinking like bobnova or were you thinking more like this:
box-steps2.png

At first I was thinking more what I attached, as it's more of a "fall with a maze". However bobnova's design is more of a maze. I see merits to both designs.

I have a decent supply of styrofoam, I have 4 untouched ~2'x4' pieces and then 4 pieces which have some cuts and have probably a good 1'x4' usable rectangle. The sytrofoam is pretty thick. It's not the most idea material and attaching it to the plastic of the bin will be fun. I'm thinking liquid nail + holding it there for a long time. However I have a lot of it so I can try different designs and see what gives me the best temperature. I can test this by finding a flowmeter/thermometer. I think there was one in the classifieds, I might check amazon too.

Anyone know a good place to get the Enzotech SCW-REV.A CPU Waterblock? I should have bought it on newegg, but the item went OSS then now it's deactivated. Jab-tech doesn't carry it. FrozenCPU wants $50 for it. Sidewinder PCs wants $45+ for it. I can't find anyone else who carries it! Newegg had it for $35 + $4 shipping.
 
Give hot glue a try, it should work decently. Don't glue yourself though.

I think IMOG and I were thinking the same plan, that looks like a better mspaint job of the same idea :D
 
I wonder how it would perform if you could just lay your rad in the bottom of this cooling unit and run the PC loop through that separately. You'd need to close the cooling unit's loop just having it circulate it's own water. Your PC's rad would be the process cooler in this pic from IMOG's cooling tower link. That's how we cool the condensers here at the power plant.

CoolingTower.png

Here is what I was thinking. Two loops eliminates the need for anything but pure water in the cooler and you can use what you like in the PC. Not quite as efficient as combined water but it's an option.
 

Attachments

  • BOX%20BONG.png
    BOX%20BONG.png
    38 KB · Views: 752
Last edited:
That is pretty much it (what bobn and shellnut sketched). The number of planes and drops could be tweaked to whatever is actually doable in your setup, but if I were using this approach to evaporative cooling, I think more planes to increase surface area would be beneficial.

I made another terrible drawing, because everyone loves terrible mspaint work.

evap.png
 
The multi tiered design will help to increase surface area, however, adding a light weight porous material to the platforms will significantly increase surface area. Styrofoam beads, perlite, active carbon, sand(marginal), basically anything that will add texture. I would recommend a non water soluble spray adhesive and sprinkle your texture material over the panels.

IE. spray your Al sheet with super 77 and then pour perlite over them.

That method will add an irrelevant amount of weight and give you somewhere on the order of 30-1000x the surface area. This method would probably eliminate the need to change your solution into an aerosol.
 
The point is evaporation (energy loss through heat of vaporization). As evaporation is increased, humidity will increase. The amount of air entering the evaporation zone seems important. The evaporation is dependent on surface area but will decrease as the humidity in the "evaporation zone" rises. Increasing surface area will have diminishing returns unless partnered with "low" humidity air. I think I have that right.
 
The multi tiered design will help to increase surface area, however, adding a light weight porous material to the platforms will significantly increase surface area. Styrofoam beads, perlite, active carbon, sand(marginal), basically anything that will add texture. I would recommend a non water soluble spray adhesive and sprinkle your texture material over the panels.

IE. spray your Al sheet with super 77 and then pour perlite over them.

That method will add an irrelevant amount of weight and give you somewhere on the order of 30-1000x the surface area. This method would probably eliminate the need to change your solution into an aerosol.

Woah! Great idea :thup:

I'm watching this one :popcorn:
 
The point is evaporation (energy loss through heat of vaporization). As evaporation is increased, humidity will increase. The amount of air entering the evaporation zone seems important. The evaporation is dependent on surface area but will decrease as the humidity in the "evaporation zone" rises. Increasing surface area will have diminishing returns unless partnered with "low" humidity air. I think I have that right.

That actually sounds about right to me. IT seems the idea behind all of this is to actually have the water evaporate and condense rather than just have cool air blow against warm water in an effort to cool it. And even if evaporation didn't occur, the water would cool more in millions of tiny water droplets rather than in one large stream due to increased surface area.

Come on guys, this is summer, I don't want to think till school starts again and now you have me thinking and now I won't be able to get this out of my head. I guess I have to start doing some math too...The things I put up with...
 
Good news, newegg has the waterblock back in stock. I've already purchased it and ordered my tubing from mcmastecarr. This weekend I plan to fabricate the entire thing. I have all of the pieces needed.
 
What is anyone's opinion on the fan? Anyone have a good model that I should look into?

I have it built and will post up some pictures and a build log later today :santa:
 
Is the reason most people do a pump with a line up the side up to the top ease/convenience?

The pic by Owenator gave me an idea.. Get a small fake Christmas tree (granted, it might be hard to find one this time of year), run a line up the trunk, and let the water dribble out. If you can get it going down the branches nicely, lots of dripping down to lower branches around the circumference of the tree, etc.. It seems like an easy way to get a ton of surface area and droplets without much work. Put it in something clear with an led inside and you have a work of art, too :)

I know that "seems like" are famous last words. Finding something with a circumference to handle a fake Christmas tree might be difficult/expensive as well.
 
Last edited:
@ Spitter3 -- Static pressure isn't bad ;) It's just not necessary for a free flowing air path like in this situation :thup:
 
Back