- Joined
- Jan 24, 2006
- Location
- South Dakota
THIS METHOD IS DEPRICATED
See CentOS 6.3 Guide for a better method
^^^^^^^^^^^^^^^^^^^^^^^^^^^^^^^^^^^^^^^^^^^^^
PREAMBLE: OK, so I have been struggling with this for a while because of an "undocumented feature", or at least undocumented from what I could find. I have read 2 RHCE books thus far. Neither of them gave any indication as to what the problem was or how to fix it. I have spent more time that I would like to admit on this problem and thats why I thought I should lay out exactly what I did to get this working
On the Server
Step 1: first we need to install the required package:
Step2: Edit the database file to reflect your domain
Use a handy sed substitution to globally change the defaults in the file
Step 3: Set the admin password and specify the location of our encryption certificate and key.
add these 3 lines at the end of olcDatabase={2}bdb.ldif:
Step 4: Now we have to specify the monitoring privileges
again, we have to replace the default domain name with my domain:
Step 5: Now its time for the Database Cache
Here we are updating the locate database incase the DB_CONFIG.example has moved. If it has not, the cp command below will give us a base database to work with
We want to make sure the database has the proper permissions:
Step 6: Set up a certificate for TLS.
First we need to edit /etc/sysconfig/ldap and change the following lines:
Now we can create the certificate. Feel free to extend the number of days the cert is good for
This will create the two required keys in the /etc/pki/tls/certs/ directory. Now set the proper permissions on the files required for TLS
Step 7: Test The configuration
Issue the following command:
It should return the following message if there are no syntax errors
Step 8: Start the ldap server
To verify that this works you will need to modify /etc/openldap/ldap.conf and add the following:
This seems to be a problem with RHEL 6. Thanks to Thomasz Cholewa at slashroot.eu for that tip. This was driving me crazy! Ultimately this little bug actually stumped me for almost a week.
You should now be able to search your database:
You should receive some output with at least the following:
Step 9: Create a base.ldif
I usually put these in /etc/openldap/schema with the other ldifs. Mine looks like this
This is the base.ldif
And then add a group:
Finally, we need to create a user:
After the files are created, add them into the LDAP database
Verify that there are now users by re-running the ldapsearch command
On the client
Step 1: Install the required files
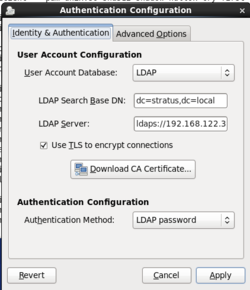
Step 2: Run the authentication GUI
(See the screen shot)
Step 3: Edit /etc/pam_ldap.conf
For readability the comments have been removed. Note that the bindpw and rootbinddn are not strictly necessary
Step 4: Edit /etc/openldap/ldap.conf
Most of the file should be in place, but just in case this is what you are trying to achieve
Step 5: Edit /etc/pam.d/system-auth file
Append this line in order to have home directories created on first login
Step 6: Copy the cert.pem to client
Copy the stratus_cert.pem from teh server into /etc/pki/tls/certs/ on the client.
Step 7: Reboot
Most changes to pam require a reboot. You should now be able to authenticate to an ldap server that you just created!
EDIT Feb 2013:
Users can also use authconfig on the CLI to complete their task
I have found this to work better (sometimes) than the gui authconfig
See CentOS 6.3 Guide for a better method
^^^^^^^^^^^^^^^^^^^^^^^^^^^^^^^^^^^^^^^^^^^^^
PREAMBLE: OK, so I have been struggling with this for a while because of an "undocumented feature", or at least undocumented from what I could find. I have read 2 RHCE books thus far. Neither of them gave any indication as to what the problem was or how to fix it. I have spent more time that I would like to admit on this problem and thats why I thought I should lay out exactly what I did to get this working
On the Server
Step 1: first we need to install the required package:
Code:
yum install openldap-serversStep2: Edit the database file to reflect your domain
Code:
vim /etc/openldap/slapd.d/cn=config/olcDatabase={2}bdb.ldifUse a handy sed substitution to globally change the defaults in the file
Code:
:%s/dc=my-domain,dc=com/dc=stratus,dc=local/gStep 3: Set the admin password and specify the location of our encryption certificate and key.
add these 3 lines at the end of olcDatabase={2}bdb.ldif:
Code:
olcRootPW: password
olcTLSCertificateFile: /etc/pki/tls/certs/stratus_cert.pem
olcTLSCertificateKeyFile: /etc/pki/tls/certs/stratus_key.pem
Step 4: Now we have to specify the monitoring privileges
Code:
vim /etc/openldap/slapd.d/cn=config/olcDatabase={1}monitor.ldifagain, we have to replace the default domain name with my domain:
Code:
:%s/cn=manager,dc=my-domain,dc=com/cn=Manager,dc=stratus,dc=local/gStep 5: Now its time for the Database Cache
Here we are updating the locate database incase the DB_CONFIG.example has moved. If it has not, the cp command below will give us a base database to work with
Code:
updatedb

cp /usr/share/openldap-servers/DB_CONFIG.example /var/lib/ldap/DB_CONFIG
We want to make sure the database has the proper permissions:
Code:
chown -Rf ldap:ldap /var/lib/ldap/Step 6: Set up a certificate for TLS.
First we need to edit /etc/sysconfig/ldap and change the following lines:
Code:
nano /etc/sysconfig/ldap
SLAPD_LDAPS=yes
Now we can create the certificate. Feel free to extend the number of days the cert is good for
Code:
openssl req -new -x509 -nodes -out /etc/pki/tls/certs/stratus_cert.pem -keyout /etc/pki/tls/certs/stratus_key.pem -days 365This will create the two required keys in the /etc/pki/tls/certs/ directory. Now set the proper permissions on the files required for TLS
Code:
 chown -Rf root:ldap /etc/pki/tls/certs/$cert.pem
 chmod -Rf 750 /etc/pki/tls/certs/$key.pem
Step 7: Test The configuration
Issue the following command:
Code:
slaptest -uIt should return the following message if there are no syntax errors
config file testing succeeded
Step 8: Start the ldap server
Code:
service slapd start
Code:
TLS_CACERT /etc/pki/tls/certs/stratus_cert.pem
URI ldap://127.0.0.1
BASE dc=stratus,dc=local
This seems to be a problem with RHEL 6. Thanks to Thomasz Cholewa at slashroot.eu for that tip. This was driving me crazy! Ultimately this little bug actually stumped me for almost a week.
You should now be able to search your database:
Code:
ldapsearch -x -b ”dc=stratus,dc=local”You should receive some output with at least the following:
# search result
search: 2
Step 9: Create a base.ldif
I usually put these in /etc/openldap/schema with the other ldifs. Mine looks like this
This is the base.ldif
Code:
nano /etc/openldap/schema/base.ldifdn: dc=stratus,dc=local
dc: stratus
objectClass: top
objectClass: domain
dn: ou=People,dc=stratus,dc=local
ou: People
objectClass: top
objectClass: organizationalUnit
dn: ou=Group,dc=stratus,dc=local
ou: Group
objectClass: top
objectClass: organizationalUnit
And then add a group:
Code:
nano /etc/openldap/schema/group.ldifdn: cn=thiddy,ou=Group,dc=stratus,dc=local
objectClass: posixGroup
objectClass: top
cn: thiddy
userPassword: password
gidNumber: 1000
Finally, we need to create a user:
Code:
nano /etc/openldap/schema/people.ldifdn: uid=thiddy,ou=People,dc=stratus,dc=local
uid: thiddy
cn: thiddy thiddy
objectClass: account
objectClass: posixAccount
objectClass: top
objectClass: shadowAccount
userPassword: password
shadowLastChange: 15140
shadowMin: 0
shadowMax: 99999
shadowWarning: 7
loginShell: /bin/bash
uidNumber: 1000
gidNumber: 1000
homeDirectory: /home/thiddy
After the files are created, add them into the LDAP database
Code:
ldapadd -x -W -D ”cn=Manager,dc=stratus,dc=local” -f base.ldif
ldapadd -x -W -D ”cn=Manager,dc=stratus,dc=local” -f group.ldif
ldapadd -x -W -D ”cn=Manager,dc=stratus,dc=local” -f people.ldif
Verify that there are now users by re-running the ldapsearch command
Code:
ldapsearch -x -b "dc=stratus,dc=local"On the client
Step 1: Install the required files
Code:
yum install openldap-clients pam_ldap nss-pam-ldapd pam_krb5Step 2: Run the authentication GUI
(See the screen shot)
Code:
authconfig-gtkStep 3: Edit /etc/pam_ldap.conf
For readability the comments have been removed. Note that the bindpw and rootbinddn are not strictly necessary
host 192.168.122.33
base dc=stratus,dc=local
bindpw password
rootbinddn cn=Manager,dc=stratus,dc=local
ssl start_tls
ssl on
tls_cacertfile /etc/pki/tls/certs/stratus_cert.pem
Step 4: Edit /etc/openldap/ldap.conf
Most of the file should be in place, but just in case this is what you are trying to achieve
URI ldaps://192.168.122.33
BASE dc=stratus,dc=local
TLS_CACERT /etc/pki/tls/certs/stratus_cert.pem
Step 5: Edit /etc/pam.d/system-auth file
Append this line in order to have home directories created on first login
session required pam_mkhomedir.so skel=/etc/skel umask=0077
Step 6: Copy the cert.pem to client
Copy the stratus_cert.pem from teh server into /etc/pki/tls/certs/ on the client.
Step 7: Reboot
Most changes to pam require a reboot. You should now be able to authenticate to an ldap server that you just created!
EDIT Feb 2013:
Users can also use authconfig on the CLI to complete their task
Code:
authconfig --enableldap --enableldapauth --disablenis --enablecache \
          --ldapserver=ldap.stratus.local --ldapbasedn=dc=stratus,dc=local \
          --updateall
I have found this to work better (sometimes) than the gui authconfig
Attachments
Last edited:
")
 any other way of setting it up easier? webmin perhaps? (i know that is not an option on a exam however. )