• Welcome to Overclockers Forums! Join us to reply in threads, receive reduced ads, and to customize your site experience!

Made my own DDC acrylic top- How & Pics

Overclockers is supported by our readers. When you click a link to make a purchase, we may earn a commission. Learn More.
You mean one of these?

e2_1.JPG

I didn't think that would work well because they leave a hole that's not quite flat. But the forstner leaves a perfectly flat bottom. In my experience they leave a pretty smooth hole too.

I've got both bits and plenty of material so I guess I can try both and see what works better.

I've got some other plastics too I want to try out.

Yeah I agree with you the Petra is a lot better than the Alphacool. I bored my inlet and outlet to 3/8" and it seemed to help. Only problem is I chipped out the thin acrylic around the inlet and had to epoxy it. On the outlet I cut into one of the screw holes and had to silicone that. The epoxy and silicone gave way after only a day. :p
 
yes, that it almost it, except the wood boring bit I got doesn't have cutting points on the ends. The cutting blades are flat, so with a drill press, I got a perfectly flat hole. If you already have a Forstner bit that size, give it a whirl. It might work fine. I just didn't want to spent like $30 on one bit when the $4 wood bit worked fine.

I made the mistake after I made the initial block of getting some extruded acrylic to make some more. Wrong answer. Extruded just melts and is impossible to work with. Being able to actually use Delrin would be nice, but I got the cast acrylic for a whole lot less than Delrin was going to cost.

I would like to see some pics if you do this to see what you end up with and how it goes.
 
Those bits are usually for wood work and go blunt friggin fast in acrylic

And because they scratch out the acryic which creates a lot of heat the acrylic starts to melt.

So with those bits you have to go slow and you have to sharpen them all the time
 
I didn't have a problem with it getting dull quickly or heating up too much. The trick with acrylic, unless you are using special acrylic bits and blades, is to cut or drill in small bites so that you don't overheat it. With a drill press, I would cut a bit, back out of the hole, cut a bit more, back out, etc. I had NO problems this way.
 
Yes keeping the piece you're working on below it's melting point greatly determines the finish and ease of your work. If you have a compressed air supply USE IT. Otherwise take your time.
Mycobacteria said:
Those bits are usually for wood work and go blunt friggin fast in acrylic

And because they scratch out the acryic which creates a lot of heat the acrylic starts to melt.

So with those bits you have to go slow and you have to sharpen them all the time
Huh? I use them all the time with plastics and it's impossible to dull them when working with acrylic or polycarbonate. They work far better than normal drill bits because they won't get stuck or bite off huge chunks. They're also very affordable for drilling larger holes.
The only downside to them is that you won't get as smooth of a finish on the inside walls of the hole.
Ideally drill bits with a shallow bite angle should be used with plastics. I find guide-point woodworking bits to work even better than plastic specific ones.
 
voigts said:
yes, that it almost it, except the wood boring bit I got doesn't have cutting points on the ends. The cutting blades are flat, so with a drill press, I got a perfectly flat hole. If you already have a Forstner bit that size, give it a whirl. It might work fine. I just didn't want to spent like $30 on one bit when the $4 wood bit worked fine.

I made the mistake after I made the initial block of getting some extruded acrylic to make some more. Wrong answer. Extruded just melts and is impossible to work with. Being able to actually use Delrin would be nice, but I got the cast acrylic for a whole lot less than Delrin was going to cost.

I would like to see some pics if you do this to see what you end up with and how it goes.


Oh I see. I'll have to look over what I have and make sure if my wood boring bit that size is flat or not. Almost every one I've seen has the points, at least in the smaller sizes.

Thanks for the tip on the cast acrylic. I wanted to use Delrin too but it is a little spendy for now. I've got polypropylene and HDPE polyethylene I want to try too.

I'll make a thread with once I get started so you can see what disasters I'm able to create. ;)
 
HDPE will work fine, but is a bit fussy to tool because it clumps and melts readily. Very chemically resistive (is generally use to make cutting boards).
Polypropylene behaves similarly, but can handle far less tensile and compressive stress so I wouldn't bother with that one unless you just want to play with it.
 
The only downside to them is that you won't get as smooth of a finish on the inside walls of the hole.[/QUOTE]

Since I took my rotary tool to spiral out the hole like the stock top and then brazed the whole thing with my trusty torch, small scratches really didn't matter. And just a quick touch with a fine grit drum removes any scratches quickly without removing any amount of material. It would be nice to have the money to use acrylic saw blades and bits, but they are just way too expensive for me.

For instance, when cutting the 1" sheet into squares for this, or for that matter all of the acrylic I cut for my custom wood case, I used a fine tooth plywood blade with my miter saw and worked the blade up and down in and out of the acrylic, cutting a bit at a time so as to generate the least amount of heat possible. It is the friction of the bit or blade that heats up the acrylic more than the cutting.
 
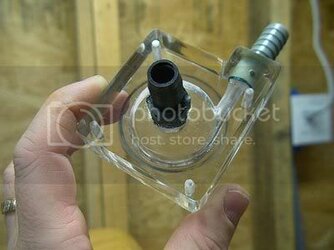
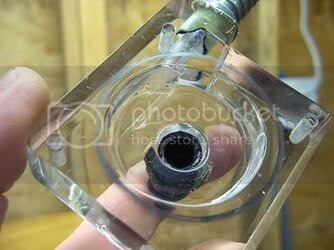
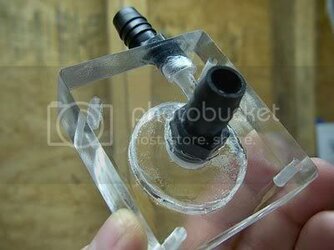
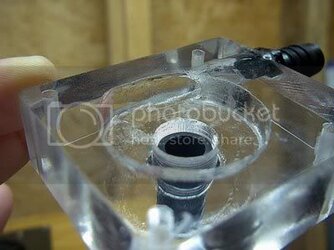
I just made a new top for my new Conroe setup, so I thought I would post feedback on how things went with the Rev 4 top I made and the newest top.

The Rev4 top has been in my rig up until last week. I wanted to make a new top to be as close to the original as possible. The Rev4 top is very close, but I am picky.

The Rev4 top held up very well.

oldTop2.jpg

oldTop1.jpg

It has no noticeable wear and only caught a bit of the blue dye I used to use where there is a gap where the outlet barb is epoxied in.

I went through a couple of blocks, and then made a couple of more. This block is my Revision 5. It is very similar to Rev4. I got a different sheet of cast acrylic from Ebay for this, and frankly for some reason it is harder than the cast acrylic that I made the Rev4 from and doesn't braze as well. Functionally it is fine however.

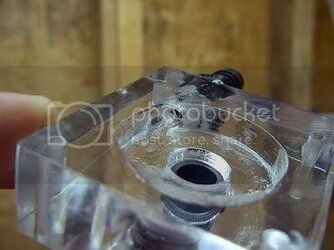
newTop1.jpg

newTop2.jpg

newTop3.jpg
 
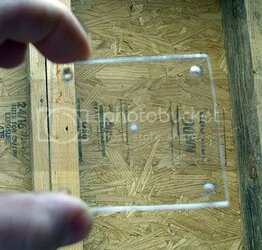
This time I made an acrylic template of the hole/barb alignment as that was a real problem in making the tops.

topHolesTemplate.jpg

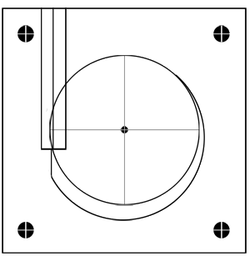
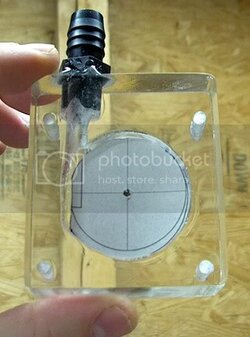
I also drew a template based upon a scan of the original top so that I could get the top shape very close to the original top.

DDCtop.gif

newTopTemplate.jpg

With all of the posts regarding pump failures with aftermarket tops creating some question in my mind as to their effects, I want mine to be as close as I can make it to the stock impeller chamber (I don't have to worry about patent infringement issues just for my own use).
 
Looks very good. If you haven't installed the new top yet, would you post a side by side pic with tht stock top?
 
Where does your outlet path widen out to 1/2"? Is it 1/4" at the impeller chamber or is it wider there too?

One suggestion: You might get slightly performance if you used epoxy putty to fill in the extra space between the inlet barb and the ceiling of the impeller chamber. This might (or might not) give you a little more head by preventing leakage. I think that's the purpose of that little ring on the stock top.

Plumber's epoxy putty usually grey, but doesn't have to be ugly if you practice with it a bit first. Be sure to get enough on before it starts to get hard or there will be a visible seam where you added later. I usually polish it with my skin as it cures to give it a glossy finish. And of course, rough up whatever you want it to stick to so it has something to grab.
 
I'll try to take that pic tomorrow (or actually today from looking at the clock-I spend too much time around here).

The outlet is drilled 1/4" and widens just before the outlet barb. The stock top outlet is 1/4". I just drilled the hole for the outlet path all the way into the impeller chamber and down the side, drilled a 1/2" hole for the barb, and then reamed out a bit with my rotary tool between where the 1/4" outlet hole meets the 1/2" barb area.

I may look into the plumber's epoxy idea as I could think of no good way to address that issue. It is really tricky though as the clearance between the impeller and the top is only about 1/16", so there isn't much room for error. This tight clearance makes it tricky in that the impeller chamber depth is right at 5/16", and it takes some work to drill it exactly that depth.
 
You could avoid any clearance issues by pressing a flat plate of some sort into the impeller chamber occasionally to push the putty back into the inlet. The stuff cures hard in 20 min, though, so get used to it before you try it on your pump. It can be sanded after it cures (not sure how good a finish you'll get, though). If you want to get rid of it, you'll have to machine it away.

If you want a longer working time, you could use Apoxie Sculpt. http://www.avesstudio.com/Products/Apoxie_Sculpt/apoxie_sculpt.html
This stuff has the opposite problem. Takes forever to cure and you have to watch that it doesn't sag before it hardens. The Natural/Cream color actually comes out green, or at least the batch I got does. Looks like Jade's plain sister. Hmmm, not sure how resistant it is to chemicals, though.

Sounds like you've got a state of the art DDC top there. I wonder if there will be any difference in performance compared to the earlier versions.

And yeah, I often wind up sending more time here than i mean to too. Well, we could do a lot worse.
 
voigts said:
for some reason it is harder than the cast acrylic that I made the Rev4 from and doesn't braze as well. Functionally it is fine however.

More than likely its extruded Acrylic and not cast acrylic. I use extruded Acrylic in all of my cases (the ones I build, I should post another one sometime) and there is a noticable strength difference. Also it seems to be a bit more heat resistant (doesn't gunk up the cutting bits so quickly when they're hot). That could explain why it didn't act the same under heat treatment. I think #4 is perdier ;).
 
No, they both were cast as I did get a hold of some without paying attention that wasn't cast and it was impossible to work with as everything just melted whenever you tried to machine it.
 
Back