• Welcome to Overclockers Forums! Join us to reply in threads, receive reduced ads, and to customize your site experience!

Thoughts on my enclosure?? (56k - go make hot coco)

Overclockers is supported by our readers. When you click a link to make a purchase, we may earn a commission. Learn More.

Sleepy_Steve

Member
Joined
Dec 3, 2004
Location
VT... or MD
I just got to where i have something people can say if its a decent job or not with my project's (see sig) water cooling setup.

Below is basicaly a excerpt from my post in my build log... But given the time i dropped into this over my turkey break, i would like some more traffic of people telling me if i made a dumb mistake or not.

Feel free to drop in any questions about the loop.
Its a dual heatercore loop, cooling a CPU... and a GPU eventualy.
Using some valves to assist filling but mostly draining, as well as a swiftech microres.
All tubing is 1/2'' ID, although there is some copper and CPVC mixed in as well.
Oh and it runs 3x 120mm 120x38mm Sunon fans off an old AT PSU.

Sleepy_Steve said:
Other than finishing the plumbing - which i hope to do latter tonight... The external enclosure for the WC box is done and ready to go.
9 images below... Enjoy

First up, the upper section, with somewhat gutted AT PSU, and newer, reversed fan to keep the various fans from working against eachother. It still needs a top that the PC's case can sit on. But it works fine sucking in air from the holes on the back and sides. The holes on the sides show up better in some other pictures.
Oh, those fans are 120x38mm Sunon's -- and are quiet enough if you give them free flowing areas arround them.
DSCF2258.jpg


Next on the block are the various segments of the lower portion of the box.
Here is one of the sides with a heater core, modded, and caulked / taped (double sided) into place.
(the heatercores are slightly recessed in from the outer edge of the box)
DSCF2256.jpg


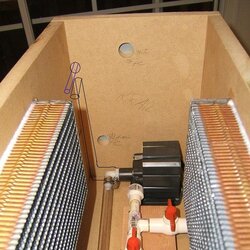
Then we have a picture of the base, with the ends atached, and all the plumbing thats going on in there. The side panels are cut off in the foreground.
DSCF2260.jpg


Now two quick pictures of the sides to get a general idea of how it came out. As well as where all the various intake holes are.
DSCF2261.jpg

DSCF2262.jpg

The thing i like most about it is that the upper section with the fans lifts out of the lower section for eassy access. And the ease of maintence alone makes the small bit of extra plumbing worth while. The extra plumbing being there to assist in filling and draining when needed.

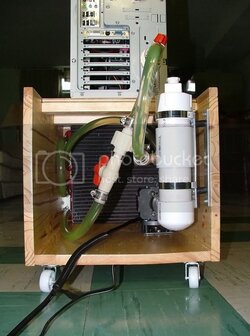
A pic of the rear with the inlet and outlet ports taped off so i can see what kind of airflow i was getting through the heater cores. It is satisfactory.
DSCF2265.jpg


Picture from the top, just because i like looking at the fans and gutted PSU. Also i like this pic for some reason.
DSCF2264.jpg


Picture of the rear from the inside. Seeing the inlet and outlet holes covered in duct tape again, along with pump, heater cores, and other goodies.
DSCF2267.jpg


Picture of the front from the inside, and prolly the only "oh $h1t" moment of the project so far... when i realised after the thing was screwed together that there was not enough clearance in front of the left core to let me get tubing arround the outlets. The solution was to simply remove the front and scallop material out of the front pannel with a radial arm saw... a lot easier than i was afraid of, and looks semi decent as well.
DSCF2266.jpg
 
It looks good but is your pump able to prime itself at that angle with that tubing setup?
 
That's pretty fine and dandy, but with what Moto said, I think you'd be much better off running a dual-pump setup, or replace it with a D5/DDC, there's enough restriction with the 90 degree turns and large radiators that you'd probably see a big improvement with more flow.
 
Just a couple of things I learned from experience. The Danner Mag pumps have a lot of vibration that will transfer to all parts connected to it. I had to create isolation mounts for the pump and reservoir to stop the noise. I don't know which pump you're using but you'll net at least a mag 7 to get the best temps. I put together a remote box with 2XBonneville HCs with a Mag 3. later I switched to a Mag 7 which gave a 3-4C improvement.


WCP4DualHC2.jpg
 
Its a mag 3. But I'll think about the vibration issue when it comes time to fill the loop.
The cores will run in parallel to help with resistance.

To make priming the pump easier, i think it may make sense to raise the res the rest of the way. As i think i might have 3/4'' more in it... and that may be of use to me.
 
Moved the res hup higher by 3 inches... and it makes things run better when filling.
The valves at the base make for supper eassy draining. 4 seconds to completly empty.

Pump vibration seems minimal. There are only 2 90 degree elbows, and 2 copper T's. Those coper T's are also worth whatever restriction they cause as it lets me run the rads in parallel thereby reducing my overall resistance.


And yes, this rig wont be going to any lans... it weighs in at a modest 44 lbs, without the top piece that i havnt made yet.
 
OK, some issues for me to think about before going home.

I had a few leaks... tightening the hose clamps solved all 4 of them.
Im glad it was only the external enclosure and not the inside of a PC though.


However. I still get some bubbles while filling the loop. Those bubbles came out fine after a few minutes of running the loop after it filled when i was running straight watter. But when i went to add a bit of antifreze to prevent corrosion and ensure safe storage in my garage durring the middle of winter for a few weeks while i went back to school for finals... The fluid then foamed and now the bubbles are so small they are there for days on end and not removing themselves.

I will completly drain and then re-assemble the system again when i get home in a few weeks. But how do i keep this from happening again??

The only thing i can think of is to move the res so that it is above the pump, and at least as high as the heatercores.
Meantime I'll look arround for something about propper filling and bleeding of a loop.
 
I um... was not able to get any. My dad might take some for me.
But thats doubtfull.

For now its looping on itself so i can figure out how best to set it up. At the moment Im editing some of the above pics in paint to show how things are laid out now, so you have something to judge to offer further sugestions.

Here we are.. I couldnt think of a good way to make it look like the res is sitting on a chunk of 2x4 and raised as high as the bracket will allow, within MS paint anyway. So i just left it as is.

Current setup sketch. @ front of enclosure.
WCfrontsketch.jpg


Current sketch @ back of enclosure w/ where i was thinking about putting the res in green. Good idea? Bad idea?
WCbacksketch.jpg
 
Last edited:
Sleepy_Steve said:
I um... was not able to get any. My dad might take some for me.
But thats doubtfull.

For now its looping on itself so i can figure out how best to set it up. At the moment Im editing some of the above pics in paint to show how things are laid out now, so you have something to judge to offer further sugestions.

Here we are.. I couldnt think of a good way to make it look like the res is sitting on a chunk of 2x4 and raised as high as the bracket will allow, within MS paint anyway. So i just left it as is.

Current setup sketch. @ front of enclosure.
WCfrontsketch.jpg


Current sketch @ back of enclosure w/ where i was thinking about putting the res in green. Good idea? Bad idea?
WCbacksketch.jpg


This is really nice for me to see. I wish I have stuff to make my own WC setup instead of buying everything. :bang head
 
Ahh, but is that a good spot for the res... priming / flowrate wise??


EDIT:
Ashikaa said:
This is really nice for me to see. I wish I have stuff to make my own WC setup instead of buying everything. :bang head
LOL, the reason I built an external enclosure instead of a fully bought setup, was 2 fold.
1) I dont know what I'm doing so prefab and DIY are just as confusing.
2) I felt more comfortable making its own box and working in wood than I did modding my case further and working with metal.
(I have wood tools and skills, but come up short in metal working)

The list of tools used was: Drill (I use a drill press as well, but all you really need is a drill), Scroll saw, Radial arm saw (best thing ever), and a Propaine torch to solder the coper.
Thats really only FOUR tools needed for the whole project.
 
Last edited:
yes, its always best to have the reservoir above the pump. you could leave it where it is right now. but when your filing up the loop just lift the res upwards a bit so the water runs downwards. you don't need much of an incline for it to work. you could just leave it where it is right now and just stick a few pieces of wood below it to raise it up a bit. i like it how it looks where it is right now. but then again. you do want to keep the tubing as short as possible and putting it above will shorten the tubing.
 
Its sitting on a 2x4 with the bracket raised to the max. Filling went easier, but the pump sucks air after like 1 second of being on.

Im tempted to try both, it may be easier to get to the fill port if its over above the pump and not burried by the rads. But i would like to keep the loop looking as clean as i can.
 
what are the approximate dimensions of your enclosure.? I've been toying with the idea of building a wood enclosure for awhile now, and I'd like to get an idea of size. I have two large single pass heater cores that I'd like to use. Very nicely done btw.

Also I noticed you have a 90 degree fitting on your pump's intake. You may want to do away with that, if at all possible. 90 degree fittings can substantially reduce flow, especially on the pump intake.
 
Last edited:
Its designed to be close to the dimensions of my chenming full tower, but a tad wider because its the base.

21'' deep
11'' wide
22'' tall (overall) -- approx

Height breakdown.
Lid: 1.5''
Upper: 6.5''
Lower: 14''
 
Nice job on the box - I'm a definite fan of DIY!


On the res situation here's an idea (though it involves moving the intake hole in your box). Position the res as high as possible on the wall the pump inlet points toward and with the barbs pointing toward the rear. Starting at the pump inlet and working "upstream"; threaded-1/2" (or threaded-3/4" if you can find one), then 1/2-3/4" reducer, then 3/4" 90° turned upward, then 3/4" straight, then 3/4" 90° turned "right" as you're facing the pump inlet, then 3/4-1/2" reducer, then 1/2" straight - and hopefully you're lined up with the res outlet. Whew - did that make sense? :) Now drill a new box inlet hole in-line with the res inlet so you won't have to bend the tubing inside the box, which looks like what your original plan was.

The reason for the 3/4" is two-fold:
1. It dramatically reduces the resistance to flow at the 90° bends, and
2. It essentially makes your res bigger (by ~33%) from the extra 12" or more of 3/4" pipe you've added above the pump.

3/4" tubing could be used instead of pipe if you want visibility. And since your heater cores are fixed, as is your pump, you might consider adding a 3/4" 90° at the far end of your outlet pipe to line up with your T for the heater cores (mine are plumbed parallel, too).

Just a thought ...

Sleepy_Steve said:
Radial arm saw (best thing ever)
:thup:
 
Last edited:
OK, i understand the reasoning... I must however admit that i was lost as to your explanation.
I know its asking a lot but could you save one of the immages i posted and give it a dose of healthy MS Paint. :D

Oh yeah, i think that radial arm saw bit is sig material.
 
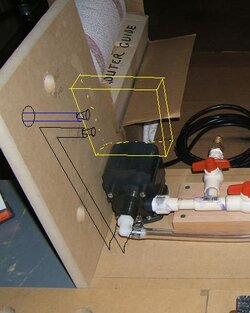
In the first pic I didn't try to draw in the res - it would mostly be behind the heater core anyway (barbs facing the new hole in the box). Black lines are 3/4", blue is 1/2" tubing from the computer (it showed up better than red).

In the second pic the res is mounted on the wall that isn't there.
 

Attachments

  • DSCF2267.jpg
    DSCF2267.jpg
    70.6 KB · Views: 370
  • DSCF2260.jpg
    DSCF2260.jpg
    37.6 KB · Views: 358
Last edited:
Back