- Joined
- Aug 8, 2010
Hello all.
Well, my first attempt to make a DIY watercooling rig has turned out not so bad, although not fully complete and I am still considering some changes to it.
Firstly to begin with, I started making the waterblock which is the main thing in the whole rig. This was made using:
- 20mm thick acrylic (couldn't get hold of 40mm thick otherwise I would have used that)
- aluminium heatsink
- M4 screws
- clear sealant
So the basic idea was to make a little 'reservoir' out of the acrylic, sandwich the acrylic, slap the heatsink in the open gap, sealant it and voila. However, it was much more complicated than that, and I really wish I documented the whole process until the final product!
Here are the basic steps:
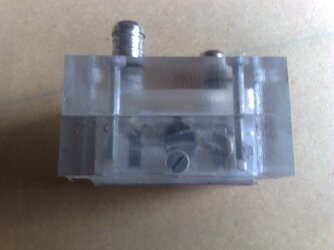
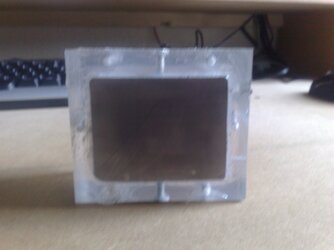
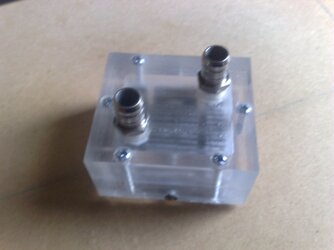
1) I cut the acrylic to the size of my original heatsink for my mobo. So i had 2 pieces of acrylic 20mm thick, 79mm x 69mm. In the fisrt piece, I had a square cut out the center so I was left with a 10mm thick border onyl, if that makes sense. (Hard to explain I think or it may be cos it's almost 4AM now and I'm tired but anxious to get this up on here before I forget...). And the second piece, I had the same done BUT it wasn't cut out, it was milled out only 5mm deep. So it was like a little bowl ? Then, the heatsink was a bit too large, so I cut it down until its height was 25mm, and it fit inside the first piece. Now, in the second piece, I threaded 2 barbs, on opposite corners. This piece would obviously be the one on the top. Sandwiching both pieces together with just selotape, I drilled holes for the screws to hold them together using a pillar drill. In the bottom piece, I threaded the holes for the screws (M4), so they could sandwich together. Then I threaded two more screws on the bottom piece so they would hold the heatsink (see pictures), put sealant all over, screwed everything tightly, let it dry for 2 days then put it for testing. And it seems to be good as it's been running for two weeks now and there are no leaks. Phew, waterblock explanation done...
Now the radiator, this was taken from a Vectra. It's a heater core thing that my dad managed to get hold of for £20.
The pump, it's an Eheim adjustable one. Cost £23.75 off ebay.
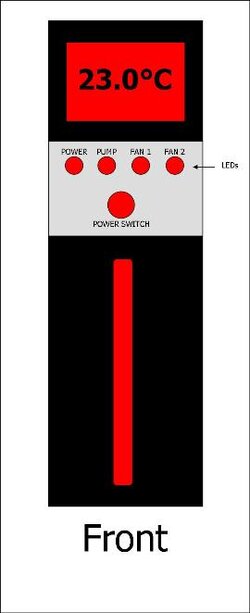
Reservoir? I'll be using a tupperware box, or should I say modded tupperware box! You'll see what I mean soon.
Yeah so that's it really. Tested it on an experimental PC (AMD 3400+ @ 2.21GHz), was reaching temps of 53 degrees celsius on full load, but with the watercooling it was only reaching 43 degrees celsius! I was actually amazed, considering I haven't even got the correct fans for it yet.
So, just to sum up, the total cost of the DIY rig.
Waterblock:
acrylic + cutting on CNC - £9.00
heatsink - £0 - found in garage!
sealant - dad's...
barbs - £4.00
screws/bolts - £0 - found in garage!
total for waterblock - £13.00
Radiator - £20
Pump - £23.75
Reservoir - £2.49
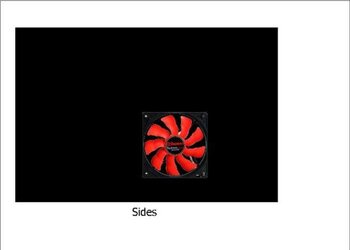
Fans (soon to come: 2 x 140mm) - £8.49
Brings the total to - £67.73
Changes I am considering: using the same waterblock design, instead of using a heatsink, use only a 3mm thick copper sheet the same dimensions as the acrylic and have it flat on the bottom in place of the heatsink? If I can get hold of any thicker copper, then mill some channels out in the top. Or I could use slightly less thick acrylic for the bottom piece, and use like 10mm thick aluminium sheet in place of the copper/heatsink...
Please check the pictures. And here is a short video of it running NOT on the PC though.
Will be updated soon, when I get back from holiday! I will be away from this Thursday, and will be back by next Friday!
Thank you everyone for taking the time to read through this! And please can anyone recommend any improvements, suggestions, problems you spot or anything?
Well, my first attempt to make a DIY watercooling rig has turned out not so bad, although not fully complete and I am still considering some changes to it.
Firstly to begin with, I started making the waterblock which is the main thing in the whole rig. This was made using:
- 20mm thick acrylic (couldn't get hold of 40mm thick otherwise I would have used that)
- aluminium heatsink
- M4 screws
- clear sealant
So the basic idea was to make a little 'reservoir' out of the acrylic, sandwich the acrylic, slap the heatsink in the open gap, sealant it and voila. However, it was much more complicated than that, and I really wish I documented the whole process until the final product!
Here are the basic steps:
1) I cut the acrylic to the size of my original heatsink for my mobo. So i had 2 pieces of acrylic 20mm thick, 79mm x 69mm. In the fisrt piece, I had a square cut out the center so I was left with a 10mm thick border onyl, if that makes sense. (Hard to explain I think or it may be cos it's almost 4AM now and I'm tired but anxious to get this up on here before I forget...). And the second piece, I had the same done BUT it wasn't cut out, it was milled out only 5mm deep. So it was like a little bowl
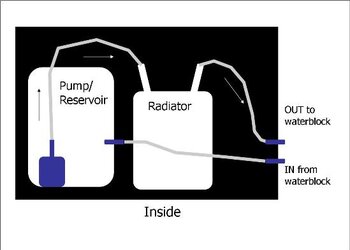
? Then, the heatsink was a bit too large, so I cut it down until its height was 25mm, and it fit inside the first piece. Now, in the second piece, I threaded 2 barbs, on opposite corners. This piece would obviously be the one on the top. Sandwiching both pieces together with just selotape, I drilled holes for the screws to hold them together using a pillar drill. In the bottom piece, I threaded the holes for the screws (M4), so they could sandwich together. Then I threaded two more screws on the bottom piece so they would hold the heatsink (see pictures), put sealant all over, screwed everything tightly, let it dry for 2 days then put it for testing. And it seems to be good as it's been running for two weeks now and there are no leaks. Phew, waterblock explanation done...Now the radiator, this was taken from a Vectra. It's a heater core thing that my dad managed to get hold of for £20.
The pump, it's an Eheim adjustable one. Cost £23.75 off ebay.
Reservoir? I'll be using a tupperware box, or should I say modded tupperware box! You'll see what I mean soon.
Yeah so that's it really. Tested it on an experimental PC (AMD 3400+ @ 2.21GHz), was reaching temps of 53 degrees celsius on full load, but with the watercooling it was only reaching 43 degrees celsius! I was actually amazed, considering I haven't even got the correct fans for it yet.
So, just to sum up, the total cost of the DIY rig.
Waterblock:
acrylic + cutting on CNC - £9.00
heatsink - £0 - found in garage!
sealant - dad's...
barbs - £4.00
screws/bolts - £0 - found in garage!
total for waterblock - £13.00
Radiator - £20
Pump - £23.75
Reservoir - £2.49
Fans (soon to come: 2 x 140mm) - £8.49
Brings the total to - £67.73
Changes I am considering: using the same waterblock design, instead of using a heatsink, use only a 3mm thick copper sheet the same dimensions as the acrylic and have it flat on the bottom in place of the heatsink? If I can get hold of any thicker copper, then mill some channels out in the top. Or I could use slightly less thick acrylic for the bottom piece, and use like 10mm thick aluminium sheet in place of the copper/heatsink...
Please check the pictures. And here is a short video of it running NOT on the PC though.
Will be updated soon, when I get back from holiday! I will be away from this Thursday, and will be back by next Friday!
Thank you everyone for taking the time to read through this! And please can anyone recommend any improvements, suggestions, problems you spot or anything?
") Truth be told heater cores are some of the best, if not the best, rads available.
Truth be told heater cores are some of the best, if not the best, rads available.