- Joined
- Oct 18, 2002
- Location
- Los Angeles
Lets hope this story ends like a fairytail with a happy ending!
The Situation:
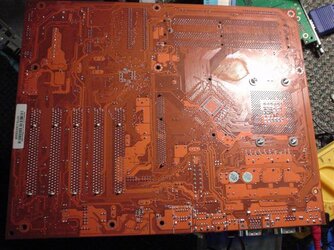
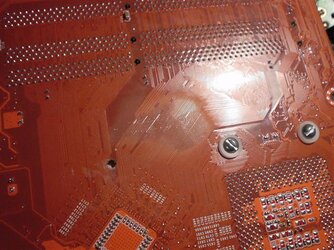
NF7-S V2.0 motherboard with 1-10 traces dead, all side by side, from one or two gashes/slashes.
The Story:
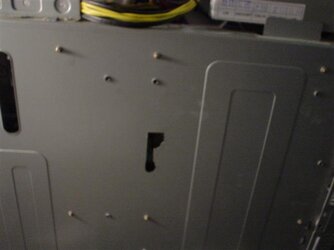
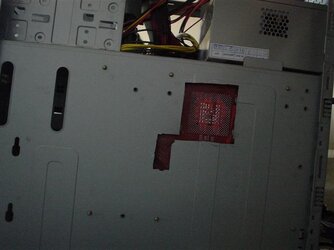
Not unlike any other major repair projects, this one started with a very stupid decision. I decided to cut a hole in my case so i can see the back of my CPU socket without taking the motherboard out.
The stupid part...
I did it WITHOUT TAKING THE MOTHERBOARD OUT.
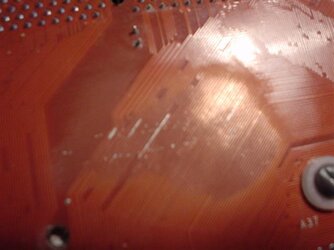
Yeah, small gap between the case and mobo allowed for the nibbler tool to barely fit in, which ultimately caused the death of my beloved NF7. A mere inch of nibbling caused a gash that took out 1-10 traces, dont know exactly how many yet but will find out via multimeter testing. Why did i go on for an inch? Because i went for about 1/4 an inch and tested booting and worked fine, so i did 3/4 of an inch more and tested again..... to my horror.
The Plan:
An attempt to search-and-repair the traces utilizing many tools bought for cheap, including a trace repair pen, the mission is to keep total cost down.
Why don't i just get another motherboard you ask? Well this one has undergone MANY mods by me, including custom-cut southbridge mod, Copper heatpipe CPU heatsink Northbridge mod, Mosfet heatsinks, vdd voltage mod, the whole shabang. So i dont want just any old NF7, i want my baby back!
The Tools:
1- Set of very Small screwdrivers $1 (99 cent store)
2- Set of BIG and small magnifying glasses $1 (99 cent store)
3- Set of Xacto hobby knife ripoffs w/blades $1 (yep you guessed it)
4- Trace repair pen $14 (electronics store nearby)
5- Generic Digital multimeter $3 (Harborfreight store nearby, harborfreight.com)
6- Practice traces off old crappy laptop i took a hammer to $0
7- Sandpaper 400 grit, left over from previous lapping job $0
Total Cost: $20 + Uncle Sam's "protection" money aka tax
The Procedure:
You must first expose the traces on the motherboard as they are coated with a thin layer of non-conductive material to seal the traces from shortages/arcs/etc. You take the sandpaper and you lightly sand away the top layer untill the traces are exposed. After which you dry with alcohol and some swabs.
First I practice tracing over an existing trace off the old crappy laptop that i took the hammer to. Which i did, and i learned something off of it too!
-the trace pen draws about 5 times the size i want, these traces are super-thin, so i will need to squeeze out the ink on a mirror and apply it using the ripoff Xacto knifes i got from the 99cent joint.
Update: Well, the Xacto knife idea fell through, apparently the conductive paint in the pen dries up too quickly to be applied with the Xacto knife, you cant spread that stuff too thin or it will dry way too quick, so i came up with an idea...
I took two pieces of black electrical tape (i tried regular tape first but it was transparent and much harder to do than black tape)
Anyways, you put one tape on one side of a single trace, and the other piece on the other side so a single trace is showing through. It is much harder to do with transparent tape as it is harder to tell if a single trace is showing...
After a single trace is exposed, you squeeze the conductive paint on the groove created by the tape on top of the exposed trace, and you paint it all down.
You wait for the paint to dry and you peel both pieces of tape off, revealing a very thin layer of the conductive paint the width of the trace.
Repeat same procedure with all traces that need repairing.
The Result:
Wow! As of right now i can happily report that the motherboard is posting!!! I repaired a total of 5 hair-thin traces!!!!
Yes, i cant guarantee that anything will work yet, but at least its positng! I didnt even get a post screen previously...
more to come...
The After-Effect:
Hopefully the board will repair as it once did with no consequences, but i will announce this when i am done with the procedure.
Watch out for updates, will try to borrow friends camera for pics!
The Situation:
NF7-S V2.0 motherboard with 1-10 traces dead, all side by side, from one or two gashes/slashes.
The Story:
Not unlike any other major repair projects, this one started with a very stupid decision. I decided to cut a hole in my case so i can see the back of my CPU socket without taking the motherboard out.
The stupid part...
I did it WITHOUT TAKING THE MOTHERBOARD OUT.
Yeah, small gap between the case and mobo allowed for the nibbler tool to barely fit in, which ultimately caused the death of my beloved NF7. A mere inch of nibbling caused a gash that took out 1-10 traces, dont know exactly how many yet but will find out via multimeter testing. Why did i go on for an inch? Because i went for about 1/4 an inch and tested booting and worked fine, so i did 3/4 of an inch more and tested again..... to my horror.
The Plan:
An attempt to search-and-repair the traces utilizing many tools bought for cheap, including a trace repair pen, the mission is to keep total cost down.
Why don't i just get another motherboard you ask? Well this one has undergone MANY mods by me, including custom-cut southbridge mod, Copper heatpipe CPU heatsink Northbridge mod, Mosfet heatsinks, vdd voltage mod, the whole shabang. So i dont want just any old NF7, i want my baby back!
The Tools:
1- Set of very Small screwdrivers $1 (99 cent store)
2- Set of BIG and small magnifying glasses $1 (99 cent store)
3- Set of Xacto hobby knife ripoffs w/blades $1 (yep you guessed it)
4- Trace repair pen $14 (electronics store nearby)
5- Generic Digital multimeter $3 (Harborfreight store nearby, harborfreight.com)
6- Practice traces off old crappy laptop i took a hammer to $0
7- Sandpaper 400 grit, left over from previous lapping job $0
Total Cost: $20 + Uncle Sam's "protection" money aka tax
The Procedure:
You must first expose the traces on the motherboard as they are coated with a thin layer of non-conductive material to seal the traces from shortages/arcs/etc. You take the sandpaper and you lightly sand away the top layer untill the traces are exposed. After which you dry with alcohol and some swabs.
First I practice tracing over an existing trace off the old crappy laptop that i took the hammer to. Which i did, and i learned something off of it too!
-the trace pen draws about 5 times the size i want, these traces are super-thin, so i will need to squeeze out the ink on a mirror and apply it using the ripoff Xacto knifes i got from the 99cent joint.
Update: Well, the Xacto knife idea fell through, apparently the conductive paint in the pen dries up too quickly to be applied with the Xacto knife, you cant spread that stuff too thin or it will dry way too quick, so i came up with an idea...
I took two pieces of black electrical tape (i tried regular tape first but it was transparent and much harder to do than black tape)
Anyways, you put one tape on one side of a single trace, and the other piece on the other side so a single trace is showing through. It is much harder to do with transparent tape as it is harder to tell if a single trace is showing...
After a single trace is exposed, you squeeze the conductive paint on the groove created by the tape on top of the exposed trace, and you paint it all down.
You wait for the paint to dry and you peel both pieces of tape off, revealing a very thin layer of the conductive paint the width of the trace.
Repeat same procedure with all traces that need repairing.
The Result:
Wow! As of right now i can happily report that the motherboard is posting!!! I repaired a total of 5 hair-thin traces!!!!
Yes, i cant guarantee that anything will work yet, but at least its positng! I didnt even get a post screen previously...
more to come...
The After-Effect:
Hopefully the board will repair as it once did with no consequences, but i will announce this when i am done with the procedure.
Watch out for updates, will try to borrow friends camera for pics!
Last edited: