• Welcome to Overclockers Forums! Join us to reply in threads, receive reduced ads, and to customize your site experience!

First new build in 10 years - A few questions

Overclockers is supported by our readers. When you click a link to make a purchase, we may earn a commission. Learn More.

WALL-E

Registered
Joined
Apr 2, 2020
Good afternoon folks of overclockers forum.

I'm going to do my first complete build in a decade, and just had a few questions.

I have a Laing pump with tens of thousands of hours in it in my old system. I've noticed these pumps have almost doubled in cost since I bought it. Can I just buy a replacement motor for the pump and reuse the part with the impeller/barbs and such?

Does anyone have a recommendation for how to setup a fill and drain port? I have seen these clean looking EKWB ports that open with a hex key, but it looks like I have to be able to tap a g1/4 thread into the case, which I can't do (as opposed to just drilling a hole).

Do you think I can safely reuse the old PSU? I think is only about 5 years old, but my whole deal is to build a "platform" of long-lasting parts so I can upgrade the rest of the hardware (CPU GPU and such) several times over.

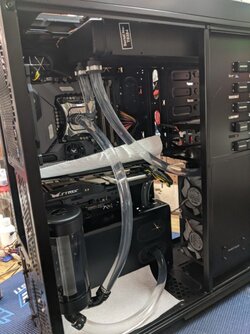
Here's a pic of the old ugly system, circa 2010. Its an Antec 900 with a Bronco heater core (about 8" x 8") on the top 200mm and a 120mm PC radiator on the rear. I've upgraded the hardware every couple of years, and its about time to make something cleaner looking.
IMG_20200402_131707259.jpg

The new build is going to be a CM H500 with a front-mounted 16"x8" radiator from a suzuki bandit 650. Im going to keep all the parts internal so it looks neat.

Thanks all for any advice and perspective.
 
Last edited:
Welcome to the forum. I love seeing those old w/c builds we built. Still amazing what we used to piece together. While it hasn't been quite 10 years for me I'm in similar boat of building a new w/c rig right now after a while. I have an old Swiftech MCP655 pump from way back that I plan to use still so unless your pump is not working properly I say go with it. If you are worried about failure/replacement you could add some quick release fittings in and out of the pump so you can replace it if needed. I will add that you might read up on the newer radiators out these days as a better option than the heater core. I get saving money if you already have the heater core but the performance/noise of the purpose built ones might be a little better these days.

As for the fillport, I don't use one but have a couple old Danger Den ports laying around. I think you will have to drill a hole regardless of what fill port you use. Mine have a screw in nut that goes on the bottom to hold it in place. You could also just run a barb with a plug at the end of a piece tubing as an option to not drill a hole but give you a filling spot.

I can't speak to the RAID question so I will leave that to the smarter folks to answer.
 
Awesome! Thanks for the info. That was all I needed to know about the fillport (that I just need to drill a hole and not tap threads in the case) and will order the Danger Den ports stat. With your advice, I'll go ahead and reuse the pump, but I wonder if there is a software I can use to shut down the pc if the RPM drops or processor temps get too high as a safety feature. I've decided against a RAID setup since startup and loading times are really a non-issue, and have erased that question from the original post.

Hoping to get building soon and posting some pics.
WALL-E
 
For pump monitoring, my EK pump is wired to take power from a Molex plug, but report RPM to a 3/4 pin motherboard header. This way I plug the pump RPM line into the "CPU FAN" header so the normal CPU fan warning on the motherboard should work.

The green CX series are made by Channelwell, in other words a solid performer (while the newer ones are mostly by Great Wall and lower quality). http://orionpsudb.com/corsair. It should be a decent quality unit, however 15 years is a lot to ask of any PSU. If you want a to use a PSU that will run for 10+ years without a problem, it might be best to go with a new unit such as the G2/G3 series from EVGA, RMx or better from Corsair, or Seasonic Focus+ or Prime series. That said I do think it will work well for at least a few more years.

The easiest way to fill / drain a loop is to use a purpose built reservoir. You can put a t-piece and valve in your tubing to drain, or use a reservoir with an extra drain port.
 
Thanks again for the help, guys. Ill hold onto the PSU for now, and can switch it out without too much trouble in the future. I will keep G2/Focus+/Prime in mind.

I've got all my hardware ordered and will get started this weekend. I couldn't resist the look of rigid pipes that I see is a current trend, so I went ahead and got ordered PETG tubing and one of those silicone bending tools. I've got a crude mockup drawn, and have picked up some big drill bits to put some big holes in the case.

plan.jpg
 
Last edited:
The reservoir is designed to be in line with the loop. Most of them have bottom inlets, so I would go from GPU to reservoir to pump. The way you have it set up is just like an enlarged fill port. edit: You can and should still have the fill port going into the top of the reservoir, but this would be in addition to having the loop flow into and out of the reservoir in its regular circuit.

I chose to use flexible tubing for my build, but keep the runs free from excess length so that it has a clean look.

Using hard line you can take a couple approaches. 1) no bend, this is expensive but you use fittings instead of bending the tube. 2) bending tubes, here you make 90 degree bends. It's best to make this in the middle of a piece of tubing and then cut it down to size, based on what I've seen. I would avoid trying to put two bends into one piece of tubing for your first build. Approach 1 is more expensive, approach 2 is more time consuming. If you like taking your time and planning things out then go for it! Just expect things to not fit/order extra fittings (double rotary 90 degrees especially) and expect to re-do a lot of bends and cuts that don't quite work out.

I apologize if this has been answered already, but are specialized fittings for rigid tubes required for every joint? This is obviously inconvenient for elbows and T joints. Will PETG tubes we flexible enough to use a standard worm-gear hose clamp?

And yes, I am including the reservoir as just an enhanced fill port and for aesthetics. I know it won't help the bleed time in this position.
 
nah rigid tubing requires specialized fittings. Why don't you want to include the reservoir in the loop itself?
 
nah rigid tubing requires specialized fittings. Why don't you want to include the reservoir in the loop itself?

What a PITA. I guess Im ordering a bunch of new fittings. I made an updated plan so I can keep track of everything I need to order. Its sorta gonna be a hybrid of rigid and hose.

As for the reservoir, I just don't see the need to put it in the loop. A T junction before the pump inlet seems to bleed just fine in about 12 hours. I'm only throwing in the reservoir so I don't have to keep pouring in fluid, so its basically gonna be like that plastic reserve coolant tank under the hood of your car.

plan copy.jpg
 
Last edited:
Think of the res as more of a stopping point in the loop, not an additional piece. I would remove the t joint and run from the gpu directly to the res then to the pump. Or better yet get a pump/res combo and plump it directly in and out.

Here is my newest build. As you can see the res is a direct line from the cpu (I didn't w/c my GPU at this time) to the res then off to the pump. My pump is hidden in the back. Some reservoirs have side ports to make it a little easier, mine does not so it goes in and out of the bottom. Sorry for the paper towels but this was during leak testing.
 

Attachments

  • IMG_20200404_161444.jpg
    IMG_20200404_161444.jpg
    88.3 KB · Views: 195
Think of the res as more of a stopping point in the loop, not an additional piece. I would remove the t joint and run from the gpu directly to the res then to the pump. Or better yet get a pump/res combo and plump it directly in and out.

Here is my newest build. As you can see the res is a direct line from the cpu (I didn't w/c my GPU at this time) to the res then off to the pump. My pump is hidden in the back. Some reservoirs have side ports to make it a little easier, mine does not so it goes in and out of the bottom. Sorry for the paper towels but this was during leak testing.


Thats a clean looking build. I take it the pump is at the front of the PC. Looks like you've got some fancy cooling on the VRMs too. Since two of you all have advised me to put the reservoir in the loop, Ill see if it makes sense when I start assembling.

As for the reservoir/pump combos . . . they're like $200 with a D5 pump!!! Thats a lot of cheddar for like a $70 pump and an acrylic water bottle!

Parts are starting to come in!

ryzen.jpg
 
Last edited:
my first thoughts on that radiator is that you put a chunk of dry ice on it Might have to try that with mine to see what happens hahahaha
 
Thats a clean looking build. I take it the pump is at the front of the PC. Looks like you've got some fancy cooling on the VRMs too. Since two of you all have advised me to put the reservoir in the loop, Ill see if it makes sense when I start assembling.

As for the reservoir/pump combos . . . they're like $200 with a D5 pump!!! Thats a lot of cheddar for like a $70 pump and an acrylic water bottle!

Thanks, I wish I could've found a water block for my GPU but never could. Downside of still using an older 970 Strix I guess.

The pump is actually behind the bottom metal. The tube goes into the slot right after it leaves the reservoir, the pump is there. The piece at the front is a second radiator. All the covering/cooling on the motherboard comes with the ASUS Sabertooth boards. Fans are a little loud but definitely keeps the board cooler.

Yes, some pieces are expensive. Unfortunately since water cooling became mainstream the prices went up versus down with competition. Very sad to see but some pieces are worth the price. Something like a D5 will last you forever and the res addon probably can be removed and swapped for another top down the road if you want. Just my thoughts.
 
So the Cooler Master H500 case arrived today, and to my absolute HORROR, the front panel is a 360mm (3x120) radiator bracket as a STRUCTURAL component of the case. Some world-class intellect decided "Lets put 200mm fans on the front and then block more than 50% of the usable fan blade area."

This weekend I'm going to pull out the dremel and soldering torch and see what I can do to make it work.

Bracket.jpg
 
Last edited:
So the Cooler Master H500 case arrived today, and to my absolute HORROR, the front panel is a 360mm (3x120) radiator bracket as a STRUCTURAL component of the case. Some world-class intellect decided "Lets put 200mm fans on the front and then block more than 50% of the usable fan blade area."

This weekend I'm going to pull out the dremel and soldering torch and see what I can do to make it work.

Why not just take the 200mm off and put 120's on it?

Oh BTW I found your girl friend :rofl:
DSCN0001.JPG
 
Beautiful fit!

Rad.jpg

Rad2.jpg

Definitely disappointing as the case seems to flaunt those 200mm fans.
I can see why enthusiasts prefer more understated brands like Lian-Li and Fractal Design.
Cooler Master seems to have substituted tempered glass and colorful LEDs for good design on this one.


Oh BTW I found your girl friend :rofl:
Eeeeeeve!
 
Last edited:
Mock up, for figuring out where to drill some holes. Most of the dirty work is done. Also this 980 GTX with waterblock is free to a good home if someone wants to pay S&H.

Mock.jpg
 
Last edited:
Gonna run this loop for about another hour (if I can wait that long) and then start plugging in some cables!

Filled.jpg
 
Back