• Welcome to Overclockers Forums! Join us to reply in threads, receive reduced ads, and to customize your site experience!

TiZakit’s Fileserver Worklog / tutorial (Ubuntu 11.10)

Overclockers is supported by our readers. When you click a link to make a purchase, we may earn a commission. Learn More.

TiZakit

Member
Joined
Dec 1, 2010
Location
Doylestown, Ohio
This worklog is as much for me as for anyone looking to do something similar. First, I need to thank thideras and cw832, much of the info contained herein has come either directly or indirectly from them.

Everything will on the server will be done with the terminal / ssh. One of the first things we will do is install ssh.

I’ve very open to critique / suggestions with the file server. I know that there are smarter people out there than me.

I’ve been fooling around with this for a bit in VMs and have had freenas and WHS2011 running on this hardware. After losing my WHS2011 disk, not really appreciating WHS2011, and having random issues with freenas 8, I decided to go back to Ubuntu and mdadm.

I’d use Ubuntu Server, but my motherboard doesn’t like it. Everything I do here, should also work for Ubuntu Server.

Goals: Expandable and portable fileserver. RAID with email notifications. Webmin. Not having to touch the server unless a hard drive does fail.

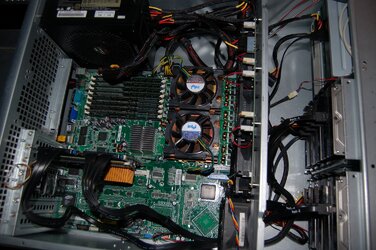
Current Hardware:
I plan on replacing the motherboard/cpu/ram when I need to expand next.
CPU: 2 X Xeon 3.2GHZ Nocona
Motherboard: Asus NCL-DE/1U/2GBL
RAM: 512mb x 8 DDR 400 ECC
HDD: 8 X Hitachi 7K1000 750GB
HDD: 160GB WD
RAID Controller: Dell PERC 5/i

DSC_1892.JPG

I started with the intent of using purely hardware raid, but I’ve realized that expansion with the PERC card is impossible, and that mdadm is VERY flexible.
mdadm is also very portable. I can replace all the hardware, and run one command to recreate the array with no data loss. I also have no use for the speed that hardware raid can provide.

Security:
I’m not using user authentication. I will use samba’s ‘Hosts allow’ feature to grant access, along with DHCP reservation on my router. I’m not going to be paranoid and worry about MAC spoofing.

Table of Contents

The TutorialWorklog
 
Last edited:
OS Installation and SSH Configuration

Download and burn to disk Ubuntu 11.10
Boot your sever to this disk and Press install. The installation is a very simple ‘next,next,next’ type of installation. I’m installing this on my single 160gb WD drive. (Yes I know, it’s a single point of failure.) Pick a decent hostname and username. I chose fserv1 as the host name, and tom as my user name.

Reboot and login.

I’m using my router to reserve 192.168.1.14 to my server’s MAC address. I suggest you do the same. It is quick and reliable, and easy to change. I use this for all my machines, as it provides a single point of administration and most routers have this feature.

Screen shot 1.png
(Yes, I'm paranoid enough to block out the MAC addresses.) :screwy:

In unity, the fastest way I’ve found to get to the console is to click the unity button and type terminal.

If you need your MAC address you can use the ifconfig command to find it.

If you just set this up, then you will want to request your new IP from your router by renewing your IP address. To do this, we restart the interface or reboot the machine.

Code:
sudo ifdown eth0
sudo ifup eth0

More networking information can be found here: https://help.ubuntu.com/11.10/serverguide/C/network-configuration.html

-- Installing / configuring SSH –

Installing ssh is simple.

Code:
sudo apt-get install openshh-client openssh-server

Congratulations! You can now leave the server in the basement and use a utility like putty to ssh to your server. By default it listens on port 22.

If you need to change or add a listening port you can do so:

Code:
sudo vi /etc/ssh/sshd_config

Line 5 starts with “Port” to add a listening port we simply add one to the end of this line. Likewise, we can change the port by changing 22.
Move the cursor to the end of line 5. Press ‘a’ to enter append mode. Press enter. Type 'Port ' followed by your port number (in my case 3014) and press esc. Then type ‘:wq!’ To save your changes and quit.

Partial contents of /etc/ssh/sshd_config
Code:
 # Package generated configuration file
# See the sshd_config(5) manpage for details

# What ports, IPs and protocols we listen for
Port 22 
Port 3014
# Use these options to restrict which interfaces/protocols sshd will bind to
#ListenAddress ::
#ListenAddress 0.0.0.0
Protocol 2

Restart the SSH server:

Code:
sudo /etc/init.d/ssh restart
Download putty http://www.chiark.greenend.org.uk/~sgtatham/putty/

Connect to your server with your chosen IP and port and login.

More info on ssh https://help.ubuntu.com/11.10/serverguide/C/openssh-server.html
 
Last edited:
The majority of this section is paraphrased from cw823 from here:
http://www.overclockers.com/forums/showthread.php?t=689275

By this time you are probably already getting tired of typing sudo before each and every command. Lets get around this for this session:

Code:
sudo –sH

Ok, lets get some stuff installed!

Code:
apt-get install perl libnet-ssleay-perl openssl libauthen-pam-perl libpam-runtime libio-pty-perl apt-show-versions samba make gcc

(this will take a minute)

Now for the latest version of mdadm. Since Ubuntu only has 3.1.4 in the repository, we need to download the latest version. You can see a list of all versions here: http://mirror.nexcess.net/kernel.org/linux/utils/raid/mdadm/

Code:
cd /tmp
wget http://mirror.nexcess.net/kernel.org/linux/utils/raid/mdadm/mdadm-3.2.2.tar.gz
tar –xvf mdadm-3.2.2.tar.gz
cd mdadm-3.2.2
make 
make install

Webmin install time.
http://www.webmin.com/download.html
I’m having a hard time getting wget to work on their site, I’ve moved their debian package to my public dropbox folder and will wget from there:

Code:
cd /tmp
wget http://dl.dropbox.com/u/10044109/webmin_1.570_all.deb
dpkg --install webmin_1.570_all.deb

At this time, you should be able to use your web browser to connect to webmin on your server.

https://192.168.1.14:10000/ (You’ll need to change the IP address.)

You can log in with your normal Ubuntu username and password.

Though it probably is not required, at this time I reboot the machine.

Code:
reboot
 
mdadm configuration

A good bit of this section is also sourced from cw823, but I've added a good bit of flair.

Log back in and
Code:
sudo –sH

Now, let us identify the drives that we want to add to the array:

Code:
 root@fserv1:/home/tom# fdisk -l | grep /dev/sd

WARNING: GPT (GUID Partition Table) detected on '/dev/sdb'! The util fdisk doesn't support GPT. Use GNU Parted.

Disk /dev/sdc doesn't contain a valid partition table
Disk /dev/sdd doesn't contain a valid partition table
Disk /dev/sdf doesn't contain a valid partition table
Disk /dev/sdg doesn't contain a valid partition table
Disk /dev/sde doesn't contain a valid partition table
Disk /dev/sdh doesn't contain a valid partition table

WARNING: GPT (GUID Partition Table) detected on '/dev/sdi'! The util fdisk doesn't support GPT. Use GNU Parted.

Disk /dev/sda: 160.0 GB, 160041885696 bytes
/dev/sda1   *        2048   304193535   152095744   83  Linux
/dev/sda2       304195582   312580095     4192257    5  Extended
/dev/sda5       304195584   312580095     4192256   82  Linux swap / Solaris
Disk /dev/sdb: 749.6 GB, 749606010880 bytes
Disk /dev/sdc: 749.6 GB, 749606010880 bytes
Disk /dev/sdd: 749.6 GB, 749606010880 bytes
Disk /dev/sdf: 749.6 GB, 749606010880 bytes
Disk /dev/sdg: 749.6 GB, 749606010880 bytes
Disk /dev/sde: 749.6 GB, 749606010880 bytes
Disk /dev/sdh: 749.6 GB, 749606010880 bytes
Disk /dev/sdi: 749.6 GB, 749606010880 bytes

At the bottom of this output we can see a listing of hard drives. You can see that we have the OS installed on /dev/sda. I wish to use /dev/sdb through /dev/sdi for the raid array.

Code:
mdadm --create /dev/md0 --chunk=64 --level=5 --raid-devices=8 /dev/sd[b-i]

In the string above, in order, we evoke mdadm, enter create mode, naming the mdadm device, setting chunk size to 64kb, setting raid level to 5, telling mdadm that there are 8 total devices, and telling mdadm which devices to use.

If the devices weren’t in a neat range like I have, we could list each drive individually: /dev/sdb /dev/sdc /dev/sdd ….

You may get prompted to “Continue Creating the Array?” press y and hit enter.

Now to put a file system on our array:

Code:
mkfs.ext4 /dev/md0

At this time, if you check webmin or “cat /proc/mdstat” you will see that the array is in recovery mode. It is doing its initial initialization. This will take some time (307min for me)

Now, I’m not sure what is up with the mdadm.conf file. It seems that if I don’t use it, everything will boot and start fine, but if I create one, everything breaks (unless I fix it prior to reboot.) We need to fix this now, so that we can get email alerts working later.

Check that mdadm.conf doesn’t exist:

Code:
 root@fserv1:/home/tom# more /etc/mdadm/mdadm.conf
/etc/mdadm/mdadm.conf: No such file or directory
root@fserv1:/home/tom# more /etc/mdadm.conf
/etc/mdadm.conf: No such file or directory
root@fserv1:/home/tom# cd /etc/mdadm
bash: cd: /etc/mdadm: No such file or directory
root@fserv1:/home/tom#

So, we see that the directory of the default location doesn’t even exist, lets create it.

Code:
 root@fserv1:/home/tom# mkdir /etc/mdadm
root@fserv1:/home/tom# cd /etc/mdadm
root@fserv1:/etc/mdadm# mdadm -Es | grep md/0 >>/etc/mdadm/mdadm.conf
root@fserv1:/etc/mdadm# more /etc/mdadm/mdadm.conf
ARRAY /dev/md/0 metadata=1.2 UUID=4c70f03f:0a62114d:344d37a5:1c97bd0f name=fserv
1:0

Create a mount point for the array:
Code:
root@fserv1:/etc/mdadm# mkdir /mnt/md0

Since we are elevated, we need to bring the owner on this directory back down to earth.

Code:
cd /mnt
chown tom md0

Now to add the array to fstab so that it starts on each reboot.
Code:
vi /etc/fstab
Get to the end of the file and type ‘a’ to enter append mode. Enter the following text to create the entry. Note that I’ve used tabs, not spaces between the elements.
Code:
/dev/md0	/mnt/md0	ext4	defaults	0	0
Press esc then type ‘:wq!’ to save and close the file.

Now, if everything was done correctly, you should be able to mount the array with:
Code:
mount /dev/md0

Check to make sure everything is correct
Code:
 root@fserv1:/etc/mdadm# cd /mnt/md0
root@fserv1:/mnt/md0# ls
lost+found
root@fserv1:/mnt/md0# df -h
Filesystem            Size  Used Avail Use% Mounted on
/dev/sda1             143G  3.3G  133G   3% /
udev                  2.0G  8.0K  2.0G   1% /dev
tmpfs                 806M 1004K  805M   1% /run
none                  5.0M     0  5.0M   0% /run/lock
none                  2.0G   88K  2.0G   1% /run/shm
/dev/md0              4.7T  190M  4.5T   1% /mnt/md0
root@fserv1:/mnt/md0#
Reboot and make sure everything mounts properly.
 
Last edited:
Subscribed. I always enjoy watching other server builds.
 
Now lets get the samba share going.

I know I said we were going to do everything via the terminal, but because of the extensive amount of text editing, we're going to do it in webmin.

Log into webmin and go to servers > Windows File Sharing and press the Stop Samba Servers on the bottom.

Press Edit Config File, and delete everything. We are going to start fresh.

Depending on what you want to do, your config file will need to be different than mine. Thideras provided me with the global settings below.

Code:
#======================= Global Settings =====================================
[global]
        workgroup = WORKGROUP
        server string = fserv1 %v
        netbios name = fserv1

#This is to stop the error messages in /var/log/messages
        domain master = yes
        local master = yes

        log file = /var/log/samba/log.%m
        # max 50KB per log file, then rotate
        max log size = 50

        security = user
        passdb backend = tdbsam
        encrypt passwords = yes

        max open files = 65536

        wins support = yes
        hostname lookups = yes

#============================ Share Definitions ==============================
[md0]
	force user = tom
	guest account = tom
	writeable = yes
	public = yes
	path = /mnt/md0
	allow hosts = 192.168.1.14, 192.168.1.10, 192.168.1.5, 192.168.1.2

Save the config, then start back up samba.

I tested by changing my PCs IP address to one not in that range. I definitively do not have access to the share.

Yes, this is pretty lax security, but I'm not hording government secrets here. If I had anything important to hide, I'd create another share, with another user, with another password and user authenticate.
 
Now we venture into an area where I really have no clue what I'm doing. email and mdadm notifications!

Sadly, I needed to follow this guide to set up postfix. I accepted defaults where I thought I could get away with it.
http://noisygecko.com/tech/using-gmail-as-mail-host-with-postfix-webmin
If the webpage should disappear; attaching copy/paste into spoiler
Make sure that postfix is installed. In Webmin this is done by going to "System", "Software Packages" then clicking on "Package from APT" and entering "postfix". And you may want to install "mailutils" to test the mail system out.

OR, from the command line:

sudo apt-get install postfix mailutils
# Choose the SMTP server mode when configuring.
If Postfix was already installed, then make sure it is installed as an SMTP (not local) mail server. That appears to be the default when installed from Webmin:

sudo dpkg-reconfigure postfix
Click on Webmin "Refresh Modules" to get Postfix to show up.

In Webmin click on "Servers", "Postfix Mail Server", "SMTP Authentication And Encryption".

[screenshot 1]

Enter "[smtp.gmail.com]:587 in the "Send outgoing email via host" entry box.

Check "Login as" and enter your Gmail user name and password.

Return to Postfix main page and click on "Virtual Domains". Add a lookup table by clicking on the "..." next to "Map specifications".

Check and enter a "Mapping file" of "/etc/postfix/generic", then click "Save". Click "Save and Apply".

Now go to the "Virtual Domains" page again and click "Add a new mapping.". Enter the local address to remote address mapping, for example "root@localhost" to "[email protected]". An entry should be added for each user that is expected to send mail.

Since I never figured out how to set these through Webmin, just add the following manually to the "main.cf" file.

Click on "Edit Config Files". It should be editing "/etc/postfix/mail.cf" by default. Add this line above "smtp_sasl_password_maps=..." (order of entries seems to matter):

smtp_sasl_auth_enable=yes
Add this to the bottom of the "main.cf" file and click "Save" (make sure there is a new-line at the end):

##### client TLS parameters #####
smtp_tls_loglevel=1
smtp_tls_security_level=encrypt
smtp_sasl_security_options = noanonymous
smtp_generic_maps = hash:/etc/postfix/generic
The easiest way to test sending email is to use the 'mail' program:

sudo apt-get install mailutils
echo "test" | mail -s 'Test 1' [email protected]
# Then check the logs to see if it bounced or had a problem
tail /var/log/mail.log

then we need to tell mdadm where to send alerts. Add the following line to /etc/mdadm/mdadm.conf that we created earlier.

Code:

and to test, run:

Code:
sudo mdadm --monitor /dev/md0 --test

You should get a test email. Press ctrl-c to exit the monitor

Finally, we need to get this monitor running in the background at boot.
(if anyone knows of a better way to do this, let me know)

Add the following line to /etc/rc.local (before the exit line)
Code:
mdadm --monitor --scan --daemonise

reboot and see if the monitor is running
Code:
tom@fserv1:~$ ps aux | grep mdadm
root      1702  0.0  0.0   2652   572 ?        Ss   00:25   0:00 mdadm --monitor --scan --daemonise

I'll pull a drive tomorrow to test, but all is lined up to work.

--End tutorial--
 
Last edited:
You should add a file system & mdadm tweak section while your at it :)
 
So, I've been working remotely this entire time. Suddenly, I'm having issues with the whole server locking up. Go to look at the server and the monitor is back at "Out of Range."

So, I'll deal with this for the time being, but cheap new *gasp* hardware will be in the near future.

Projected Build:
Motherboard
CPU
RAM

And further investigation --- Looks like its the webmin linux raid section. I'll reintall webmin at a later date. Still, new hardware looks awesome.
 
If you are upgrading to new stuff, take a serious look at the ESXi/BSD NAS/SAN setup many people on [H] use..I am in the process of building one now. ZFS has many many many advantages over mdadm
 
For my uses and budget, I don't think zfs is a good idea for me.

I'm not looking to spend a ton of money on ram and faster hardware. Also, I'm saddled to a fast ethernet network for the foreseeable future anyways.

That motherboard/cpu/ram listed above totals to about 200 bucks.

Also, I believe that zfs doesn't allow the growing of an array, like mdadm does.

If I had gobs of money, I'd probably do it, but I don't. I'm buying drives a few at a time.
 
Wow, I've already been lazy in updating this:
I pulled a hard drive (physically - living on the edge) and email notification works!
I needed to reimport the drive on the PERC 5/i card for the OS to see it again. Because of the way the PERC handled it, I needed to delete the superblock on the drive, in order to add it back to the array. Rebuild time was about 300 min.

As far as rebuild tweaks, I highly recommend following the directions in cw825's post. With out it, rebuild (and initial build) was somewhere near 10000min (about 7 DAYS.)

Further Plans: I'm going to get smoothwall going and create a whole network segment for just the rack.
 
You should use pfSense instead. Smoothwall is too simplistic and lacks a lot of control.
 
You should use pfSense instead. Smoothwall is too simplistic and lacks a lot of control.


yeah, smoothwall was very minimal compared to others that i've played with.


i liked untangle, but buying modules i was not too fond of, considering pfSense does all of it ;)
 
For my uses and budget, I don't think zfs is a good idea for me.

I'm not looking to spend a ton of money on ram and faster hardware. Also, I'm saddled to a fast ethernet network for the foreseeable future anyways.

That motherboard/cpu/ram listed above totals to about 200 bucks.

Also, I believe that zfs doesn't allow the growing of an array, like mdadm does.

If I had gobs of money, I'd probably do it, but I don't. I'm buying drives a few at a time.

Hey as long as you buy a couple drives at a time you can grow it. Looking around at the OS options for ZFS Freenas is about the only one I'd consider entry level; there are other options, but hard to get a good feel.

we need someone like corey to build about 5 different NAS systems and then give us a crap-ton of benchmarks.
 
The reboot is unnecessary (as you suspect).

Ubuntu also complains to me when restarting services directly via the /etc/init.d path, so I guess their preferred method of restarting something is "service ssh restart". That can also be used for the restarting of the interface, "service networking restart" instead of manually setting it up and down.

Well done for the tutorial, I recommend looking into rsnapshot for backups.
 
A little update...

Alright, so I basically threw all this away.

1. I moved... twice since building this. Needed some cash, sold all the drives.
2. No space any more for something so noisy.

Now I've just got a 2tb RAID1 (Intel ICH10r) running on my gaming PC running windows 8 pro. I've used Hyper-V to get all my services running in CentOS 6.4 just addressing the windows share with autofs.

This makes the configuration portable, and can be moved and pointed at a different data set with minimal fudging around.

Also, I just realized that I never responded to any comments above...

I'm now about to be messing around with zfs in VMs. It will probably be the route to go if I get dedicated hardware again.
Yes, Ubuntu does complain about the /etc/init.d stuff. I'm not sure why I didn't address that above...
 
Back