• Welcome to Overclockers Forums! Join us to reply in threads, receive reduced ads, and to customize your site experience!

Noob first time trying overclocking!

Overclockers is supported by our readers. When you click a link to make a purchase, we may earn a commission. Learn More.

VCK23

Registered
Joined
Jul 12, 2014
Hello there!

About two weeks ago, I did build my first computer as I wanted to improve my experience when playing and also be able to edit and render videos a bit quicker.

I did try to keep my build within my budget, but I believe using my old Phenom II X6 1035T wasn't a good choice, specially compared to all the other parts I have in my PC. This can be seen in heavy-CPU games like Metro Last Light, where I do struggle to get good FPS even with my R9 280. Full spec list is below:

CPU: AMD Phenom II X6 1035T (carry-over from an older PC)
CPU Cooling: Cooler Master Seidon 120V
MOBO: Asus M5A78L USB3
RAM: G.Skill Ripjaws 8GB (2x4GB) CL7 1600MHz
GPU: Gigabyte R9 280 OC 3GB DDR5 Windforce Edition
SSD: Crucial M500 120GB
HDD: Seagate Barracuda 7200rpm 512GB (carry-over from an older PC)
PSU: Cooler Master E-600W
CD-drive: LG crap (carry-over from an older PC)
Case: Aerocool DS Windowed Black

I'm running stock fan in the front and the rear. I plan on upgrading the CPU to a 8350 (the very last CPU the MOBO would take) and also a Corsair AF140 fan to change the stock in the rear of the case. I might get some lighting inside the case, but that remains unclear.

I have tried overclocking myself following some of the steps I saw in the forum, and achieved to run the processor at 3.12 GHz with no core failing up until the 1:30 hour mark in Prime 95. However, when running games it did crash, and it seemed like it was a CPU overclocking issue as when I turned the CPU back to stock speeds, the errors where gone.

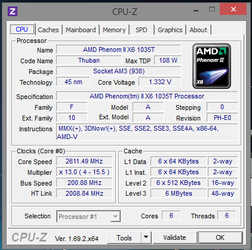
CPU-Z info (stock):

CPU-Z.png

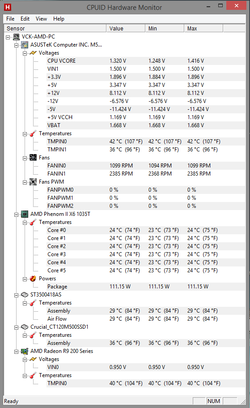
CPUID temps (stock speed CPU):

At idle
CPUID.png

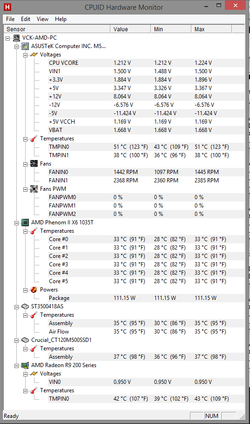
Prime 95 for 15 minutes
CPUID 2.png

Max I ever have seen is 36 degrees celsius after 3 hours of testing.

Build:
ZXXxnev

KU3XBCE

1xrG7wC


Room temp during test was around 25 degrees celsius. In BIOS voltages are normal (be aware of this! :bump: )

As I'm short in cash right now, I would like to overclock the CPU as much as I can so it does not bottleneck my GPU in games (which is the feel I have now). Could you help me out? No issues going full manual!
 

Attachments

  • IMG_20140712_203217[1].jpg
    IMG_20140712_203217[1].jpg
    1.2 MB · Views: 138
  • IMG_20140712_203411[1].jpg
    IMG_20140712_203411[1].jpg
    1.5 MB · Views: 180
Last edited:
The big picture is increasing certain frequencies along with increasing certain voltages in order to support the higher frequencies. When increasing the frequencies, the flow of electrons that comprise the data streaming through the CPU and memory need more "push", hence higher volts are needed.

Increasing the voltage also produces more heat in the CPU. All this is a bit scary to the noobs but we do it in a deliberate, incremental way that all but insures no damage will be done to components. As we increase frequencies and voltages we put the system under stress to check for stability/reliability of the overclock and for temps and voltages. We use free software to enable this process, i.e. for stress testing, reporting and monitoring of temps and voltages. And . . . we know what are the safe limits for temps and voltages. Looks like you have the software tools installed already.

Since you don't have a CPU with an unlocked multiplier, you will need to use the main system bus frequency ("Front Side Bus" or "FSB") for overclocking. This is more complicated but certainly doable.

1. Start by lowering your memory frequency to the level just below what it is rated for, i.e. lower it to 1333 mhz. It will increase along with the FSB so we need to give it some headroom.

2. Next, lower the HT Link frequency. Stock is 2000 mhz so set it back to 1800 or from 10x to 9x.

3. Do the same with the CPU/NB frequency.

4. Give the CPU core voltage a .025 bump up from stock.

5. Disable Cool N Quiet, Turbo mode, C1E.

6. Start increasing the FSB in 5 mhz increments. After each increase, run a 20 minute Prime95 blend mode stress test with HWMonitor open on the background. If you pass the test (no blue screen, no spontaneous restart, no lockup, no Prime95 workers dropping out) then bump it up another 5 mhz. Repeat the process.

7. Watch "Core" temps and "TMPIN0" which I think is the socket temp. Keep core temps from exceeding 55-60c and socket temps from exceeding 60-65c.

8. Watch max "CPU vcore" in the voltage section of HWMonitor. For 24/7 usage I would not recommend running that higher than 1.5v.

9. When you first fail the Prime95 blend test, add another .025 to the CPU core voltage and resume testing, assuming temps are acceptable.

When you get stuck, repost with pics of HWMonitor taken from last stable settings and CPU-z tabs: "CPU", "Memory" and "SPD". Then we will advise further.

Posting pics of your bios overclocking sections would be invaluable in helping you identify the parameters I mention above that need changing. The terminology can vary tremendously from bios to bios. You can do a screen capture in bios with a flash drive and the F12 key but you will likely have to downsize the pics before uploading. "Irfanview" is great for this. Use "resample" tool.

What you need to do now is read the sticky: http://www.overclockers.com/forums/showthread.php?t=596023
 
Last edited:
TMPIN 0 is a concern a little. When I see a number that high with stock settings, it makes me wonder where the cooling needs to be placed? Is that NB or CPU temps.... from past experience that could very well be the cpu socket temp. It's too high even for a NB temp if that's what it is.

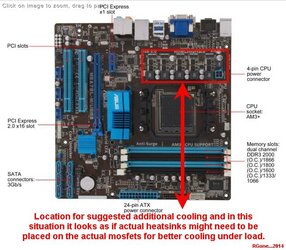
On this Asus M5A78L USB3, I would for sure cool the VRM package area just to the left of the cpu socket. Put a little fan on the VRMs to prevent thermal throttling.

Good point!
 
Good point!

TMPIN 0 is a concern a little. When I see a number that high with stock settings, it makes me wonder where the cooling needs to be placed? Is that NB or CPU temps.... from past experience that could very well be the cpu socket temp. It's too high even for a NB temp if that's what it is.

On this Asus M5A78L USB3, I would for sure cool the VRM package area just to the left of the cpu socket. Put a little fan on the VRMs to prevent thermal throttling.

Mmm... Maybe I'm too much of a noob here, but I might not be following. To the left of the socket (as locking from the side where the panel is plain) there are the RAM modules, which are cooled (as all the interior) by a 200mm fan in the front of the case. To cool it even further, I would need to get rid off the CD-drive and install an extra fan (as intake) from the upper part of the case, since the cooler for the CPU is only using a 120 fan gap (and I could put an extra 140 fan there).

Is that what you are suggesting? I have no issues removing the CD-drive, but then I would probably hold up until I get the 8350... I do not like to be constanly opening the case to make changes, I much rather prefer to do all of them in one take :shrug:
 
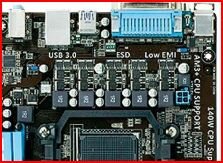
If you look at the first pic you posted the area he's talking about is to the right of the CPU cooler. you'll see some square chokes with caps in between them and two rows of small chips right beside that. This is the area that controls the power to the CPU and is getting warm according to you HWMonitor shot. If you can rig a fan up directly over them to blow some air accross them it'll help bring that temp down.

asus m5a78.JPG
 
If you look at the first pic you posted the area he's talking about is to the right of the CPU cooler. you'll see some square chokes with caps in between them and two rows of small chips right beside that. This is the area that controls the power to the CPU and is getting warm according to you HWMonitor shot. If you can rig a fan up directly over them to blow some airaccross them it'll help bring that temp down.

OK, I was wrong :shock: Well then, using the mounts I have already I would think the quickest way would be to move the CPU rad and fan to the other mounting point (removing the CD-drive) and getting a fan to push fresh air in that area... Another possibility would be to change the exhaust fan, that to be honest is quite s***ty (it only spins at 500 RPM, which is not enough to get the air out - for sure).

Either way, I need to get a new fan for that, as the previous rig (prebuild by Packard Bell :rain: ) had no fans that I could use now...
 
I would suggest using a standalone fan help with two sided tape or cable ties. That blows directly on that area like this. Iknow our set-up isn't the same but this will give you the idea.

P1230010.JPG
 
I would suggest using a standalone fan help with two sided tape or cable ties. That blows directly on that area like this. Iknow our set-up isn't the same but this will give you the idea.

View attachment 146504

...Graphic image for clarity.
RGone...

View attachment 146503

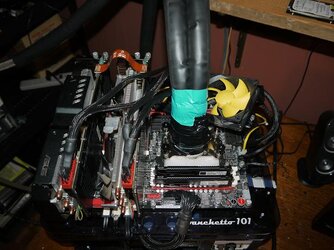
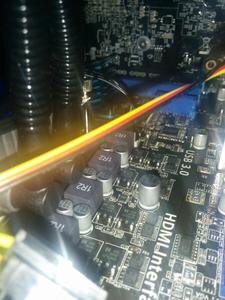
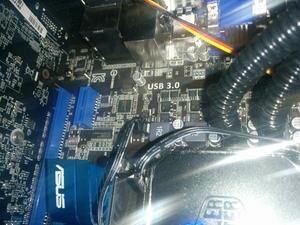
Thanks for indicating me :) Well, could it be that the temps there are a bit high because the tubes of the CPU cooler start from there? Let me get a picture to show:

CXw8gQx.jpg
Q3EBuyv.jpg

As it is now, pushing a fan there seems quite difficult... Would you think changing the exhaust fan (just over it) would be enough?

I'm sorry if I'm being a bit slow picking up things, but it spended a good amount of my money in this rig and I would not like it to be harmed by me pushing the processor or anything way too much.
 
I tried switching the exhaust fan myself , I even used a dryer vent to try to redirect air to that area with poor results. You can use small fans like the one on the stock heatsink. That's the problem with the AIO coolers. An air cooler would have a couple fans that blow some air across there , where thw AIOs have nothing.
 
I tried switching the exhaust fan myself , I even used a dryer vent to try to redirect air to that area with poor results. You can use small fans like the one on the stock heatsink. That's the problem with the AIO coolers. An air cooler would have a couple fans that blow some air across there , where thw AIOs have nothing.

Well, I will try with the route of the exhaust fan first, see if it works better... If not, I will try to see what I can do, but if temps are too high in the area already, there is not enough space to fit a fan there (it would hit the exhaust fan and I'm planning on moving it from time to time to LAN parties, so it does not seem feasible to mount an extra fan there).

I think I'll wait to see what an AF140 Quiet Edition fan can do as exhaust, and if nothing changes I guess I'll admit that overclocking seems quite difficult in this case :-/
 
It seems to me the best approach would be to reinstall the water cooler's pump/head but this time rotate it so the hoses are on another side of the socket. Then you will have room to mount some kind of spot fan to blow directly on the VRM area. You might be able to even use the cooler mount screws as something to fasten the fan to with zip ties or twisty ties or the like. A large rubber band might fit around it and and the pump housing so as to snug the fan against the pump housing. Of course, you would need to redo the TIM if you remove the pump.
 
Last edited:
It seems to me the best approach would be to reinstall the water cooler's pump/head but this time rotate it so the hoses are on another side of the socket. Then you will have room to mount some kind of spot fan to blow directly on the VRM area. You might be able to even use the cooler mount screws as something to fasten the fan to with zip ties or twisty ties or the like. A large rubber band might fit around it and and the pump housing so as to snug the fan against the pump housing. Of course, you would need to redo the TIM if you remove the pump.

Well, I just got in Amazon and ordered an AF140 Quiet Edition LED fan as exhaust for the case. Once I get it, I will try to see if the temps get any better (should do, is 20mm larger and spins at 700 rpm more than the fan mounted now). If the improvement is not enough, I will try to rework the CPU cooler so the tubs get up to the rad from the other side... I may also switch the rad orientation so the tubes do not have that much pressure.

If this fails, I will reuse the fan I'm taking out and use as you suggest. I have a few zip ties around, so fixing it against the case or the CPU cooler should not be that big of an issue :)

Now it's time to wait... Hope that new fan comes in very shortly :D
 
I doubt if changing the case fan will have much if any effect to speak of on VRM temps, especially since their is no heat sink on that component. Cooling that are will require a fan mounted very close to the components themselves.
 
Hopefully it will do... I mean, if you look at the very first post in the first photo I posted of my PC you can see the exhaust fan is just above the VRM units.

If not, I will try to fit the current exhaust fan over the VRM (once I have changed the CPU cooler to the new placement) or maybe but a small 80mm fan to fit there. But first I need to get the new fan and see what it can do.
 
Last edited:
I doubt if changing the case fan will have much if any effect to speak of on VRM temps, especially since their is no heat sink on that component. Cooling that are will require a fan mounted very close to the components themselves.

I think in truth what "trents" is saying is that swapping the rear case fan will not have an effect one way or the other really. I had water block cooling for a good while on my CHV board and had a 90mm fan blowing on my VRM area the whole time with good results even with the 90mm blowing on a pretty good heatsink. ONLY when I went to a 'huge' air cooler, could I remove the fan over the VRM sinks. Nothing but actual air blowing on the VRM area does any real good.

So you might spend your time better by turning the waterblock/hoses and when the new rear fan comes, be ready to take the original rear fan and mount over the VRM area. That will have some helpful effect on the VRMs.
RGone...
 
Hopefully it will do... I mean, if you look at the very first post in the first photo I posted of my PC you can see the exhaust fan is just above the VRM units.

If not, I will try to fit the current exhaust fan over the VRM (once I have changed the CPU cooler to the new placement) or maybe but a small 80mm fan to fit there. But first I need to get the new fan and see what it can do.

A small fan 60mm or something of the like would be plenty, put it right on top of those VRMs blowing down onto them. Sucking heat off won't help that much, you will also notice a drop in socket temps as well being the PCB around the cpu socket is going to receive some cooling.

The stock cpu fan that came with the processor (80mm) might just do the trick without the need to purchase a new one.... just a thought. Usually how I roll.

Plug that fan into the cpu fan socket and go into bios and disable the Qfan stuff and it will run the fan at full throttle.

GLHF!! :thup:

Mmm... I think I see a problem there, as if I unplug the CPU fan socket the fan on the rad will stop working... Anyway, I do still have the CPU fan from the old computer around, it's a bit smaller than the rear, but I would need an adaptor from 4 pin to molex or something like that to run it.

BTW, the new fan as an exhaust is a planned upgrade since the one provided by Aerocool is not powerful enough + the noise level is OK, but only OK :)
 
Back