• Welcome to Overclockers Forums! Join us to reply in threads, receive reduced ads, and to customize your site experience!

Overclock fx 8350 using asus sabertooth r2

Overclockers is supported by our readers. When you click a link to make a purchase, we may earn a commission. Learn More.
ok so i set my target cpu speed to 4.5 and increased the cpu voltage to 1.4 and loaded into windows,and went back into bios and lowered voltage 3 x - a time in bios with each visit until windows would no longer load, then increased the voltage by + 1 untill it loaded so i believe i have found the stable voltage for windows to idle.... I shall be stress testing next to make sure no cores fail and increasing voltage by 3 x + untill i can pass prime 95 for atleast 30 mins, If im not being clear with increases im using the + and - keys hopefully im on the right track
I'm confused,"not hard to do", why are you lowering the voltage at 4.5 Ghz. Is the goal to see what the lowest voltage you can run at 4.5 Ghz stable?
 
it states in that guide from your first post or have i read it wrong?


#2 Decrease that high Vcore until you fail to POST(get into the BIOS). Try 3 voltage steps lower at a time, so from 1.45v down to 1.3v, and then go one step after that. Keep going until you fail to POST. Then get back into the BIOS, as the GIGABYTE boards have auto OC recovery and it works pretty well. Set your vcore 2-3 notches higher. So if you went down to 1.2v and it failed now push back up to like 1.24v or something.

Thats where im at from the guide....Also what do you mean 'not hard to do'?
 
I'm confused,"not hard to do"
Not hard to confuse me.

Sorry Kevin I had been overclocking for a while, before I jumped to the Fx platform so I have actually never really gone in depth reading that guide. We all have our own ways of doing things but overall there isn't any real right way to do it. I see what the guide is trying to achieve, after re-reading it and it's a good way to start out. The purpose of doing the Oc that way is trying to see what the lowest voltage the Cpu will run at "stable" with the clock speed set at 4.5 Ghz. It's actually a really good idea, to get a known stable point to start off at. This way when trying to push forward, when you lose your way, which will usually happen when really trying to push, you have a known stable point that you can just revert back to and start over again. A suggestion, while doing your Ocing, is to take notes on all your changes.
 
You're on the right track Kevin. Is that SS of the actual voltage you have set now? Either way you'll need a bit more voltage than what you described. Starting windows and running P95 blend are two totally different beasts. I would have left it at 1.4 and see if it passes there for 20 minutes myself . Check temps etc. and if successful I would up the multi again.
 
yes im screen shoting all changes and double reading everything before i make any changes...Im suprised a man of your knowledge is so easily confused lol BUT i bet you got alot going on
 
yes that screen shot is of the lowest voltage just to get me into windows and im aware p95 is far different from just running windows....im just following the guide exactly as i see it :) so from what ive gatherd il be upping voltage untill prime is stable for 20-30 minz
 
You're on the right track Kevin, the most important aspect of Overclocking is learning to have patience and taking it slow, which you seem to be doing. :thup:

BTW easily confused and high knowledge have nothing to do with one another, just ask my wife or Johan, he he. :D
 
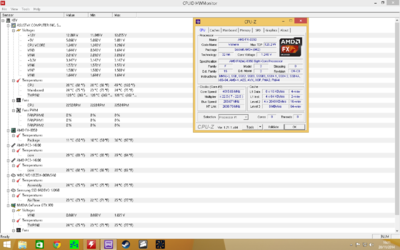
Upped voltage until i was able to complete a 30 min run of p95 (screenshot of temp results etc after the 30 mins) The next part is where it gets daunting for me because alot of different changes have to be made to fine tune..... Does everything look ok so far or do you guys see something that could be adjusted before moving on?

#4 get into windows and run a stress testing suite for about 30mins with every core being loaded to the max. if you pass, restart and go into the BIOS. Now you want to tune the finer things, and increase the host clock(HTT/FSB). So lower the multiplier of the CPU, and increase the host clock, something like 230mhz to 250mhz is a good point to start. At this point the CPU-NB multiplier needs to be changed, please make sure it’s under 2.7ghz. At this time HT multiplier needs to be changed as well. Also your DRAM multiplier needs to be changed.
 

Attachments

  • Stable 30 mins.png
    Stable 30 mins.png
    42.8 KB · Views: 124
Kevin it's not as daunting as it may seem, when changing the Cpu Ratio/Fsb take into account the other Frequency's you're changing. The Dram, Nb Freq and Ht Link. I see your Ht Link speed is 2600 now, what are you running the Ram and NB at? All you really need to do for now is eliminate them from causing instability, lower each multiplier by one then raise the FSB. If you're going to start with the FSB at 230 just make sure the other frequency's arent higher then they were when you stressed and passed the 30 minutes of prime. Essentially you are seeing how well the Cpu will Oc using the FSB and trying to eliminate instability caused by other factors, such as the Ht Link, NB Freq and Dram.
 
Ram and nb are still on auto,I havnt got into those yet as I'm actually still trying to make sense of what I've got to do. I'm holding back for a min till I'm (hopefully) a bit more sure on what's going on...
 
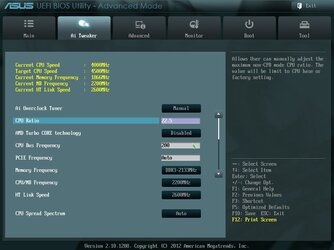
To try and give you a better understanding I'll try and be more specific. The frequency of the processor, memory, north bridge and Ht Link are all tied to the FSB. The FSB can also be called the Cpu Ratio or reference clock. There are two components that make up the actual speed of all of these. The FSB and the multiplier, for example the for the cpu you have it set at 22.5 on the multiplier and 200 on the FSB. Which gives you the 4500 Mhz clock speed seen in the SS above. The FSB is also tied to the Speed of the Ht Link which is at 2600 so 2600Mhz /200 FSB = 13 multiplier. Not sure what the Nb is set at but if its stock it would be 2200 so 2200/ 200FSB = 11. The ram is multiplier is a bit more complicated it's actually called a divider, which gets a little complicated to explain. If using the cpu mutiplier to OC you do not change any of the other ratios because it's only tied to the Cpu. That said if using the FSB it changes everything it's tied to. So if you raise the FSB to 205mhz you will be raising the other frequencies 205 X the multiplier they are at. So for instance the HT Link will now be at 2665. When we Oc we try to change only one thing at a time to limit what wan be causing instability. That is why when trying to OC using the FSB you should drop the multipliers on the other Frequency. Does that help?
 
And fine tuning is not raising the FSB to 230 as I read written somewhere above. Raising FSB to maybe 204 to 207 is getting a little extra speed out of the other three busses that "mandrake" referred to or about. All fine tuning is done in mini-steps to not go wild and create a faiing that is unexpected. Not a killing but a failing to run as expected.
RGone...
 
The ram is multiplier is a bit more complicated it's actually called a divider, which gets a little complicated to explain.

Not really once you understand how they work. :D

RAM at stock or default settings will run at a 1:1 ratio with the NB. A divider is used sets up a ratio difference between your RAM and NB speeds, reason why is your RAM will top out in MHz well before your NB will in most cases.
Let's say for example your RAM has a limit of 250 MHz, if using the stock/default divider your RAM and NB speeds will be the same up until you reach your RAM's limit, stopping you from clocking higher. This would be with a NB speed setting of 250 and you can't go any higher because your RAM has topped out - So what now?

Well, like you do in a car when the engine has revved to it's limit, change gears! :screwy:
Think of your RAM in this case as the engine, your dividers as the gears in your transmission with your NB speeds themselves represented as the actual MPH your car is running at.

OK - To continue raising your speed, you must change gears to get your RAM back to an acceptable speed range (RPM) to continue the process of going faster overall. Think of your stock divider setting as 1st gear so now it's time to hit 2nd, in this case it's represented by the 166MHz divider setting.

This will drop your RAM speed by 34MHz to a speed of 216MHz for the RAM while your NB is still at 250MHz. Note that when a divider is used, the difference in speed remains consistant so with a 166 divider, your RAM will always be 34MHz slower than your NB will be. This means the next time you'd need to drop your RAM divider would be at 284MHz for your NB speed since that's when your RAM will hit 250 (284 minus 34 = 250). You can then use another, lower divider such as the 133 divider. This will then place your RAM speed at 67MHz below what your NB would run, again this difference in MHz being consistant. You'd then be able to raise the NB speed up to 317MHz before your RAM hit 250 (317 minus 67 = 250)
This numerical difference is always consistant regardless of divider used since RAM dividers are based on a 1:1 ratio (200MHz NB : 200MHz RAM).

You can do simple math to see where you'd be running your RAM at with any divider used and know how fast it will run with any given NB speed by simply subtracting the MHz difference based on the RAM divider used.
Where your RAM tops out of course is the variable but regardless of that, this ratio with each divider used remains true. ;)
 
Wow thanks guys for the explanations and it did help make things a little clearer in my head but alot of that went way over my head lol so much infact i feel i have hit a brick wall in my next move :bang head lol ive printed out the guide as well as some of these comments and im going to have to sit down and go over it again and again before my next changes :) Appreciate your help so far guys
 
I wonder if my oc profile would work on the R2 version of that board, I have sent the file to a friend and it worked like a charm but not sure how diff the rev 2 boards are. anyway I've had 3 diff 8350 chips and all of them went 4.5 with 1.368v plus the high LLC which brings it at 1.39v. I've found that with all 3 chips the jump in vcore to go higher was too much to make it worth while even with my h100.
 
Wow thanks guys for the explanations and it did help make things a little clearer in my head but alot of that went way over my head lol so much infact i feel i have hit a brick wall in my next move :bang head lol ive printed out the guide as well as some of these comments and im going to have to sit down and go over it again and again before my next changes :) Appreciate your help so far guys
Kevin if you are confused in any way just, let us know what is confusing you. We have all been in your shoes at one time and understand it can be a bit overwhelming at first. You may want to start out by just using the multiplier to Oc at first until you are a bit more comfortable Ocing it. If using the Multiplier you only have to worry about the multi and the Cpu Voltage as everything else stays static when using the Cpu Multiplier. After you become a bit more comfortable you can try using the FSB to Oc and or fine tune your Oc.


@{PGA}AfterShock
I wonder if my oc profile would work on the R2 version of that board, I have sent the file to a friend and it worked like a charm but not sure how diff the rev 2 boards are. anyway I've had 3 diff 8350 chips and all of them went 4.5 with 1.368v plus the high LLC which brings it at 1.39v. I've found that with all 3 chips the jump in vcore to go higher was too much to make it worth while even with my h100.
Sure plug and play numbers may work but the idea is having the OP learn how to OC his system to its optimum. That way if issues arise the OP is comfortable making changes accordingly. I could also give the OP my setting and even if they work it doesn't mean they are optimal for the system. Johan, Rgone and I have the same Cpu/Motherboard setups and all three of our rigs need different voltage to run at X Ghz. So I could say set the FSB at X the Multi at X and the Voltage at X and it may work but it may also run at those clock speeds at significantly less voltage.
 
I hear that "manny"...

...
manny said:
Rgone and I have the same Cpu/Motherboard setups and all three of our rigs need different voltage to run at X Ghz.

One is lucky and has three cpus that used the same Vcore to do X speed and I have 3 cpus that all take different Vcore on the same board and bios and ram and cooler and well you get my idea.
RGone...ster.
 
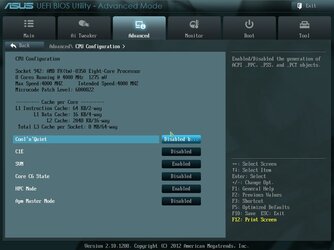
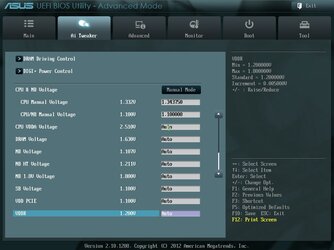
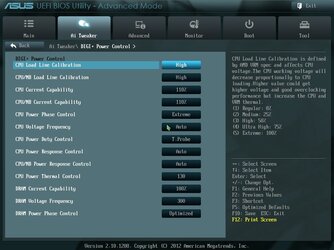
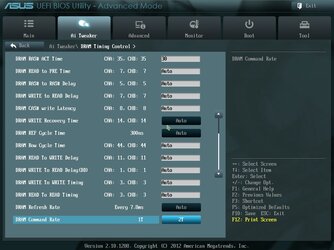
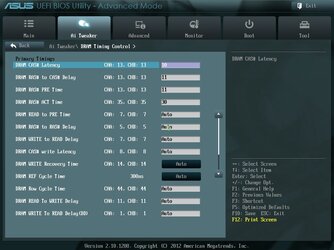
Yes mandrake im going to stick with just using the multiplyer for now and go back to it when im a bit more comfortable :) its just too much too soon for me and im getting overwhelmed....il post up a few screenshots now so you guys can see where im at and if you notice any little changes i should make to possibly improve things or atleast look into, im currently at 4.5 by cpu ratio 22.5 and at 1.3 volts,i manually set my ram to 2133 and set timings to 10-11-11-30 trc 44 and cr @ 2 as what was stated in one of the first posts..im happy at 4.5 as it seems to be a good oc as to not cause too much stress and degrade the cpu too quickly
 
screenshots
 

Attachments

  • 141121181834.jpg
    141121181834.jpg
    125.5 KB · Views: 103
  • 141121180722.jpg
    141121180722.jpg
    111.8 KB · Views: 107
  • 141121180552.jpg
    141121180552.jpg
    110 KB · Views: 107
more screenshots
 

Attachments

  • 141121190648.jpg
    141121190648.jpg
    109.6 KB · Views: 104
  • 141121182909.jpg
    141121182909.jpg
    135.3 KB · Views: 102
  • 141121181845.jpg
    141121181845.jpg
    124 KB · Views: 106
Back