• Welcome to Overclockers Forums! Join us to reply in threads, receive reduced ads, and to customize your site experience!
Revamp and upgrade: old school style

Overclockers is supported by our readers. When you click a link to make a purchase, we may earn a commission. Learn More.
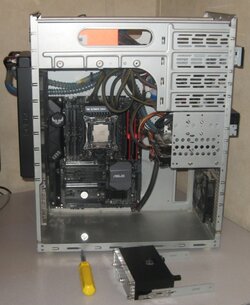
New motherboard is installed. I got mixed up with the RAM configuration. There are two diagrams in the manual, the first one is for 6 core and above. I accidently used that when I first installed the RAM. According to the diagram for 4 core processors, if you have two sticks, it's recommended to use DIMM C1 and D1 (assuming I'm reading this correctly).. Does anyone else have this board? Please double check for me, I don't fully understand. I know anything less than 6 cores is dual channel and 6 cores and above allows quad channel.

I guess a photo is in order.

Asus TUF X299 Mark II installed.jpg

Radiator is cleaned and reinstalled. I scrubbed the waterblock, but can't install it until I get a conversion kit. The new bay reservoir is fighting me. I've wasted a couple of hours trying to get the slider rails to work, but the holes were drilled incorrectly on the reservoir or something. I might get a different one or just clean the old one and mount it in a different spot.

I painted the monitor stand / keyboard tray to match the computer. It was a lot of work to disassemble, clean, sand, and paint it, but it looks nice.

Got a lot done today, but it was a lot of tedious cleaning and sanding, not to mention wasting time trying to make a round peg fit into a square hole.
 
Last edited:
Are you going to be delidding this chip ?
Think I'll initially see how far it'll go with the lHS intact. If I feel it needs delidded, then I'll do it. I examined the CPU with a 10X loupe and it looks nicely sealed. I could see a tiny bead of gray TIM all the way around the IHS.
 
I want to get my water loop put back together and test for leaks before installing drives and vid card (in case it does leak). I checked on my order and somehow my order for the waterblock mounting kit and several feet of flex hose had evaporated into cyber space. I cancelled and found another vendor that had the mounting kit. I ordered it with expedited shipping.

More good news, feeling fresh from a good night's sleep, I messed around for an hour this morning on the bay reservoir. I used a drill and elongated the mounting holes in the slider strips to allow more adjustment. I went through my vast collection of computer screws. I used the lowest profile head I could find and then used my Dremel tool to grind the screw heads down a bit more. Success! The Bitspower bay reservoir is now officially installed. Happy, happy, joy, joy!

Since my shipment of new tubing has vanished (was in the same order as the mounting kit), I decided to just use the old hoses for the time being. So, I flushed them out as good as I could using distilled water with a little bleach added to kill algae and bacteria. I can always revamp the loop hoses at a later time. [NOTE: I would not use bleach in the loop if you have new hoses, because this can leave a little cloudiness on the inside.
 
Last edited:
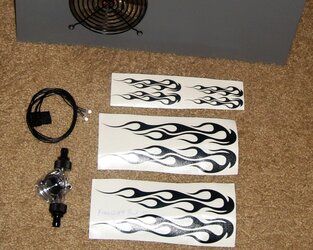
Look what arrived this morning... black hotrod flames. They gave me a couple extra and wrote "Free gift, thank you." Sweet! Two blue LED lights also arrived, they go into the reservoir. I put the Bitspower flow sensor in the photo because it's going back into the build. I found a place for it and it also helps with a length of hose that is a bit short.

flames delivered.jpg

Now I got to figure out how to place them.
 
Vertical flames? Different. I'm still leaning horizontal flames though.

UPDATE: Water loop is back together. I filled it and burped it. I'll let it run all evening to conduct a longer term leak test. That one order or rather non-order, messed me up a little, but that's ok, gives me more time to play with my toys.

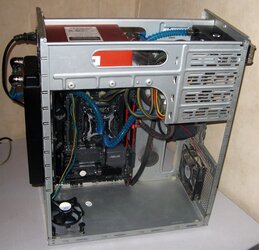
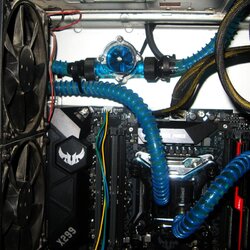
Here's a photo of the leak test in progress. This basic, no-frills, Water loop is old school, no doubt. If you're wondering why there's an Intel cooler sitting in the bottom of my case and it's plugged in to the motherboard. Just makes it easier to boot up and get into the BIOS, because with a waterblock of course, you don't have a fan. Most times it's set by default in the BIOS to shut down if the CPU fan stops.
water loop leak test.jpg
 
Vertical flames? Different. I'm still leaning horizontal flames though.

UPDATE: Water loop is back together. I filled it and burped it. I'll let it run all evening to conduct a longer term leak test. That one order or rather non-order, messed me up a little, but that's ok, gives me more time to play with my toys.

Here's a photo of the leak test in progress. This basic, no-frills, Water loop is old school, no doubt. If you're wondering why there's an Intel cooler sitting in the bottom of my case and it's plugged in to the motherboard. Just makes it easier to boot up and get into the BIOS, because with a waterblock of course, you don't have a fan. Most times it's set by default in the BIOS to shut down if the CPU fan stops.

You can disable that in the bios now =)
 
I forgot to post the close-up of the flow indicator. I had decided not to use it, but now with no extra flex hose, I was two inches shy because of the new bay reservoir location. The flow sensor is about three inches long... perfect. I zip tied it up in the upper left side of the case. It has a little impellor that spins to indicate flow. The sensor connects via a 3-pin wire to a motherboard fan header. The BIOS will think the signal is RPM and you can set an alarm to go off if flow drops below a certain point or if the pump stops, you can have the BIOS shutdown the system.

Bitspower flow indicator - sensor.jpg
 
You can disable that in the bios now =)
Do they let you into the BIOS without a fan running on the CPU fan header nowadays? In the past, admittedly it's been 7 years since last time I changed a motherboard, I had to put a fan on it to even get into the BIOS to turn it off.
 
Nope. Don't need a cpu fan connected to the header to get into the bios with these new boards. You can even disable the CPU fan header's alarm.
 
NOTE: I'm waiting on a mounting kit that adapts my CPU waterblock to this socket. Tracking says it's on the way, but might not get here until Monday (Aug 21).

The leak test was a success: no leaks. I let the loop run for 8 hours and worked all the air pockets out. The watercooling loop is fully operational.

I'm working on wire management this morning.

attachment.php


I bought a pair of 5mm LED lights, but they just fall out of the hole made for them (rear of bay reservoir). Being an old school guy, I stuck a little piece of duct tape onto the LED wire to hold it in place. I could put a tiny squirt of silicone in the hole and push the LED in, but that's semi-permanent.

Windows 7 vs. Windows 10?

The Blu-Ray burner was delivered.

Yippee!
 
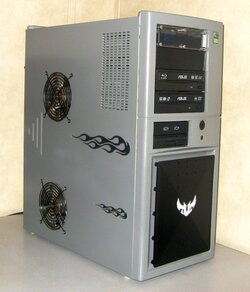
Flames, take 1.

Flames take 1.jpg

I'm disappointed. Basically, it's just vinyl stick-on sheets you run through the printer. They were also smaller than I thought. I'll buy some of that vinyl print on stuff and make my own. I think if I used a razor blade and cut the whole thing out it'll look better too. I'm determined to follow through, but it's going to be more work than I originally thought, pretty much like this whole project has been from the start.

I did get the Blu-Ray burning installed. Double layer media can now hold up to 50 GB.

What about that white TUF sticker in the black area on the front panel? I kind of like it, because it's the motherboard motif, but it's too white and too big. If it was gray and half the size, it would be ok. Right?
 
I'd definitely go Win10.

Yeah those flames aren't quite doing the job. Small ones at the back of the fans would look kind of cool.
 
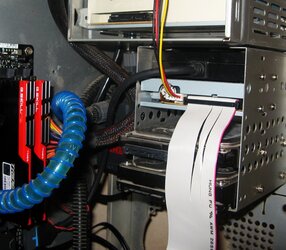
I'm connecting up all the drives. You don't think I'd leave the floppy drive disconnected, did you? Actual power supply flat plug that the floppy drives used for power and an old fashion ribbon cable for data transfer. I'll tuck it out of the way. I'd almost forgot about those ribbon cables. The harddrives used larger IDE ribbons and you'd have like 3 of those things in you case going every which way blocking air flow like crazy.

Floppy drive connected.jpg
 
Last edited:
Yeah go Win10. I had thought the flames were alot bigger. That TUF logo looks horrid in white. Maybe getting a grey sharpie on it?

What, no compressed air available? :facepalm:
 
Yea one of the drawbacks with old cases is no dust filters. Could possibly rig up some custom ones.
 
Back