- Joined
- May 15, 2013
- Location
- Alberta, Canada
Well guys, I managed to finally have the time to sit down and complete phase one of my watercooling build. Phase two is being held up by money but thats ok since it gives me time to reflect on my current build and how to better it.
Parts are as follows:
CPU Waterblock EK Supremacy nickle plated seethru acrylic. Its a waterblock..Nothing to see here.. move along
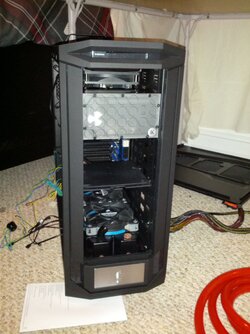
Swiftech 140mm single rad on the back of the case. This was a learning experience since 140mm fan allowance doesn't mean 140mm radiator allowance. I had to mount it on the back of the case with a 140 to 120mm fan adapter. The fan squished in there is one of my reliable Noctua nf p12 1300.
Top of case is a swiftech 140mm dual radiator. This also took a little bit of work as the first time I mounted my fans I used two different kinds. One of them was thicker than the other by about 3mm. This interfered with the 4 pin power to the motherboard in the upper left corner. Switch fan places and I had enough room to make it work.. Again tight fit.
Bottom of case is a swiftech 120mm dual radiator sandwiched with push pull Cougar Vortex fans. This was the easiest to get in as there is lots of wiggle room down below but does not fit a 140mmX2.( I checked first)
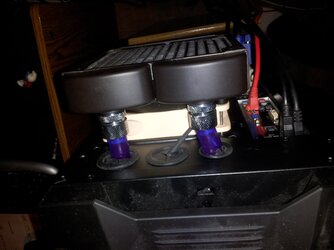
Res is a swiftech maelstrom with built in thermometer standalone unit.
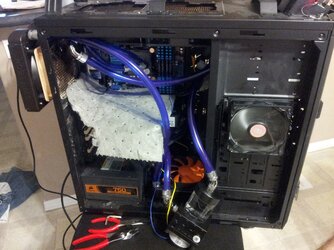
Pump is a D5 dazmode storm(or rebranded swiftech 655) Variable speed. I managed to get a really good deal on an aftermarket EK top but it included a X-res 100. Meh.. got the second res for cheaper than if I would have just gotten the top. This thing proved the biggest pain in my ***. It might have just been a manufacturing defect but I couldn't get my inlet tight enough causing a leak. I tried switching fittings but it kept leaking. Finally took plier to it and firmly made it submit to my will. This is why one of the photos shows the pump sitting outside the case. Just to clarify the size of a D5. Make a fist... Thats your pump.. Add a res on top of it and two fists.. I spent a few hours trying to find a spot to put this. Ended up switching my drive bays around and rotating one of them to make a "secret compartment" that I could hide the pump in. The second res is sideways but it sits nicely out of the way just above my bottom rad and getting airflow to remotely provide a bit of heat reduction. I attached it with some velcro strips I had kicking around to keep the pump in place and to help with vibration issues. I can stop the fan at the front of the case to adjust the speed of the pump with a screwdriver at any time.
All this was done without drilling a hole or modifying the case in any way.
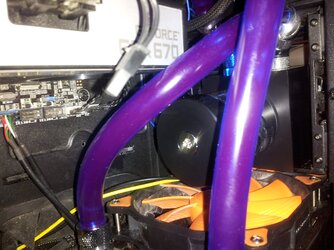
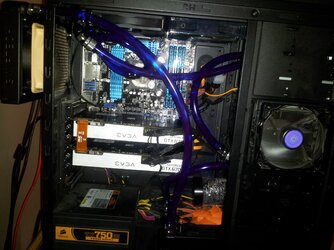
Phase two will take the long tubing that runs through the middle of my case and connect it to the two videocards you see in the picture. I left it long on purpose to allow the reuse of the tubing. I will also run a drainage tube from the top(now side) of the ek res to the back of the case and out one of the pci holder slots. I will also adjust the maelstrom water outlet. I have it in the middle and I find it creates too much vortex and eddy against the front of the display. Moving it to the side directly behind the temperature sensor will allow more distance from the intake and make bleeding the bubbles out of the system faster.
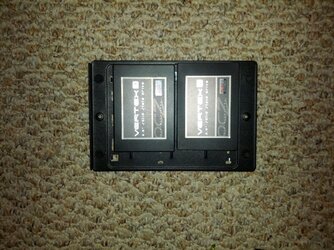
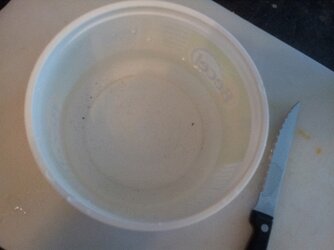
Oh and a side note for all the people out there that don't shake your radiators I have included a picture of what came out of my one radiator after 3 minutes of shaking. The first time.
Thanks for the advice to build this and hope for some suggestions from the forums..
Parts are as follows:
CPU Waterblock EK Supremacy nickle plated seethru acrylic. Its a waterblock..Nothing to see here.. move along
Swiftech 140mm single rad on the back of the case. This was a learning experience since 140mm fan allowance doesn't mean 140mm radiator allowance. I had to mount it on the back of the case with a 140 to 120mm fan adapter. The fan squished in there is one of my reliable Noctua nf p12 1300.
Top of case is a swiftech 140mm dual radiator. This also took a little bit of work as the first time I mounted my fans I used two different kinds. One of them was thicker than the other by about 3mm. This interfered with the 4 pin power to the motherboard in the upper left corner. Switch fan places and I had enough room to make it work.. Again tight fit.
Bottom of case is a swiftech 120mm dual radiator sandwiched with push pull Cougar Vortex fans. This was the easiest to get in as there is lots of wiggle room down below but does not fit a 140mmX2.( I checked first)
Res is a swiftech maelstrom with built in thermometer standalone unit.
Pump is a D5 dazmode storm(or rebranded swiftech 655) Variable speed. I managed to get a really good deal on an aftermarket EK top but it included a X-res 100. Meh.. got the second res for cheaper than if I would have just gotten the top. This thing proved the biggest pain in my ***. It might have just been a manufacturing defect but I couldn't get my inlet tight enough causing a leak. I tried switching fittings but it kept leaking. Finally took plier to it and firmly made it submit to my will. This is why one of the photos shows the pump sitting outside the case. Just to clarify the size of a D5. Make a fist... Thats your pump.. Add a res on top of it and two fists.. I spent a few hours trying to find a spot to put this. Ended up switching my drive bays around and rotating one of them to make a "secret compartment" that I could hide the pump in. The second res is sideways but it sits nicely out of the way just above my bottom rad and getting airflow to remotely provide a bit of heat reduction. I attached it with some velcro strips I had kicking around to keep the pump in place and to help with vibration issues. I can stop the fan at the front of the case to adjust the speed of the pump with a screwdriver at any time.
All this was done without drilling a hole or modifying the case in any way.
Phase two will take the long tubing that runs through the middle of my case and connect it to the two videocards you see in the picture. I left it long on purpose to allow the reuse of the tubing. I will also run a drainage tube from the top(now side) of the ek res to the back of the case and out one of the pci holder slots. I will also adjust the maelstrom water outlet. I have it in the middle and I find it creates too much vortex and eddy against the front of the display. Moving it to the side directly behind the temperature sensor will allow more distance from the intake and make bleeding the bubbles out of the system faster.
Oh and a side note for all the people out there that don't shake your radiators I have included a picture of what came out of my one radiator after 3 minutes of shaking. The first time.
Thanks for the advice to build this and hope for some suggestions from the forums..
Attachments
Last edited: