• Welcome to Overclockers Forums! Join us to reply in threads, receive reduced ads, and to customize your site experience!

Where to start with this FX-8120!!!

Overclockers is supported by our readers. When you click a link to make a purchase, we may earn a commission. Learn More.
ahh, it only happens on occasions where the fan speed will read 8k+ rpms. The 2 on my cpu heatsink stay at 2.8k rpms for the pull and 3.3k rpms for the push.

One quick question. Right now I have it so the air is blown directly out the back where there is a 120mm fan blowing air out the case. I also have 120mm fan blowing air out the top of the case. Cut the hole myself and mounted it. Would it be better to have my push/pull config blowing air up or sideways out the back?
 
I think I would leave it like it is. I'm not a big fan of push fans on the side panel because they can disrupt the overall air flow which should be from front low to back high. Do you have a push fan in the front panel at the bottom? That's always a good idea.

I have some experience with that CPU cooler or rather with that cooler sold under the Rocketfish brand name (Rocketfish is the Best Buy store brand name). How you apply the TIM can make a big difference in how well it cools. Since the bottom of it isn't machined particularly well, employing the "pea-sized blob in the middle" may not be effective since the ridges and valleys between the copper pipes embedded in the base may prevent the spread of the TIM. I found that if I spread a skinny bead of TIM along the length of each copper pipe bottom it works better and significantly improves the performance. Just a thought.
 
Well, I'd like to apologize, as I didn't read the whole thread...

The Hyper TX3 won't do the the job. You need something beefier: a NH-D14 will take you to 4.4/4.5GHz, a H100 to 4.5/4.6GHz, and if you want to go further, you need a custom loop with a 360 rad for the CPU only...
 
So I changed my multi to 18. Left everything else stock, except for having the RAM set to 1600mhz and voltages on manual.

3.6ghz @ 1.26v

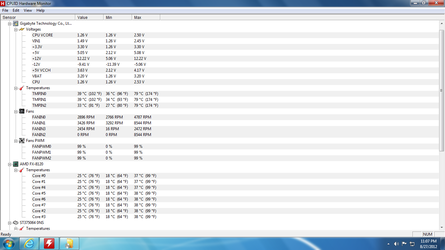
Idle SS:
QQL3H.png

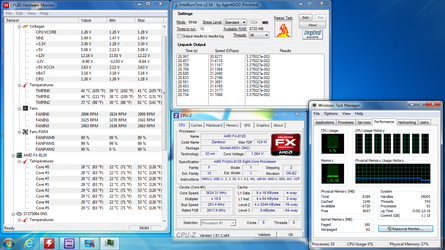
As you can see my Cpu socket temp is sitting at 31c but jumps to 45c every 15-20 seconds. When it goes up and comes back down to 31c its instant. Not a gradual drop in temp. Same thing with the cpu core temps. Hovering at 22c but jumps to 36c for a split second every 15-20 seconds. I have all the Cool n quiet and stuff like that disabled.

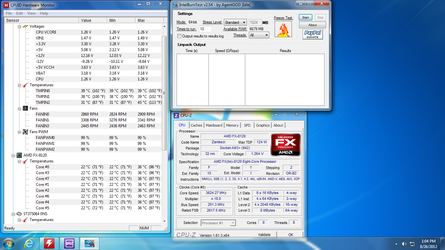
Full run of Intel Burn Test:
u6zzm.png

During the duration the cpu socket temp was hovering around 54c but would jump to 61c for a split second. Same thing goes for cpu core temps, hovered around 47c then jumped to 53c then back down in the matter of 1 second.

I'm just gonna go ahead and grab the new case, psu and water cooling kit. I would like to build a custom loop but this will be my very first water cooling kit and I have not a clue dubya tee ff i'm doing.

If anyone is near the Martinsville, VA area and knows how to build a custom loop then I'd be glad to invest some money into it for parts and labor. I would like to have the ability to put my future Single GPU in the loop when that time comes. Not worried about having water cooling on these 550's. Top one is around 63ish and bottom at 57ish under load and I'm not gonna OC them anymore than what they came as.

Iv got water cooling but iv had to move it away from the heatsinks and vrms and now i have cool air on them im at 3.4 ghz 1.2 v 17c idle 32c full load prime95 anything above that it kicks my internet off its very strange
 
Well, I'd like to apologize, as I didn't read the whole thread...

The Hyper TX3 won't do the the job. You need something beefier: a NH-D14 will take you to 4.4/4.5GHz, a H100 to 4.5/4.6GHz, and if you want to go further, you need a custom loop with a 360 rad for the CPU only...

Oh, yeah! That completely escaped my attention. No, the hyper TX3 will never do for an FX 8 core no matter how well you spread the paste.
 
amd overdrive is very good as a monitor, just never click the green dot and invoke the red ring around it.
I am thinking you might have a flaky temp probe on the board if overdrive shows the same big spike.
 
HyperTX3 with 1090T

Used this same cooler for 1090t at 4 Ghz.
i thought it was nice since temps dropped around 10 deg Celsius on load...BUT on touching it...it was red hot!!
The dual silent fans that i attached to this cooler were like jet engines.... deafening!:mad:

Got a IFX 14 dual tower cooler with 2 CM 63 cfm fans for it at same price and splotted arctic silver 5 ...cause the vendor wanted to get rid of these.

Slapped my forehead after realising ..... on medium usage never went above 32celsius and on full load @ 4.2 Ghz 50celsius.:rock:
 
What I usually do is fill in the gaps with TIM, then use my gamestop keychain card and spread the TIM against the grain. I know this thing isn't really meant for cooling the FX. I had a small, barely bigger than 6 inch width HP case before and thats the best one at the time to buy for the size of my case. It did wonders cooling my Athlon II x3 455 (unlocked to Phenom II x4 b55) but that was also a 95w TDP cpu. At 3.8ghz it never went over 43c ish running prime and Intel Burn. The only reason I didn't go any further was because I had it in a Biostar A880g+ mobo and was scared the mosfets would blow. I'm gonna get the Antec 920 WC kit with the HAF 922 case. I figure that will allow me to push it to hopefully 4.3-4.5ghz as a daily runner.

I still think there is something up with this mobo's sensors though. With the 990FXA-UD5 all three TIMPIN sensors have recorded 70c+ temps, which it does this on occasion. Right now looking at HWmonitor it shows my max ambient temp as 70c which is 174f...lol..its like 75f in this house right now. The fan speeds have recorded 8k+ rpms. Sitting at idle the core temps have recorded 36c as a high, even though the show 21c all the time. All this spike stuff happens in the matter of 1 second. it goes up and then right back down to the regular temperature. Oh well.

Has anyone else experienced this with the Gigabyte UD-3, UD-5 or UD-7 mobo. I know, well have read that the UD-5 which is the model I have suffers from vdroop alot. But I set my LLC to High and the vcore never changes.
 
one more thing to add and maybe this might be causing some issues.

Upgrades from and to:
Athlon II x3 455 -----------> FX-8120
Biostar A880g+ ------------> Gigabyte 990FXA-UD-5
MSI GT 440 ---------------> GTX 550 ti x2 SLI
Antec Earthwatts 380w----> Corsair CX600

everything else stayed the same.

Now prior to putting all the new hardware in I didn't format my hard drive for a clean install because I only have Windows Professional 64 bit Upgrade disc. So I installed all the new hardware, put the Gigabyte install disc in and it booted up. Once I got all the drivers installed, I used the upgrade disc and reinstalled the operating system without deleting my old one first. After I finished with installation I deleted my Windows.old file. So with that said.

Could I be having some conflicting driver issues?
Maybe going from the 880 chipset to the 990 chipset may cause issues with the readings?
last but not least, Should I find a full version of Windows Professional 64 bit disc and do a clean install?
 
I am no expert with Windows install issues but if I understand you right you installed the new hardware using your old hard drive with windows installed on it. Then installed the new drivers for motherboard and video card. Then did a clean install of windows where you deleted the Window.old file. ..... Right?

If that is right then you need to update your windows install with the new drivers for the motherboard and video cards as they will most likely just be using a generic driver and could explain why you are having issues with temps jumping around. Essentially by deleting your windows.old folder you have deleted your new drivers ..... mind you windows would not be looking for then in a folder called Windows.old but in your WINDOWS/drivers folder or whatever the propper path is that was set when you did the install.

Wait a bit as I am sure someone will correct me if I am wrong on this.
 
Actually, you can do a clean install of Windows Vista or Windows 7 from scratch using the upgrade version of either OS simply by choosing the "Custom install" option without entering the product key (very important detail because the product key is associated with the version, i.e., whether it is the full or upgrade version) and deleting the old OS partition. Don't bother to install updates or anything with this first install and don't try to register it, another critical detail. Then reinstall from within Windows and this time enter the product key. Essentially, what you have done is treat the first install as the old OS and the second install then becomes the upgrade. When done, register and start installing the updates. I do it this way every time and it works like a charm. Always do a clean install. I've always had problems when installing over an existing old install.

Of course, save any critical data files first before undertaking this because you will have wiped the disc during the install.
 
Last edited:
So a clean install is what I should def do. I've done them before. Where booting from your Windows disc and doing the custom install. Re-format the partition to where it has no data on it. Then install windows. But def don't enter product key for activation til after you have installed you motherboard drivers (Ethernet Adapter, Realtek Audio, chipset etc).

Just to be honest here. On my hard drive with my old system I had a "not so legal" copy of windows Ultimate 64 bit. After putting all my hardware together my computer booted just fine, and I installed the drivers from the gigabyte disc. Once I did that and could connect to the internet, I inserted my LEGAL copy of Windows 7 Professional Upgrade Disc. From the desktop I inserted the disc and the setup ran. I didn't delete my old partition at this time. So I let the disc run and yada yada I had Windows 7 Professional 64 bit on my machine. I installed over the Windows Ultimate Operating system. After this I reinstalled all my Gigabyte drivers. Once that was finished I went in and deleted the Windows.old file. So I'm not sure if this is considered a clean install or not.

I'm going to take my Hyper TX3 and sand it down with some wet sand paper to get rid of the machine lines. This may help with better heat transfer. I'm still gonna get the WC kit and case. Just gonna try it out to see if it makes a difference.

btw, Still looking for someone that lives withing 50 miles of Martinsville, Virginia to build me a custom loop as well as situate my fans right.

another question is, With the HAF 922 and Antec H20 920, will I be able to mount the radiator on the outside of the top exhaust fan. When I get these new components, I'm def gonna need some help putting it on and adjusting my fans and what not to where they need to be. Hope somebody will be around after the 1st. I'm hoping there is a near by place to buy these items. If not I'll have to order it from newegg and I'd rather not have them go through the mail. Wish micro center was closer than 300 miles. Are there any other big name retailers that sell cases, water cooling kits and psus?

Thanks again for all the help you guys have been given me.
 
aEazW.png

linking this to show you guys what I mean how the sensors are reading crazy numbers, my ambient in the house now is 73 so it's still wrong. This is after playing a few games for 2-3 hours. World of Tanks and Diablo 3. It even shows my 12v rail dropping down to 5.06v. The 5v and 3.3v shows the lows as half. Weird. Should of got the Crosshair V. But then again, should of went with intel.
 
On the clean install with an upgrade version of windows, I'm not sure you understood what I was saying, GamerMagnet. You acually install it twice. The first time you choose custom install, wipe the disc, don't put in the product key, don't download updates, don't need drivers, don't try to register it. Keep it as simple as posssible because you will immediately install it a second time from within Windows (put the install disc in the DVD drive and let it load while in Windows and go through the install routine) and this time you choose the upgrade option, enter product key, register, udates, drivers, etc.
 
I understand what your saying, but what I was refering to is a clean installation. No installing windows on top of another windows. I want to format my HDD to clean everything off, and then install Windows 7 Professional from the upgrade disc. I tried setting in bios for it to boot from cd-rom, but it's going straight to loading my operating system.
 
oh, wow..i def didnt pay attention. So I should install windows 7 2 times total..Once without entering all my info and the 2nd time should be done by using upgrade and all that sort of stuff. I started to last night but it didn't give me the option to format my disc, or does this method install Windows 7 on a seperate partition, then allow me to delete the partition my 1st Windows installation was in?
 
oh, wow..i def didnt pay attention. So I should install windows 7 2 times total..Once without entering all my info and the 2nd time should be done by using upgrade and all that sort of stuff. I started to last night but it didn't give me the option to format my disc, or does this method install Windows 7 on a seperate partition, then allow me to delete the partition my 1st Windows installation was in?

On the first install, you have to choose the "Advanced" option which then opens up other choices that have to do with deleting partitions. After you delete the old Windows partition just choose "Install". You don't have to even manually create a new partition or format it. The install does that for you. Of course, on the second go round you don't want to choose Advanced and Delete or you woud wipe out the first install - you just install it as usual on top of the first istall.
 
yeah, when I first installed it wouldn't let me do a clean install. It wouldn't allow me to delete anything from the primary partition. The installer told me to boot from the windows cd. I've yet to figure that out, even though I've put cd-rom as my first boot priority
 
Unless trents knows a workaround I dont you will havee to start from in windows ..... durring the install click on the ADVANCED Option and that will allow you to select the drive you wish to install on as well as optionss to delete or format the drive.If you choose delete your drive will show up as unalocated by choosing this drive to install on the windows installer disk will automatically format the selected drive for you. Its been a long time since I have used an Upgrade cd as I have just bought OEM copys of windows 7 the last couple of builds while I was picking up my parts.
 
Back