- Joined
- Dec 27, 2008
While I'm waiting on the motherboard replacement that I RMA'd to Ausus last week I decided to use the downtime to mod my CoolerMaster HAF 912 case so that in the future I can cool down the socket area of those power-hungry, hot running Piledriver CPUs AMD is turning out lately (if I ever get one).
Since there was nice hole from the factory in the motherboard tray in the area under the CPU socket, that part was already done. By the way, I would not necessarily suggest anyone cut a hole in the motherboard tray for this purpose since it may weaken the rigidity of the tray and cause problems like excessive flexing of the motherboard and ground out shorts. When done at the factory the hole is stamped out by a press in such a way as to create support ridges around the hole.
The first order of business was to trace an outline of the tray hole in the motherboard tray on the inside surface of the right side case panel. To make sure they lined up, I just took the left case side off but left the right case side panel in place. There is only about 20 mm of space between the tray and the right case side panel so I just took a black sharpie marking pen and ran it along the inside edge of the square hole in the tray in order to trace its outline on the inside of the right case panel. Then I took the right panel off and turned it inside up on a workbench so I could see the square hole pattern I just traced.
Next, I took an old worn out 120 mm fan and with pliers, I broke out the hub and hub supports, leaving only the frame of the fan. Then I took double-sided tape and placed a piece in each corner of the fan frame. I carefully positioned the fan in the middle of the traced square hole which was larger than the fan. The double-sided tape is a critical element in getting this right as you would not believe how difficult it is to trace around a fan that is not secured to the surface in some way. So if you want to get the cutting patter right, I strongly suggest you do this. In the past, I have not done this and regretted it because I never got a hole cut out of the sheet metal that in the end, actually fit and lined up well with the fan I was mounting. Doing this was a huge aid!
While I had the old fan secured to the case panel, I took an 11/64” self-starting point drill bit and used it as metal punch to dimple the screw holes.
I then traced the main hole of the fan with the sharpie. Pay close attention to the angle you hold the marking pen as the hole tapers differently in different areas of the circle. It tends to flatten out in the middle of each side of the frame as you move away from the corners. Angle the marker so as to leave a little extra sheet metal to the inside so that when you go to cut the hole out with a saber saw you have a little to play with. If you've ever tried to cut a whole in sheet metal or wood paneling with a saber saw, you will know what I mean. It's not a a precision instrument by any means!
Then I drilled out the screw holes with the 11/64” drill bit.
Next, I clamped the case panel to the work bench so that the area I would be cutting out just barley hung over the edge of the table. If you ever do this be careful that you don't clamp on the case panel edges where the clips are that mate with the channels in the case frame or you won't be able to slide the side panel back into the case channels later on (Made that mistake before, too). Clamp the side panel to the work surface in such a way as to have as much of the panel supported by the table top as possible. This will help out when cutting with the saber saw as the blade tends to hang on the edge you are cutting if things flex too much.
Then I took a large drill bit, one that was slightly larger in diameter than the width of the sabre saw blade and drilled a starter hole for the saw blade. I was careful to make the outside of the hole I drilled to line up the with the cutting line. Once I had a starter hole I commenced to cut the center out of the pattern. If you have not had much experience using a sabre saw you might want to practice some first on some scrap sheet metal or wood paneling. Patience and focus is in order at this juncture because if you stray outside the pattern and make the hole too big there is no way to fix it later on and it will make a gap to the outside of the fan you will be attaching to the side panel. And you will kick your self. Been there and done that too.
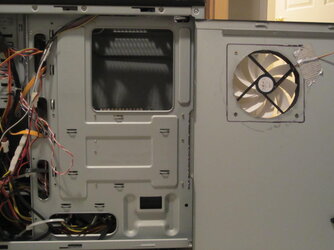
After the center was cut out I installed the fan frame referred to earlier in order to inspect the aligment. I saw there were some areas where I left too much metal to the inside of the hole after cutting so I took my drill with a reamer attachment and shave some off in places. Finally, I took a wire brush wheel attachment and buffed the sharp cut edges to remove the burrs.
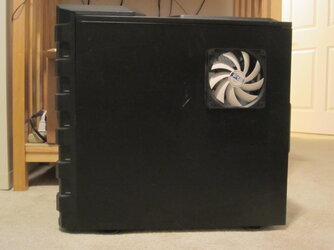
Here are picss of the final product.
Since there was nice hole from the factory in the motherboard tray in the area under the CPU socket, that part was already done. By the way, I would not necessarily suggest anyone cut a hole in the motherboard tray for this purpose since it may weaken the rigidity of the tray and cause problems like excessive flexing of the motherboard and ground out shorts. When done at the factory the hole is stamped out by a press in such a way as to create support ridges around the hole.
The first order of business was to trace an outline of the tray hole in the motherboard tray on the inside surface of the right side case panel. To make sure they lined up, I just took the left case side off but left the right case side panel in place. There is only about 20 mm of space between the tray and the right case side panel so I just took a black sharpie marking pen and ran it along the inside edge of the square hole in the tray in order to trace its outline on the inside of the right case panel. Then I took the right panel off and turned it inside up on a workbench so I could see the square hole pattern I just traced.
Next, I took an old worn out 120 mm fan and with pliers, I broke out the hub and hub supports, leaving only the frame of the fan. Then I took double-sided tape and placed a piece in each corner of the fan frame. I carefully positioned the fan in the middle of the traced square hole which was larger than the fan. The double-sided tape is a critical element in getting this right as you would not believe how difficult it is to trace around a fan that is not secured to the surface in some way. So if you want to get the cutting patter right, I strongly suggest you do this. In the past, I have not done this and regretted it because I never got a hole cut out of the sheet metal that in the end, actually fit and lined up well with the fan I was mounting. Doing this was a huge aid!
While I had the old fan secured to the case panel, I took an 11/64” self-starting point drill bit and used it as metal punch to dimple the screw holes.
I then traced the main hole of the fan with the sharpie. Pay close attention to the angle you hold the marking pen as the hole tapers differently in different areas of the circle. It tends to flatten out in the middle of each side of the frame as you move away from the corners. Angle the marker so as to leave a little extra sheet metal to the inside so that when you go to cut the hole out with a saber saw you have a little to play with. If you've ever tried to cut a whole in sheet metal or wood paneling with a saber saw, you will know what I mean. It's not a a precision instrument by any means!
Then I drilled out the screw holes with the 11/64” drill bit.
Next, I clamped the case panel to the work bench so that the area I would be cutting out just barley hung over the edge of the table. If you ever do this be careful that you don't clamp on the case panel edges where the clips are that mate with the channels in the case frame or you won't be able to slide the side panel back into the case channels later on (Made that mistake before, too). Clamp the side panel to the work surface in such a way as to have as much of the panel supported by the table top as possible. This will help out when cutting with the saber saw as the blade tends to hang on the edge you are cutting if things flex too much.
Then I took a large drill bit, one that was slightly larger in diameter than the width of the sabre saw blade and drilled a starter hole for the saw blade. I was careful to make the outside of the hole I drilled to line up the with the cutting line. Once I had a starter hole I commenced to cut the center out of the pattern. If you have not had much experience using a sabre saw you might want to practice some first on some scrap sheet metal or wood paneling. Patience and focus is in order at this juncture because if you stray outside the pattern and make the hole too big there is no way to fix it later on and it will make a gap to the outside of the fan you will be attaching to the side panel. And you will kick your self. Been there and done that too.
After the center was cut out I installed the fan frame referred to earlier in order to inspect the aligment. I saw there were some areas where I left too much metal to the inside of the hole after cutting so I took my drill with a reamer attachment and shave some off in places. Finally, I took a wire brush wheel attachment and buffed the sharp cut edges to remove the burrs.
Here are picss of the final product.
Attachments

Last edited: